Anyone else made any foolish unachievable resolutions for this year’s gaming?
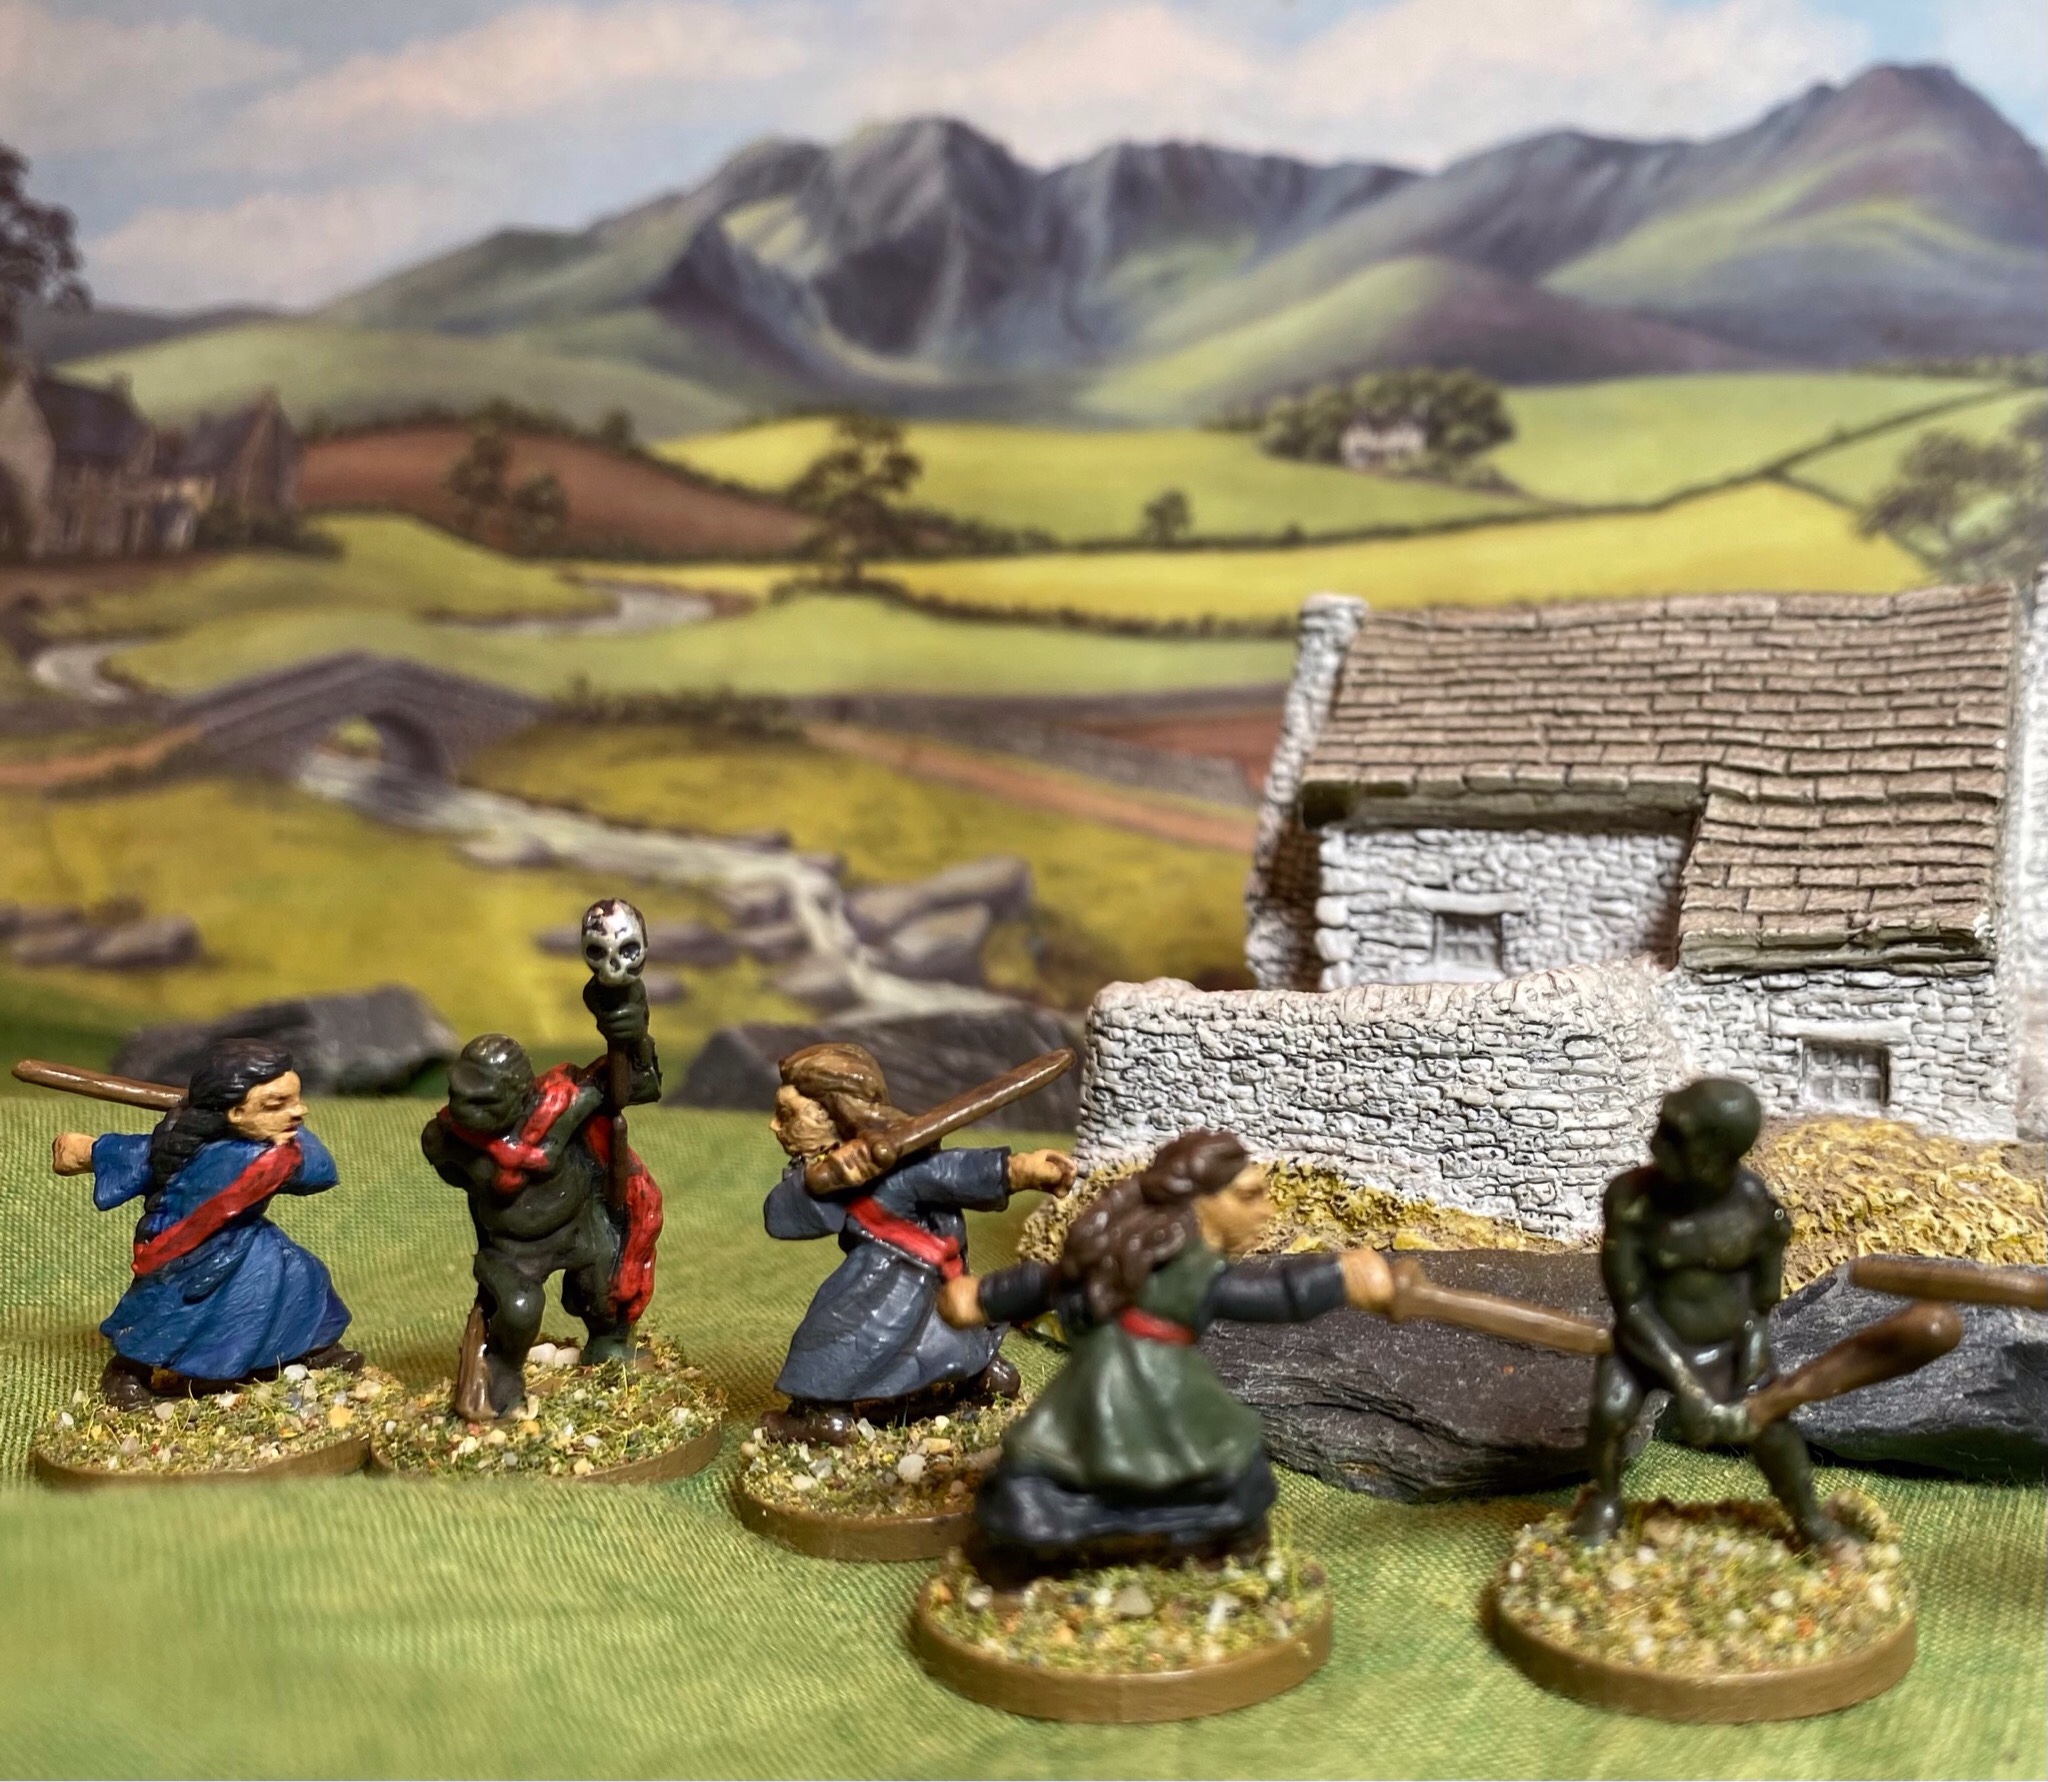
Battling Bronte Sisters (Bad Squiddo 28mm Little Wolves Amazons) meet 25mm Prince August Homecast cavemen boggarts. As close as I will get to Silver Bayonet?
*
It’s that time of the year when New Year’s Resolutions are optimistically made … but maybe not in this house.
My New Gaming Year’s Irresolutions for 2021 were kept deliberately vague …
but even then my vaguest plans for New Gaming Year NGY 2021 often went awry, mostly due to COVID.
The local village Spring Flower and Craft show 2021 never happened so no #FEMBruary figures from Bad Squiddo painted as planned but I did paint some later in the year – The Battling Bronte sisters.
Thanks to Covid levels, I never made it to the Woking 2021 54mm Little Wars Revisited Games Day when it finally happened. Covid dependent of course, but hopefully I might make it in 2022 with my Boy Scouts and snowball fighters who need more gaming time https://littlewarsrevisited.boards.net/thread/847/woking-games-saturday-march-correct.
My local history research project talk on WW2 in my local area (as a fundraiser) was postponed by COVID from autumn 2021 to late May 2022.
I think the NGY Irresolutions 2020 will still stand after a year or two interrupted but who knows what might happen in 2022?
New Gaming Year’s Irresolutions 2022
In no particular order
1. Cataloguing Peter Laing 15mm figures as part of celebrating the 50th anniversary of the now out-of-production Peter Laing figures, possibly the first 15mm figures when they launched in October 1972.
As well as cataloguing what I have over the next ten months, fellow members of the Peter Laing collectors circle on MeWe have been helping me identify figures and supplying photos of figures I don’t have. Then there’s painting and basing more of my unpainted Laing figure stash and getting in some more 15mm skirmish games?
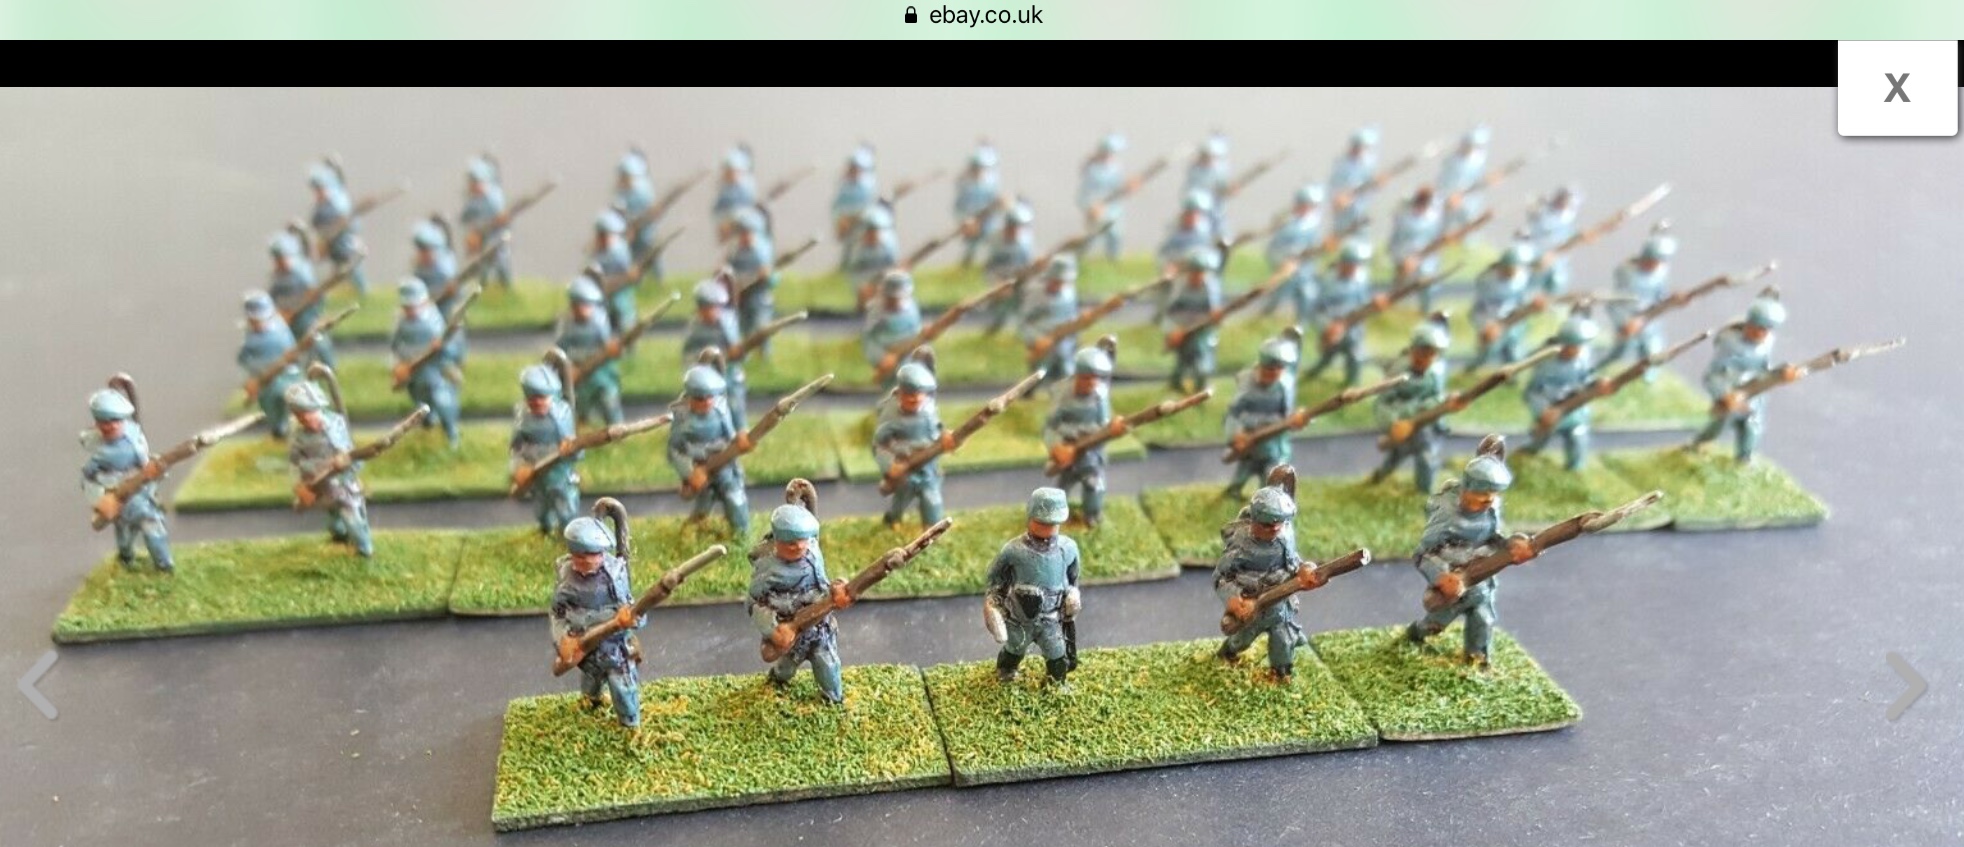
Peter Laing 15mm Chasseurs d’Alpins (WW1 Range) complete with walking sticks!
2. England or Cornwall invaded – Variations on Operation Sealion / Leon Marino
Still playing around with skirmish ideas as part of my Look Duck and Varnish Blog ongoing Operation Sealion Home Guard games, but also found out more about the WW1 ‘Gorgeous Wrecks’ or Volunteer Training Corps, good for futureVTC Wide Gamesand Victorian / Edwardian / WW1 era ‘what if’ games.
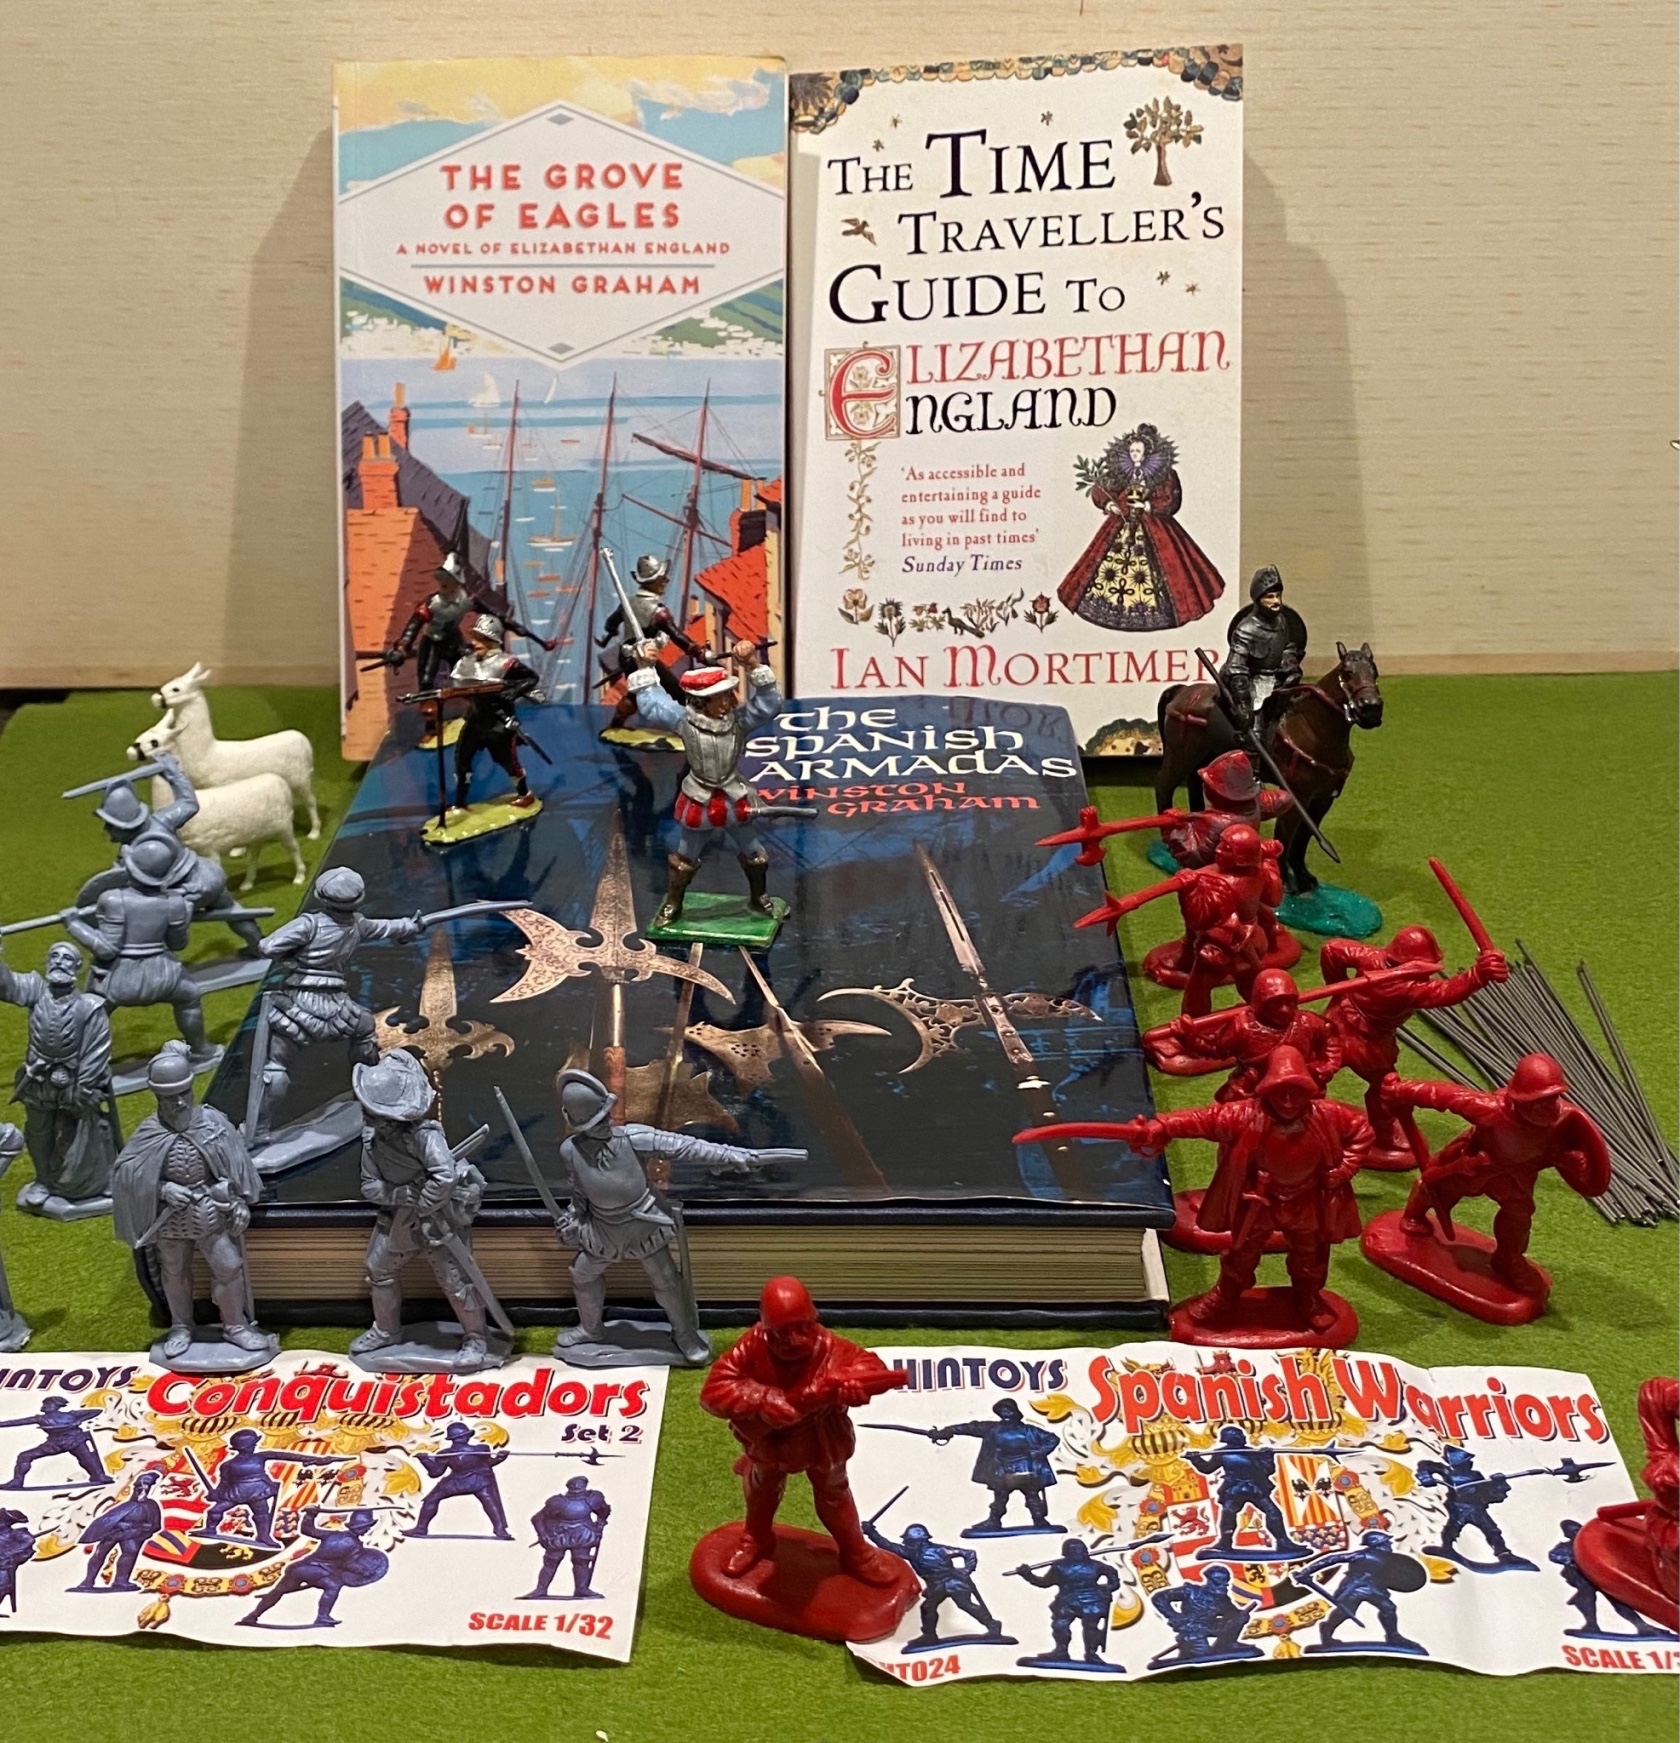
Arma-Dads Army! 1590s Home Guard Elizabethan Muster of conversions and ECW figures against the Spanish Fury, Chintoys Conquistadors and pound store Pirates …
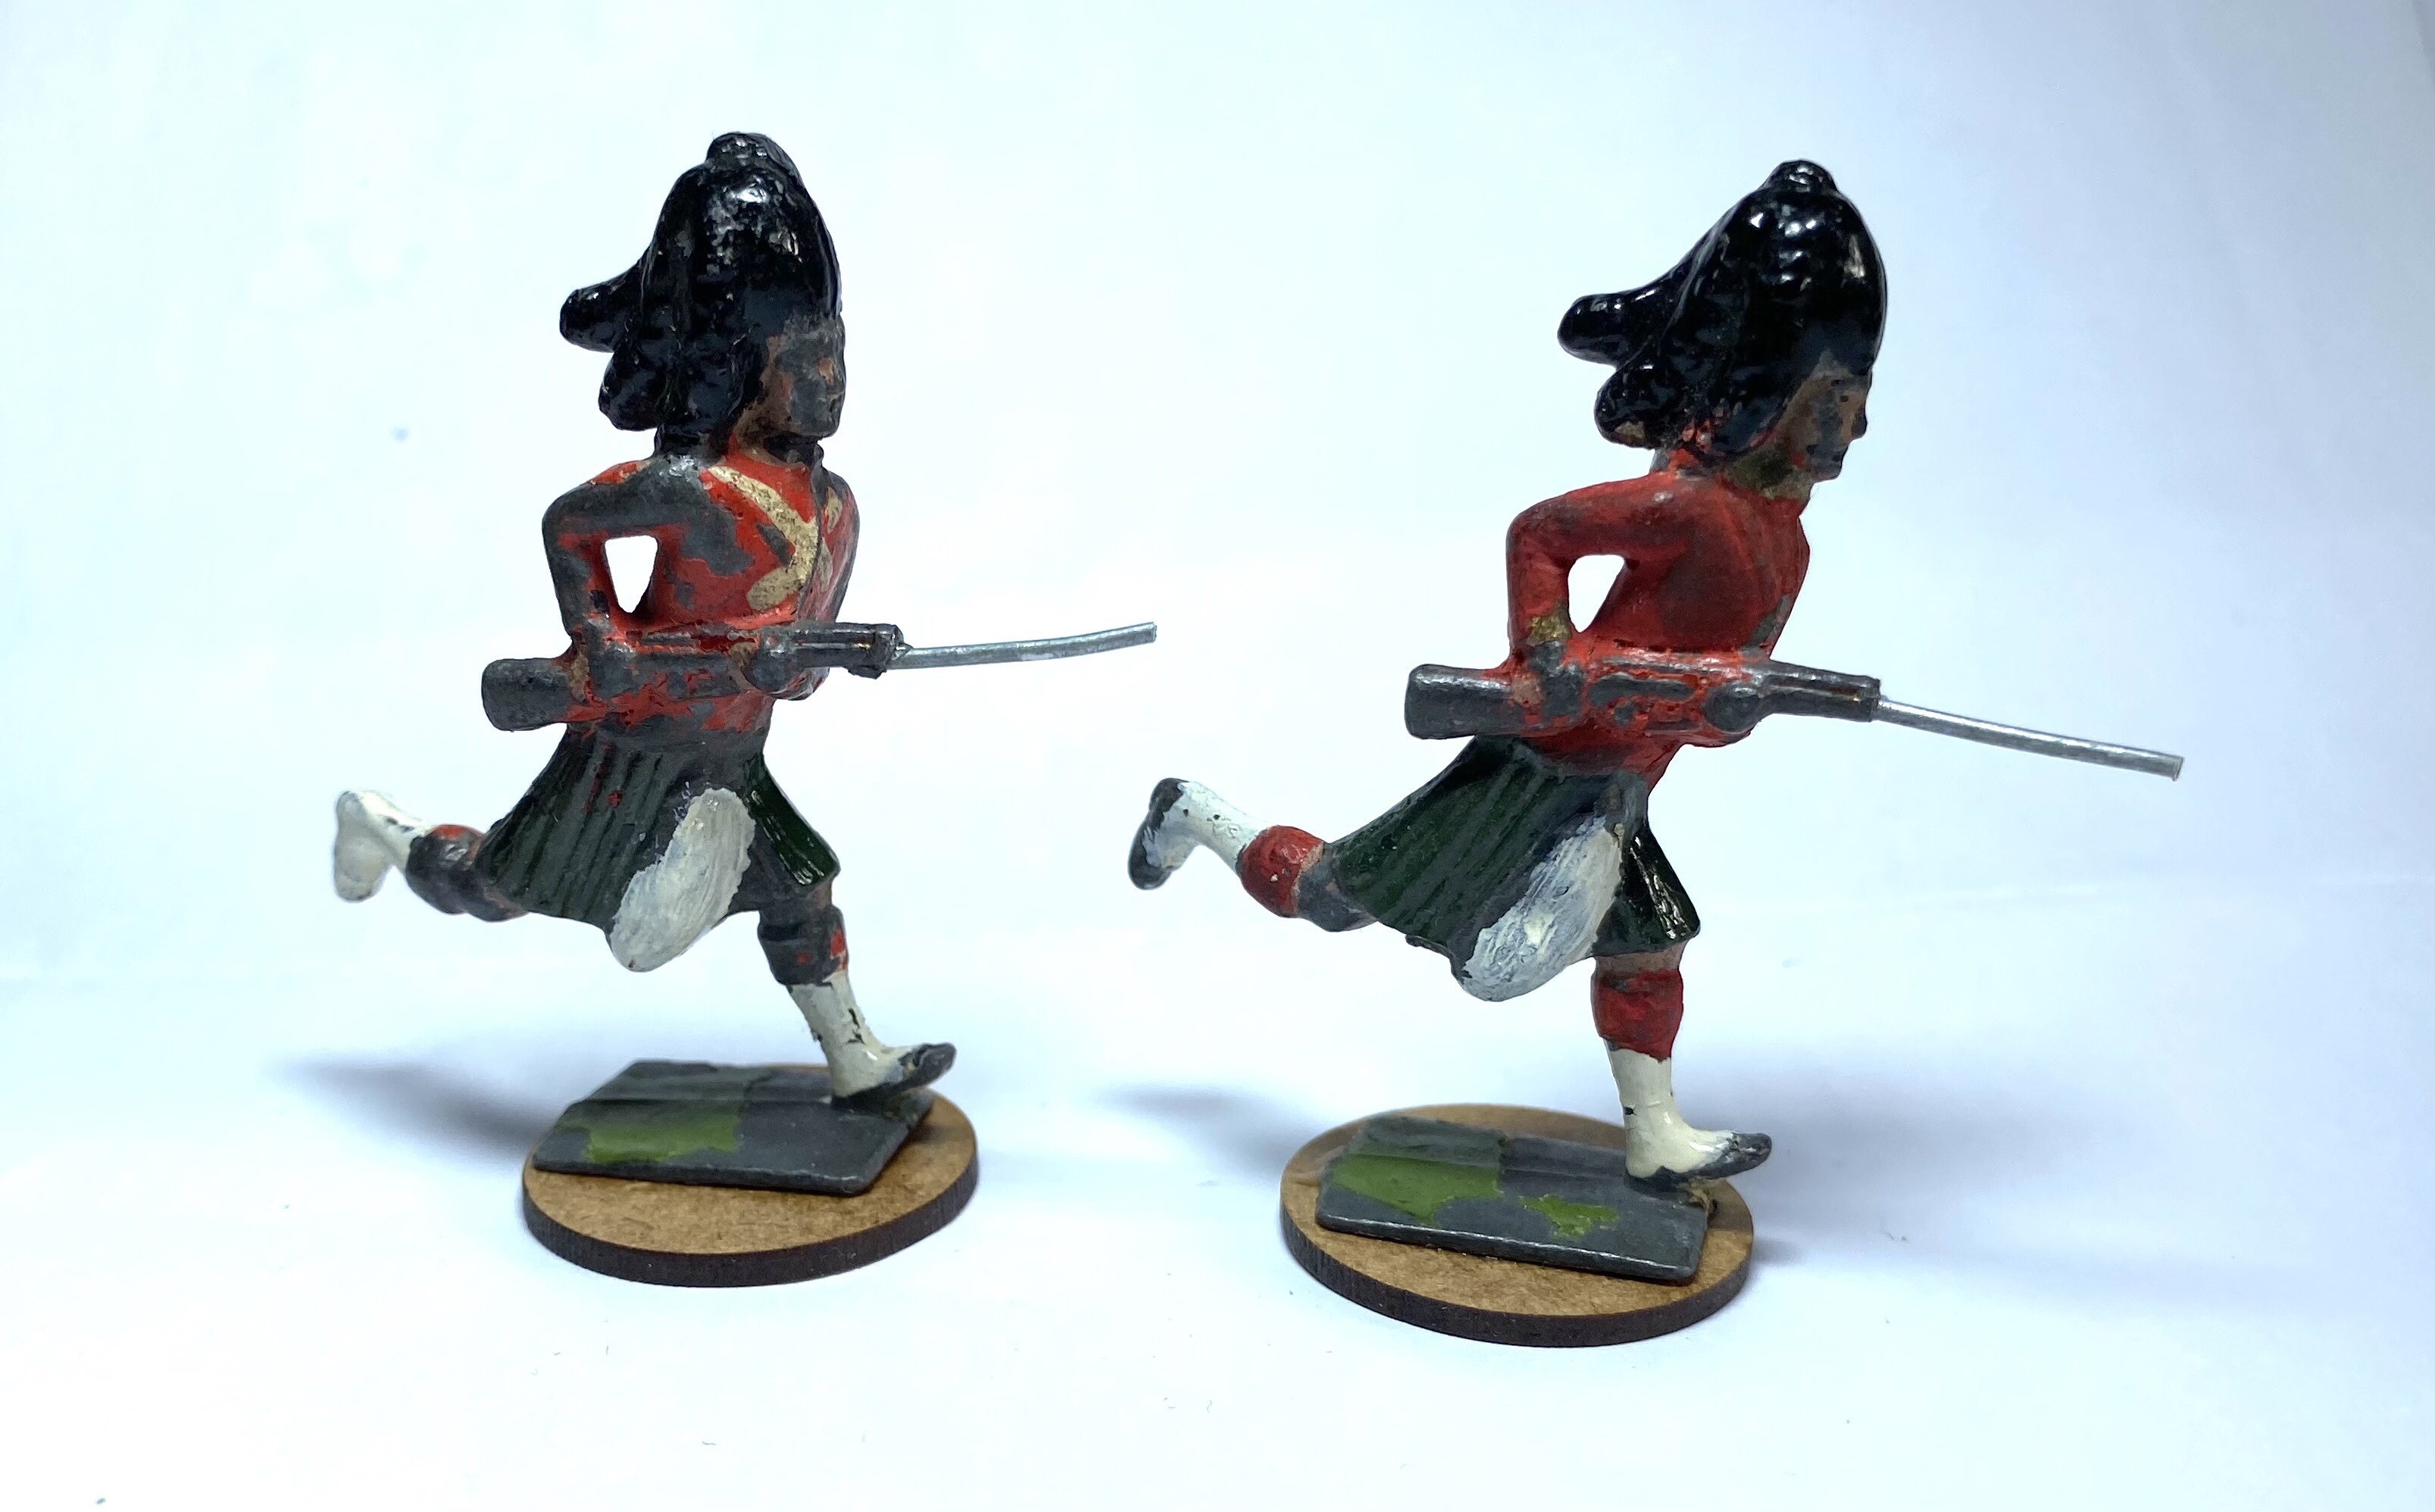
Two Britain’s Ltd. broken Scots charging – a favourite pose – with part repaired rifles, two more figures from the Waifs and Strays group of figures 2021 – “Waifs and Strays” sounds like it should be a Victorian Regimental nickname.
4. I look forward to some more enjoyable tinkering with 54mm repairs of broken lead figures to add to various units. Over the years I have been stashing away battered and broken figures from various donations – cowboys, Indians, redcoats, Scots and Khaki figures – along with the odd intriguing figure bought online.
Arrived last year and put away for Christmas – some very heavy, solid lead and fairly paint distressed Terraton 54mm-ish German semiflats to repair and rebase. Indians, redcoats, trees and farm animals …
5. What else might happen?
Weather permitting maybe will even get some more home casting done outdoors?
Pound Store Plastic figures, Early War Miniatures 1940 Range (for Svenmarck invaded!) and vintage Airfix OOHO figures to restore or rebase for some skirmish games.
Anyone else made any foolish unachievable resolutions for this year’s gaming?
Battling Bronte Sisters (Bad Squiddo 28mm Little Wolves Amazons) meet 25mm Prince August Homecast cavemen boggarts. As close as I will get to Silver Bayonet?
*
It’s that time of the year when New Year’s Resolutions are optimistically made … but maybe not in this house.
My New Gaming Year’s Irresolutions for 2021 were kept deliberately vague …
but even then my vaguest plans for New Gaming Year NGY 2021 often went awry, mostly due to COVID.
The local village Spring Flower and Craft show 2021 never happened so no #FEMBruary figures from Bad Squiddo painted as planned but I did paint some later in the year – The Battling Bronte sisters.
Thanks to Covid levels, I never made it to the Woking 2021 54mm Little Wars Revisited Games Day when it finally happened. Covid dependent of course, but hopefully I might make it in 2022 with my Boy Scouts and snowball fighters who need more gaming time https://littlewarsrevisited.boards.net/thread/847/woking-games-saturday-march-correct.
My local history research project talk on WW2 in my local area (as a fundraiser) was postponed by COVID from autumn 2021 to late May 2022.
I think the NGY Irresolutions 2020 will still stand after a year or two interrupted but who knows what might happen in 2022?
New Gaming Year’s Irresolutions 2022
In no particular order
1. Cataloguing Peter Laing 15mm figures as part of celebrating the 50th anniversary of the now out-of-production Peter Laing figures, possibly the first 15mm figures when they launched in October 1972.
As well as cataloguing what I have over the next ten months, fellow members of the Peter Laing collectors circle on MeWe have been helping me identify figures and supplying photos of figures I don’t have. Then there’s painting and basing more of my unpainted Laing figure stash and getting in some more 15mm skirmish games?
Peter Laing 15mm Chasseurs d’Alpins (WW1 Range) complete with walking sticks!
2. England or Cornwall invaded – Variations on Operation Sealion / Leon Marino
Still playing around with skirmish ideas as part of my Look Duck and Varnish Blog ongoing Operation Sealion Home Guard games, but also found out more about the WW1 ‘Gorgeous Wrecks’ or Volunteer Training Corps, good for futureVTC Wide Gamesand Victorian / Edwardian / WW1 era ‘what if’ games.
Arma-Dads Army! 1590s Home Guard Elizabethan Muster of conversions and ECW figures against the Spanish Fury, Chintoys Conquistadors and pound store Pirates …
Two Britain’s Ltd. broken Scots charging – a favourite pose – with part repaired rifles, two more figures from the Waifs and Strays group of figures 2021 – “Waifs and Strays” sounds like it should be a Victorian Regimental nickname.
4. I look forward to some more enjoyable tinkering with 54mm repairs of broken lead figures to add to various units. Over the years I have been stashing away battered and broken figures from various donations – cowboys, Indians, redcoats, Scots and Khaki figures – along with the odd intriguing figure bought online.
Arrived last year and put away for Christmas – some very heavy, solid lead and fairly paint distressed Terraton 54mm-ish German semiflats to repair and rebase. Indians, redcoats, trees and farm animals …
5. What else might happen?
Weather permitting maybe will even get some more home casting done outdoors?
Pound Store Plastic figures, Early War Miniatures 1940 Range (for Svenmarck invaded!) and vintage Airfix OOHO figures to restore or rebase for some skirmish games.
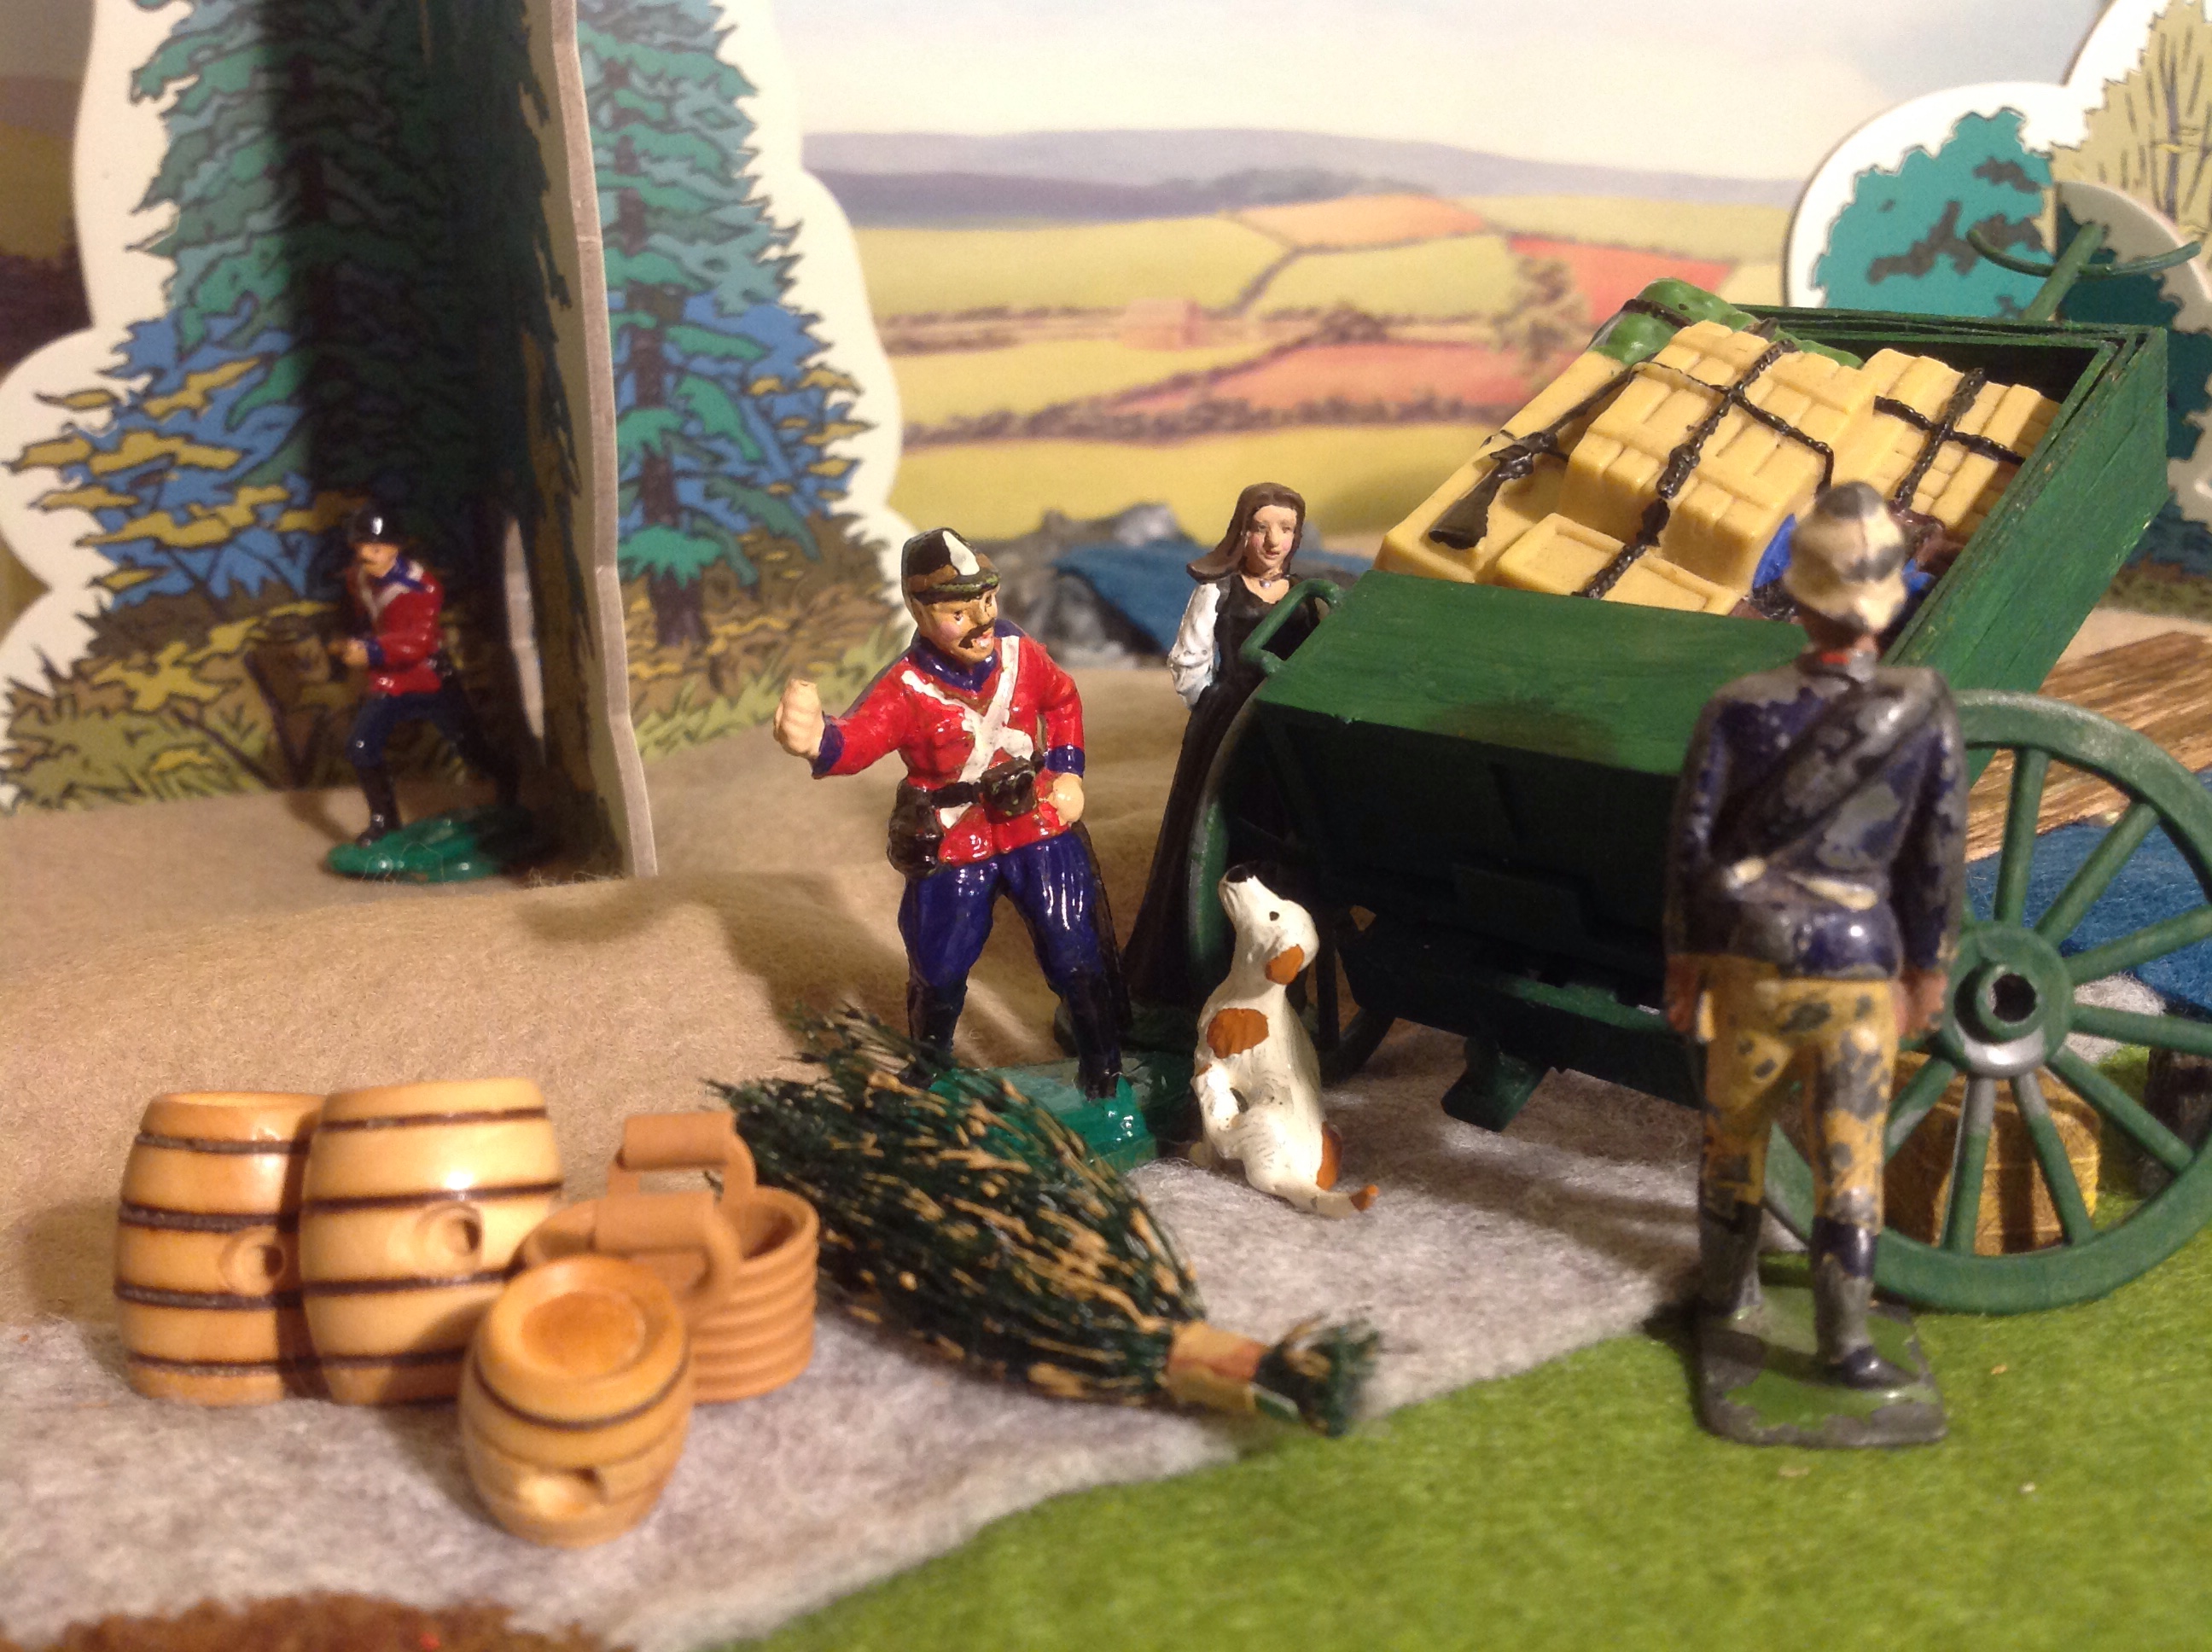
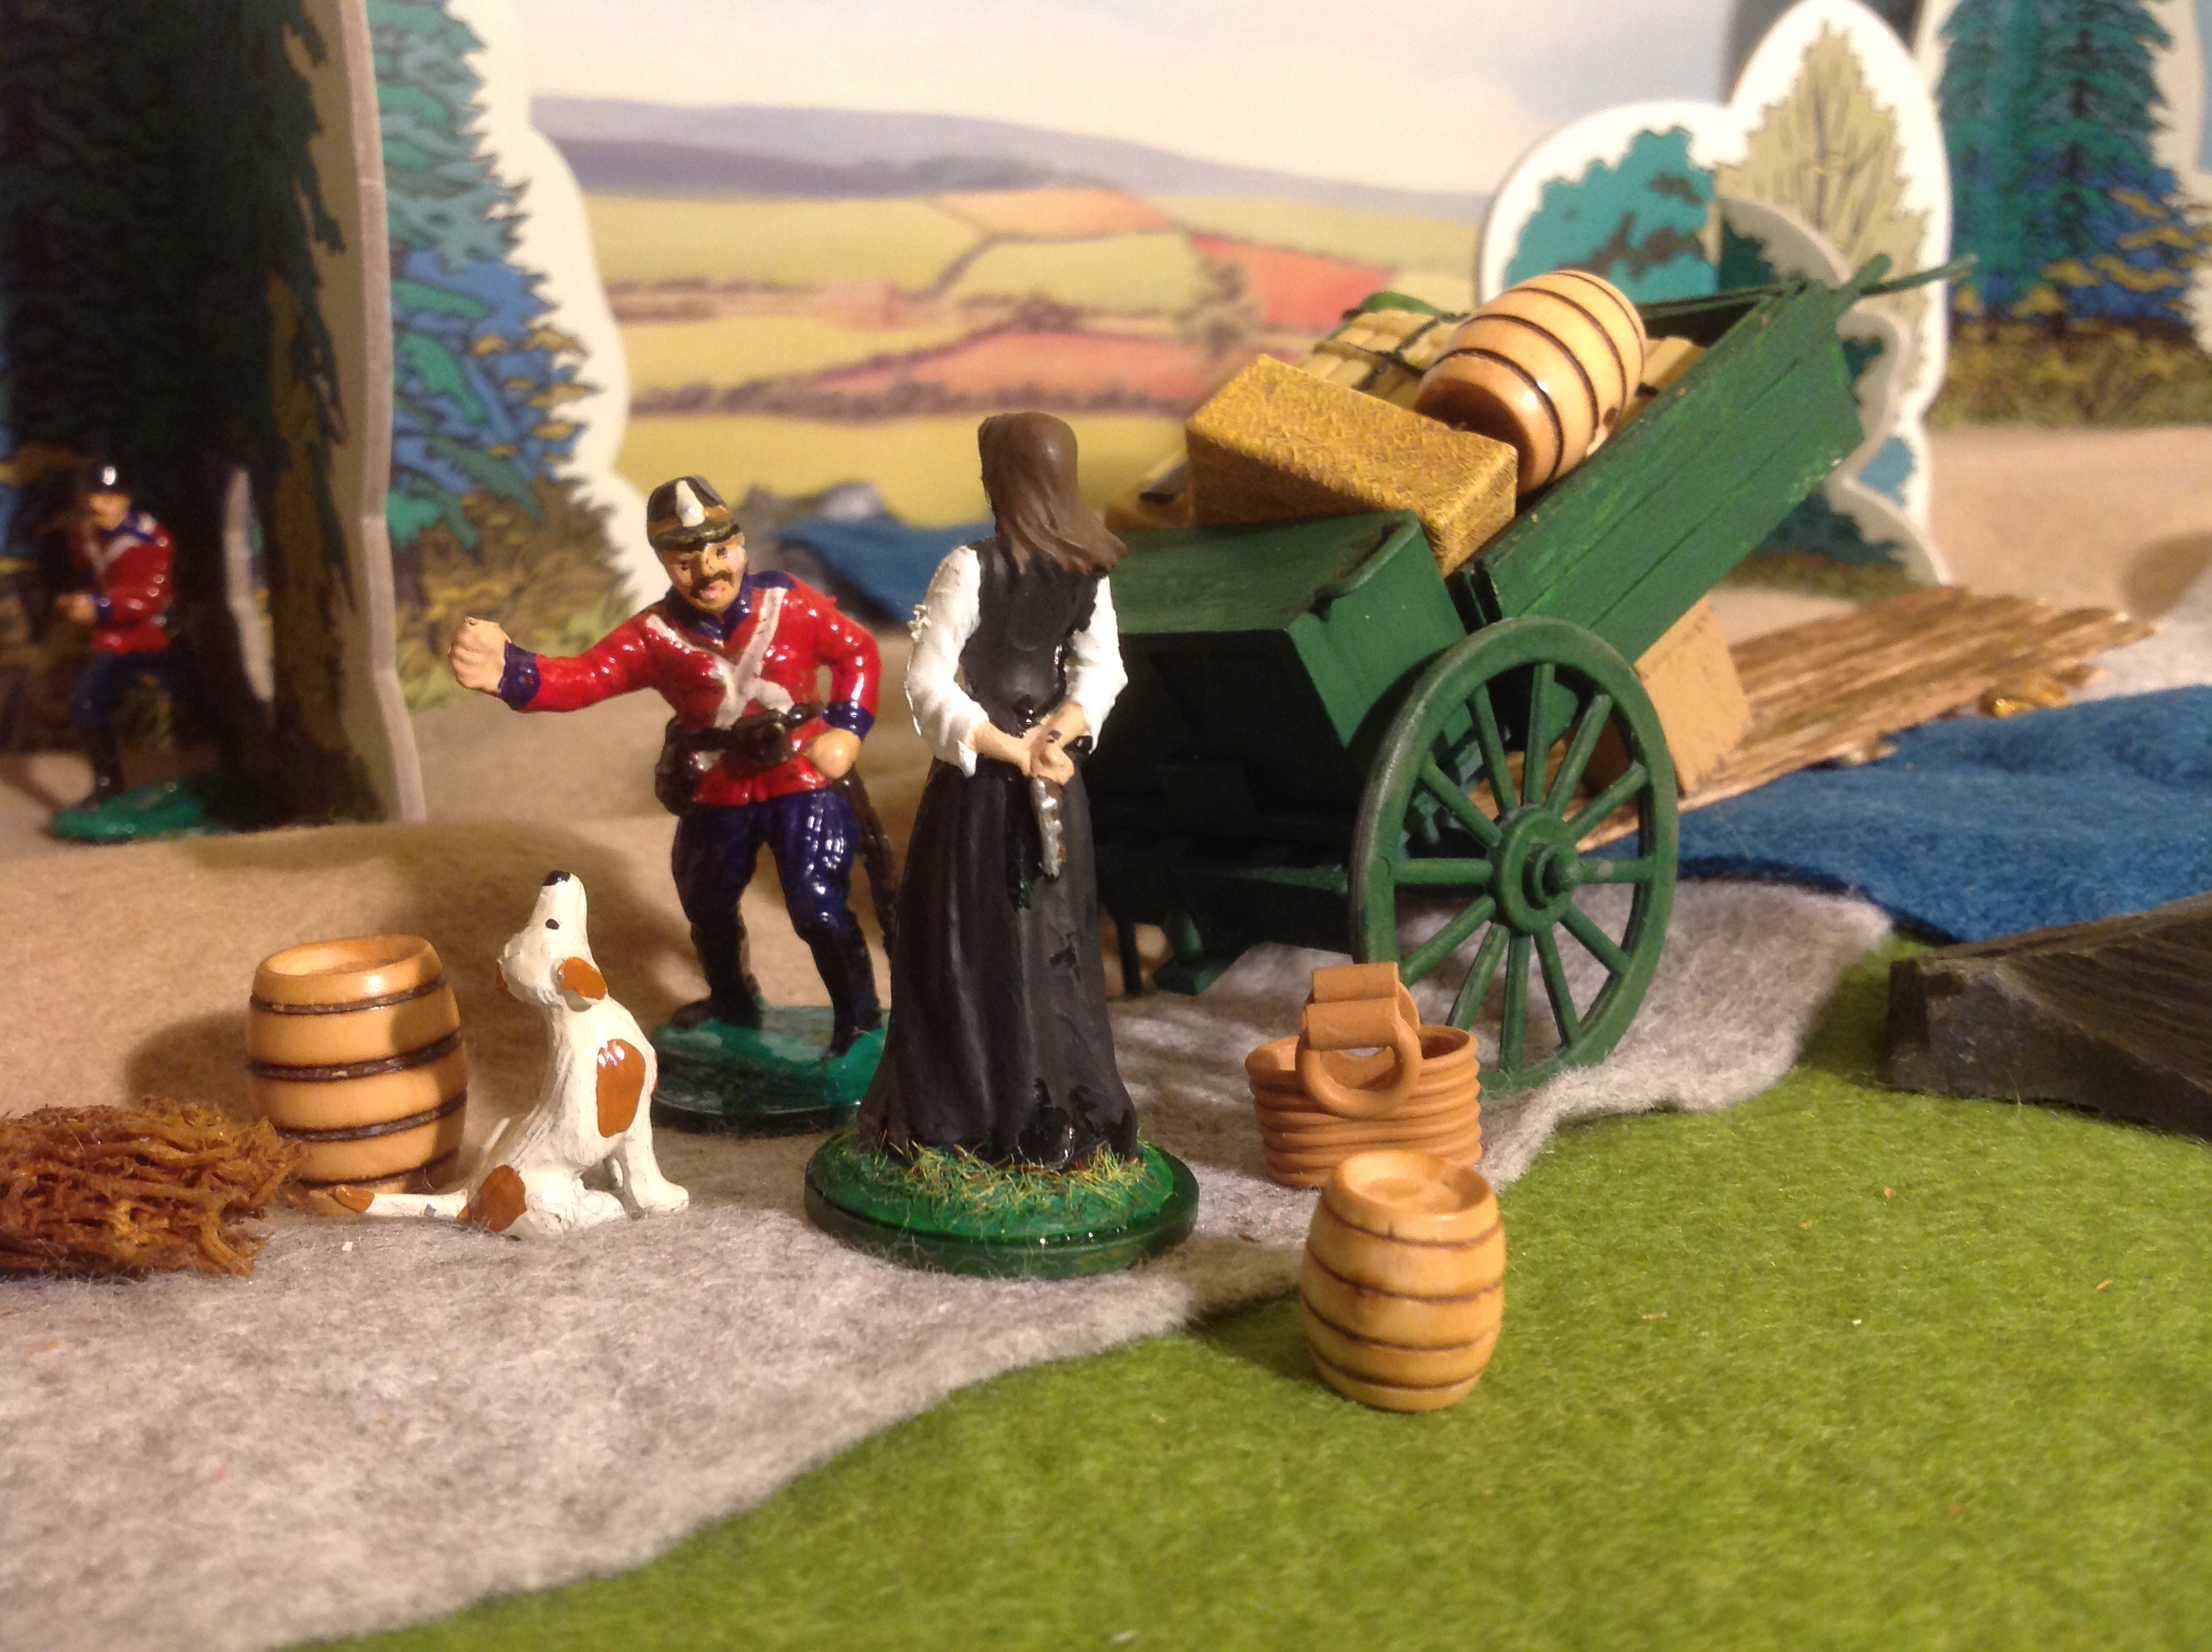
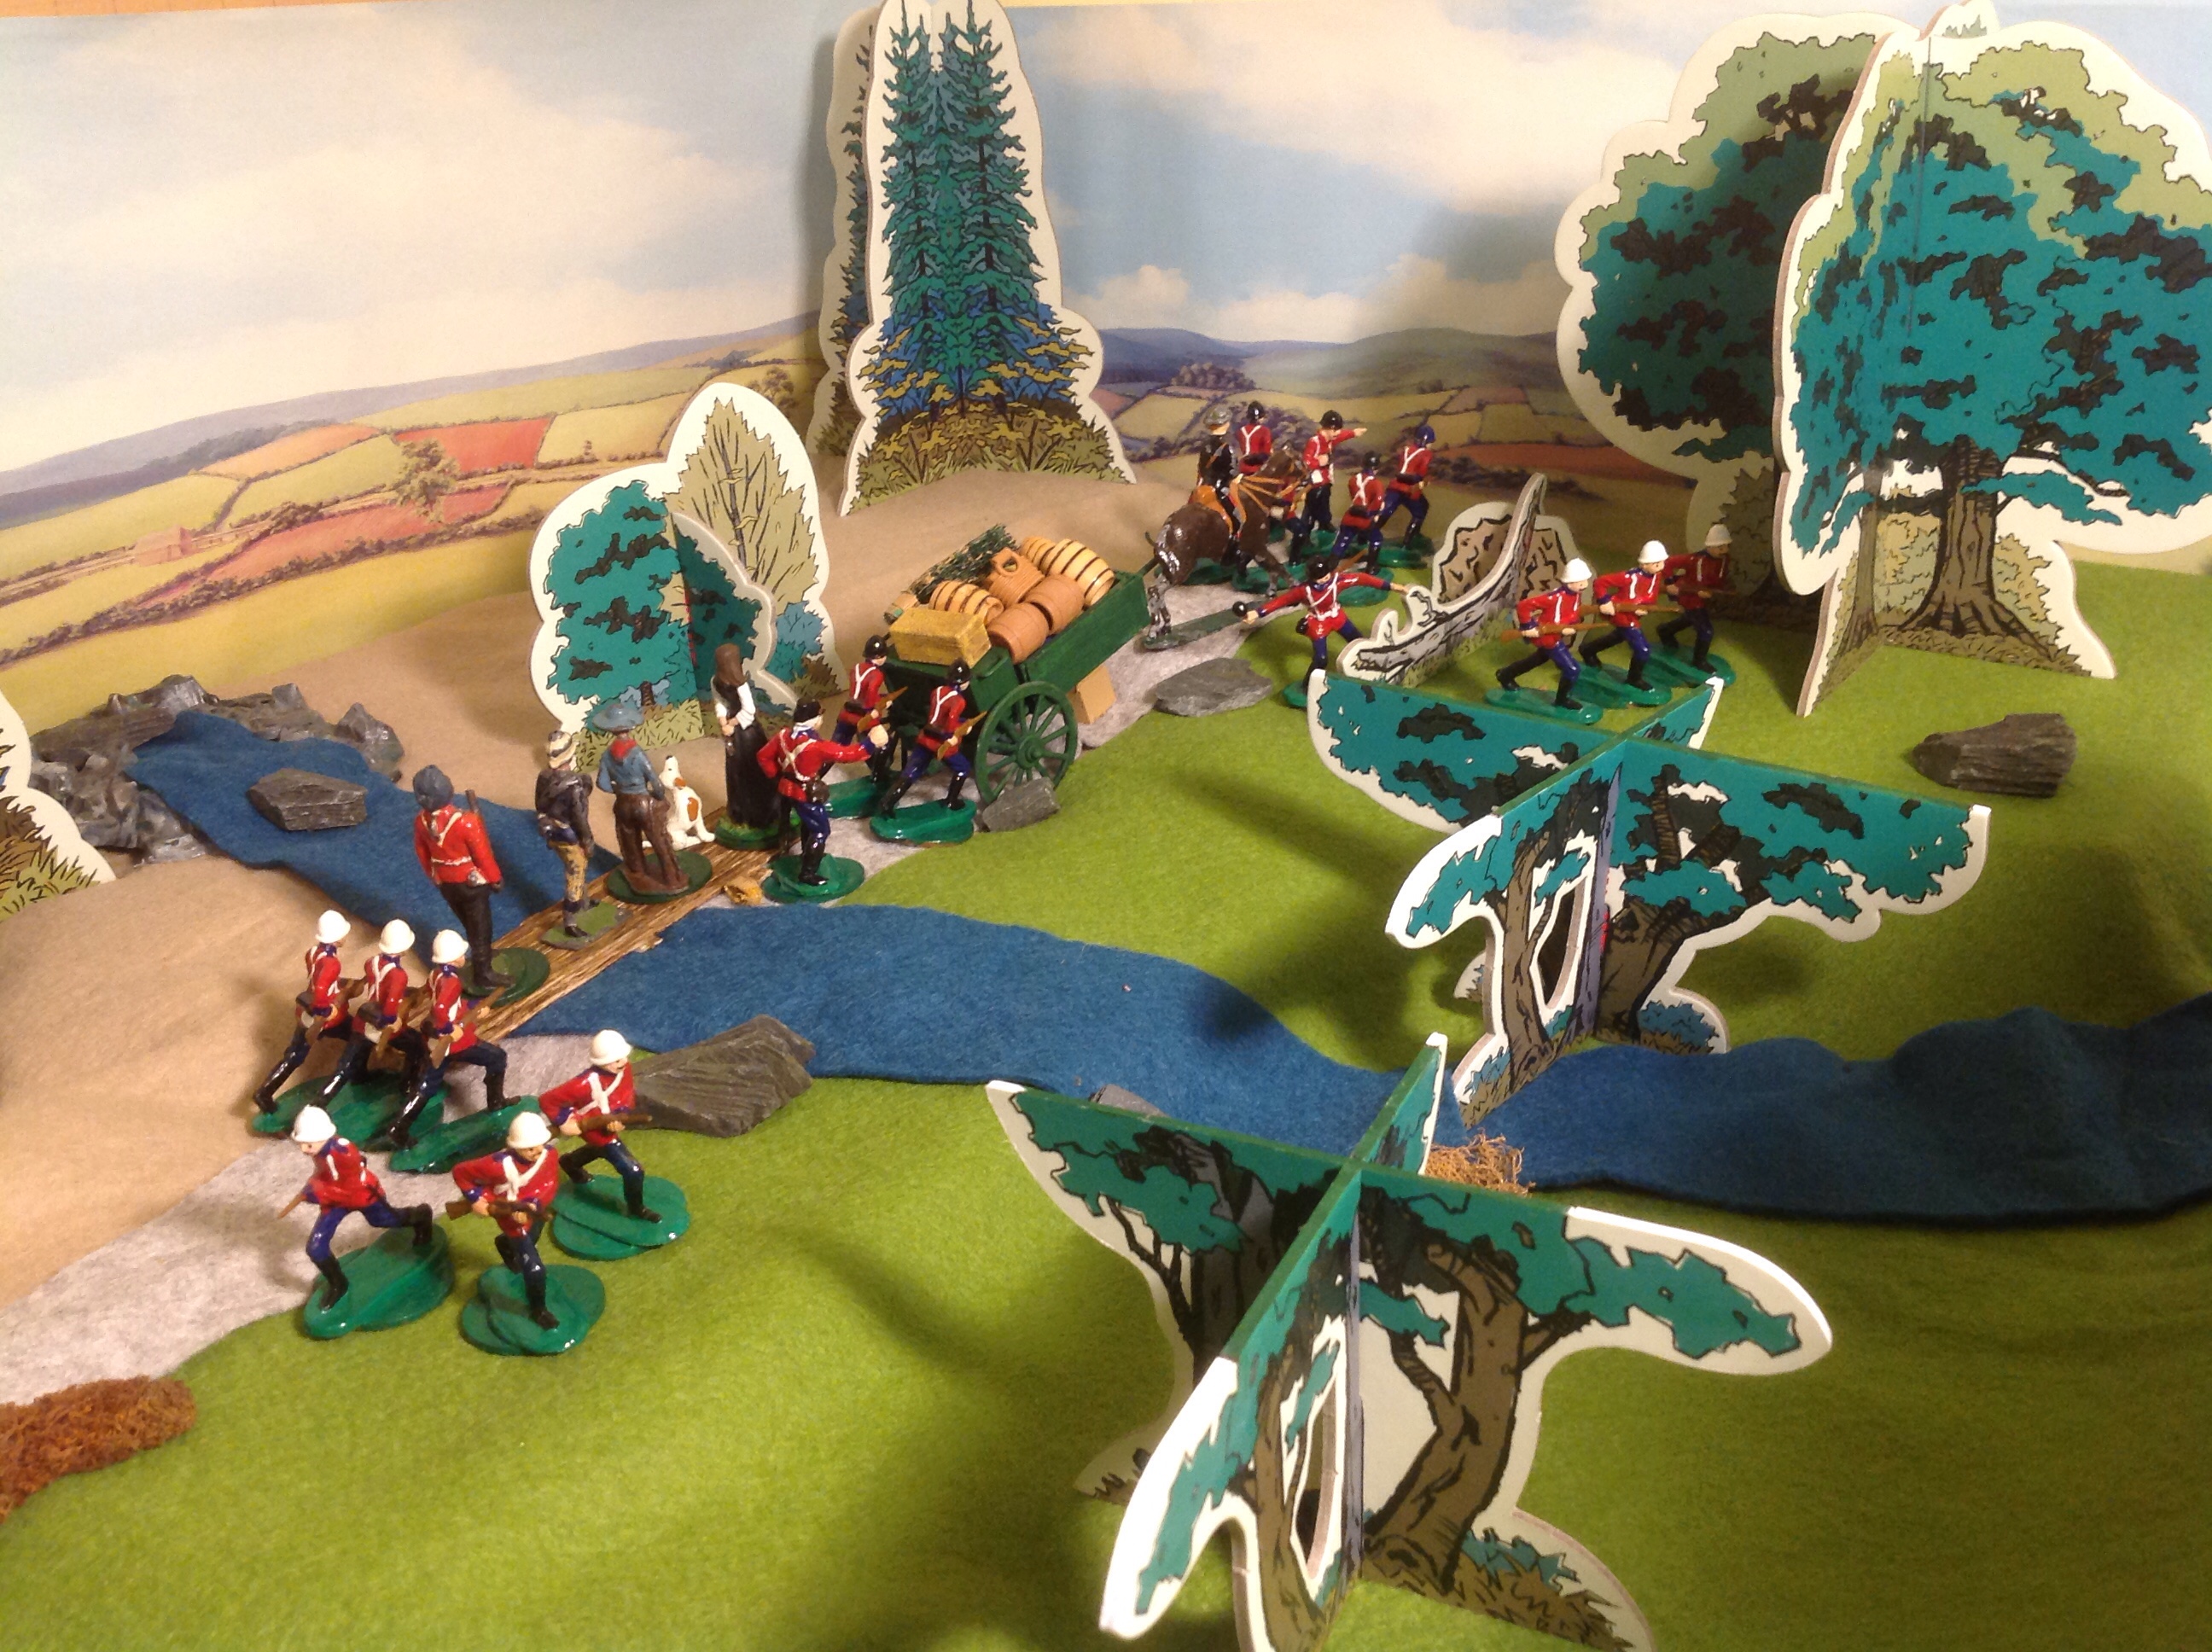
A broken axle fixing, Captain Snortt of the Yestershires and Miss MacGuffin …
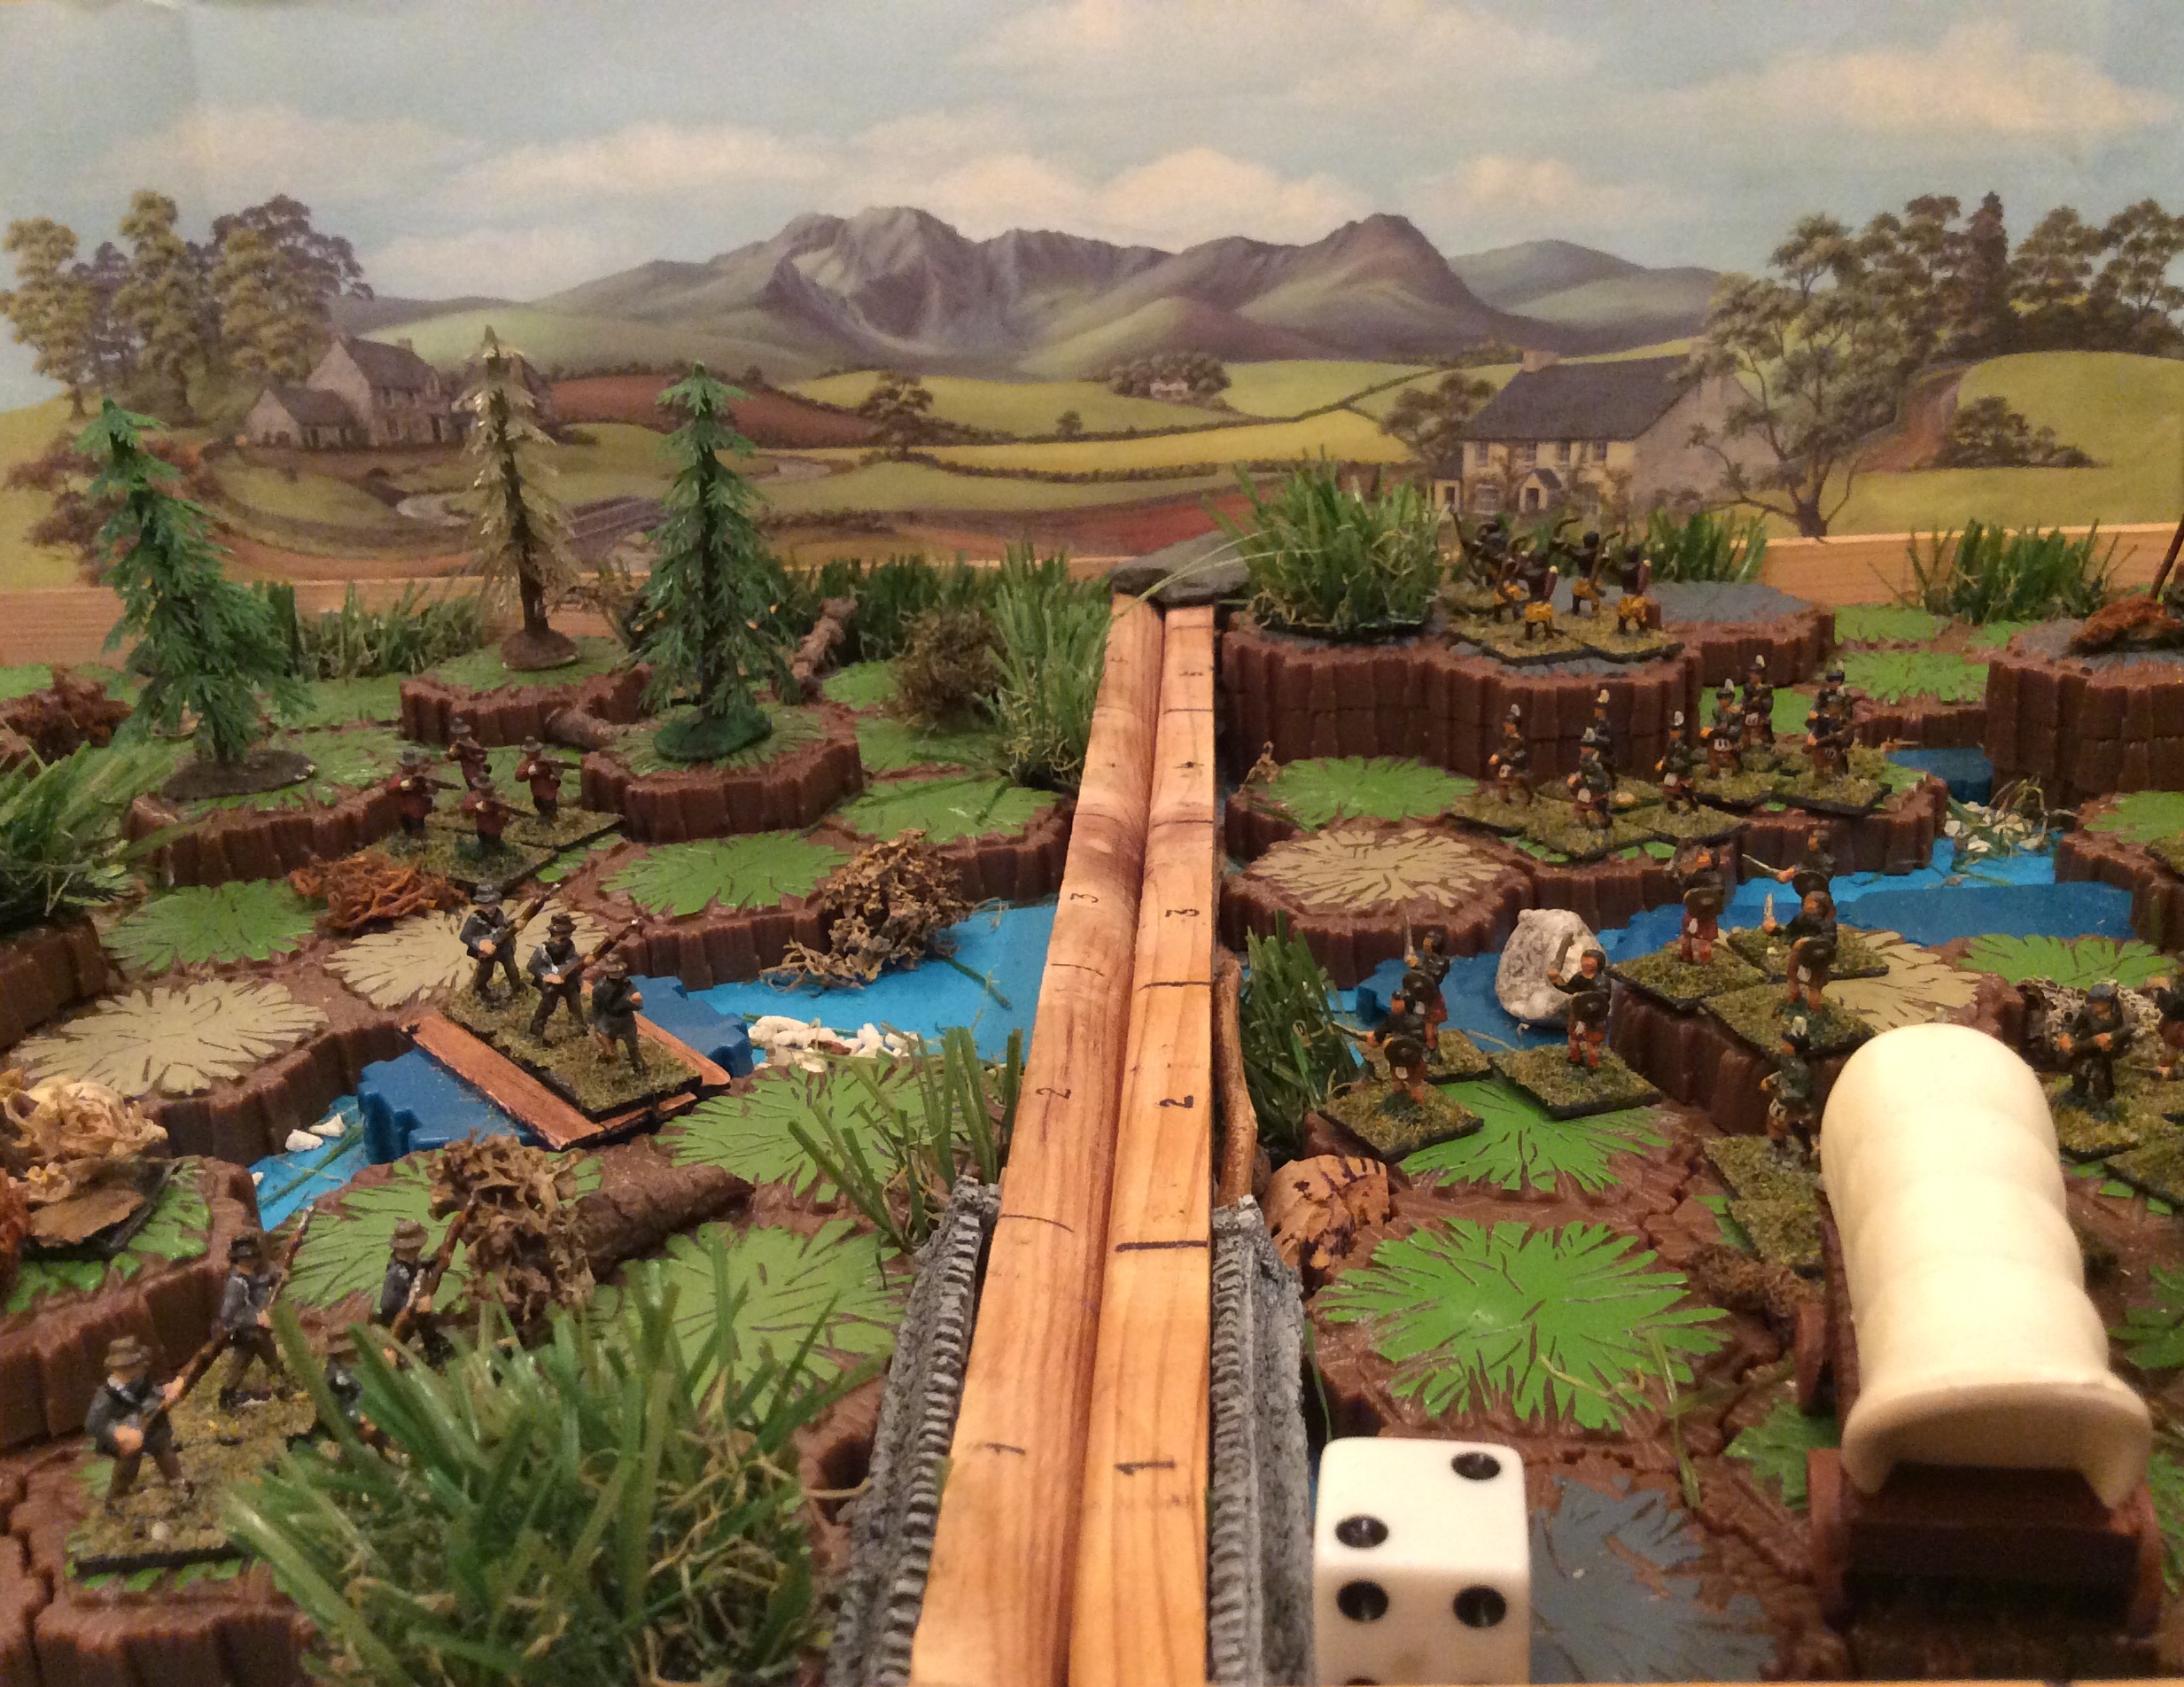
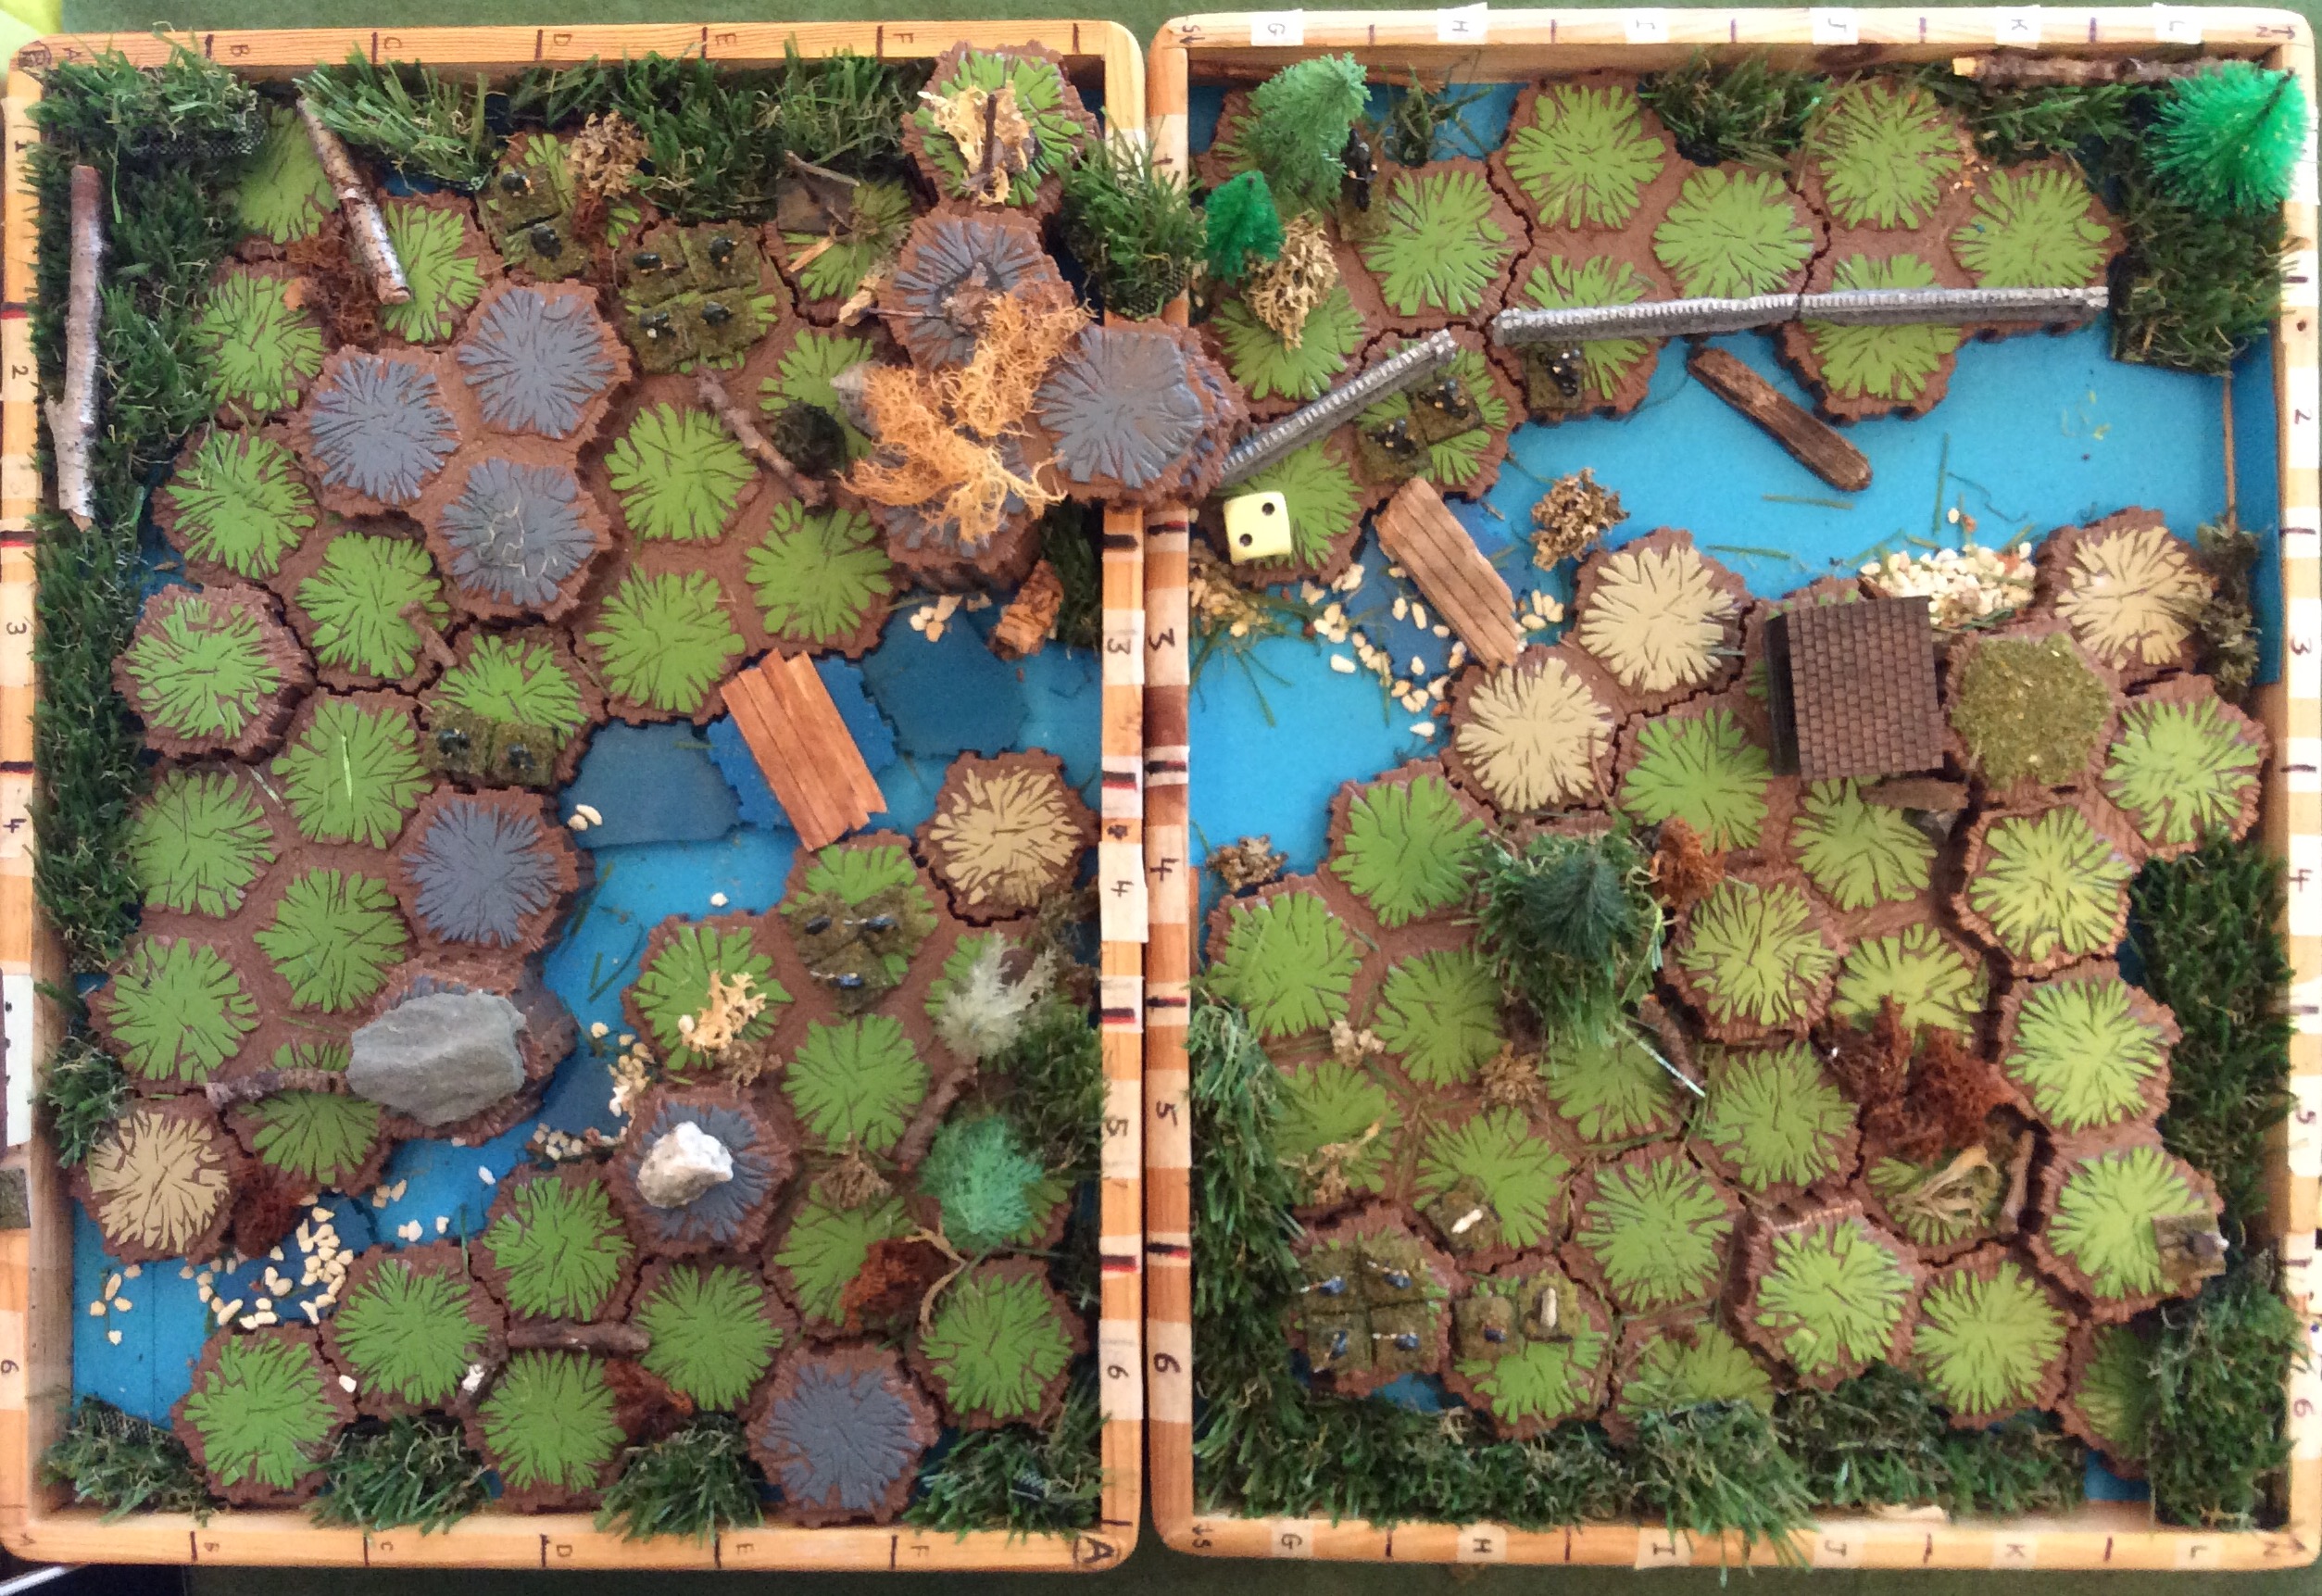
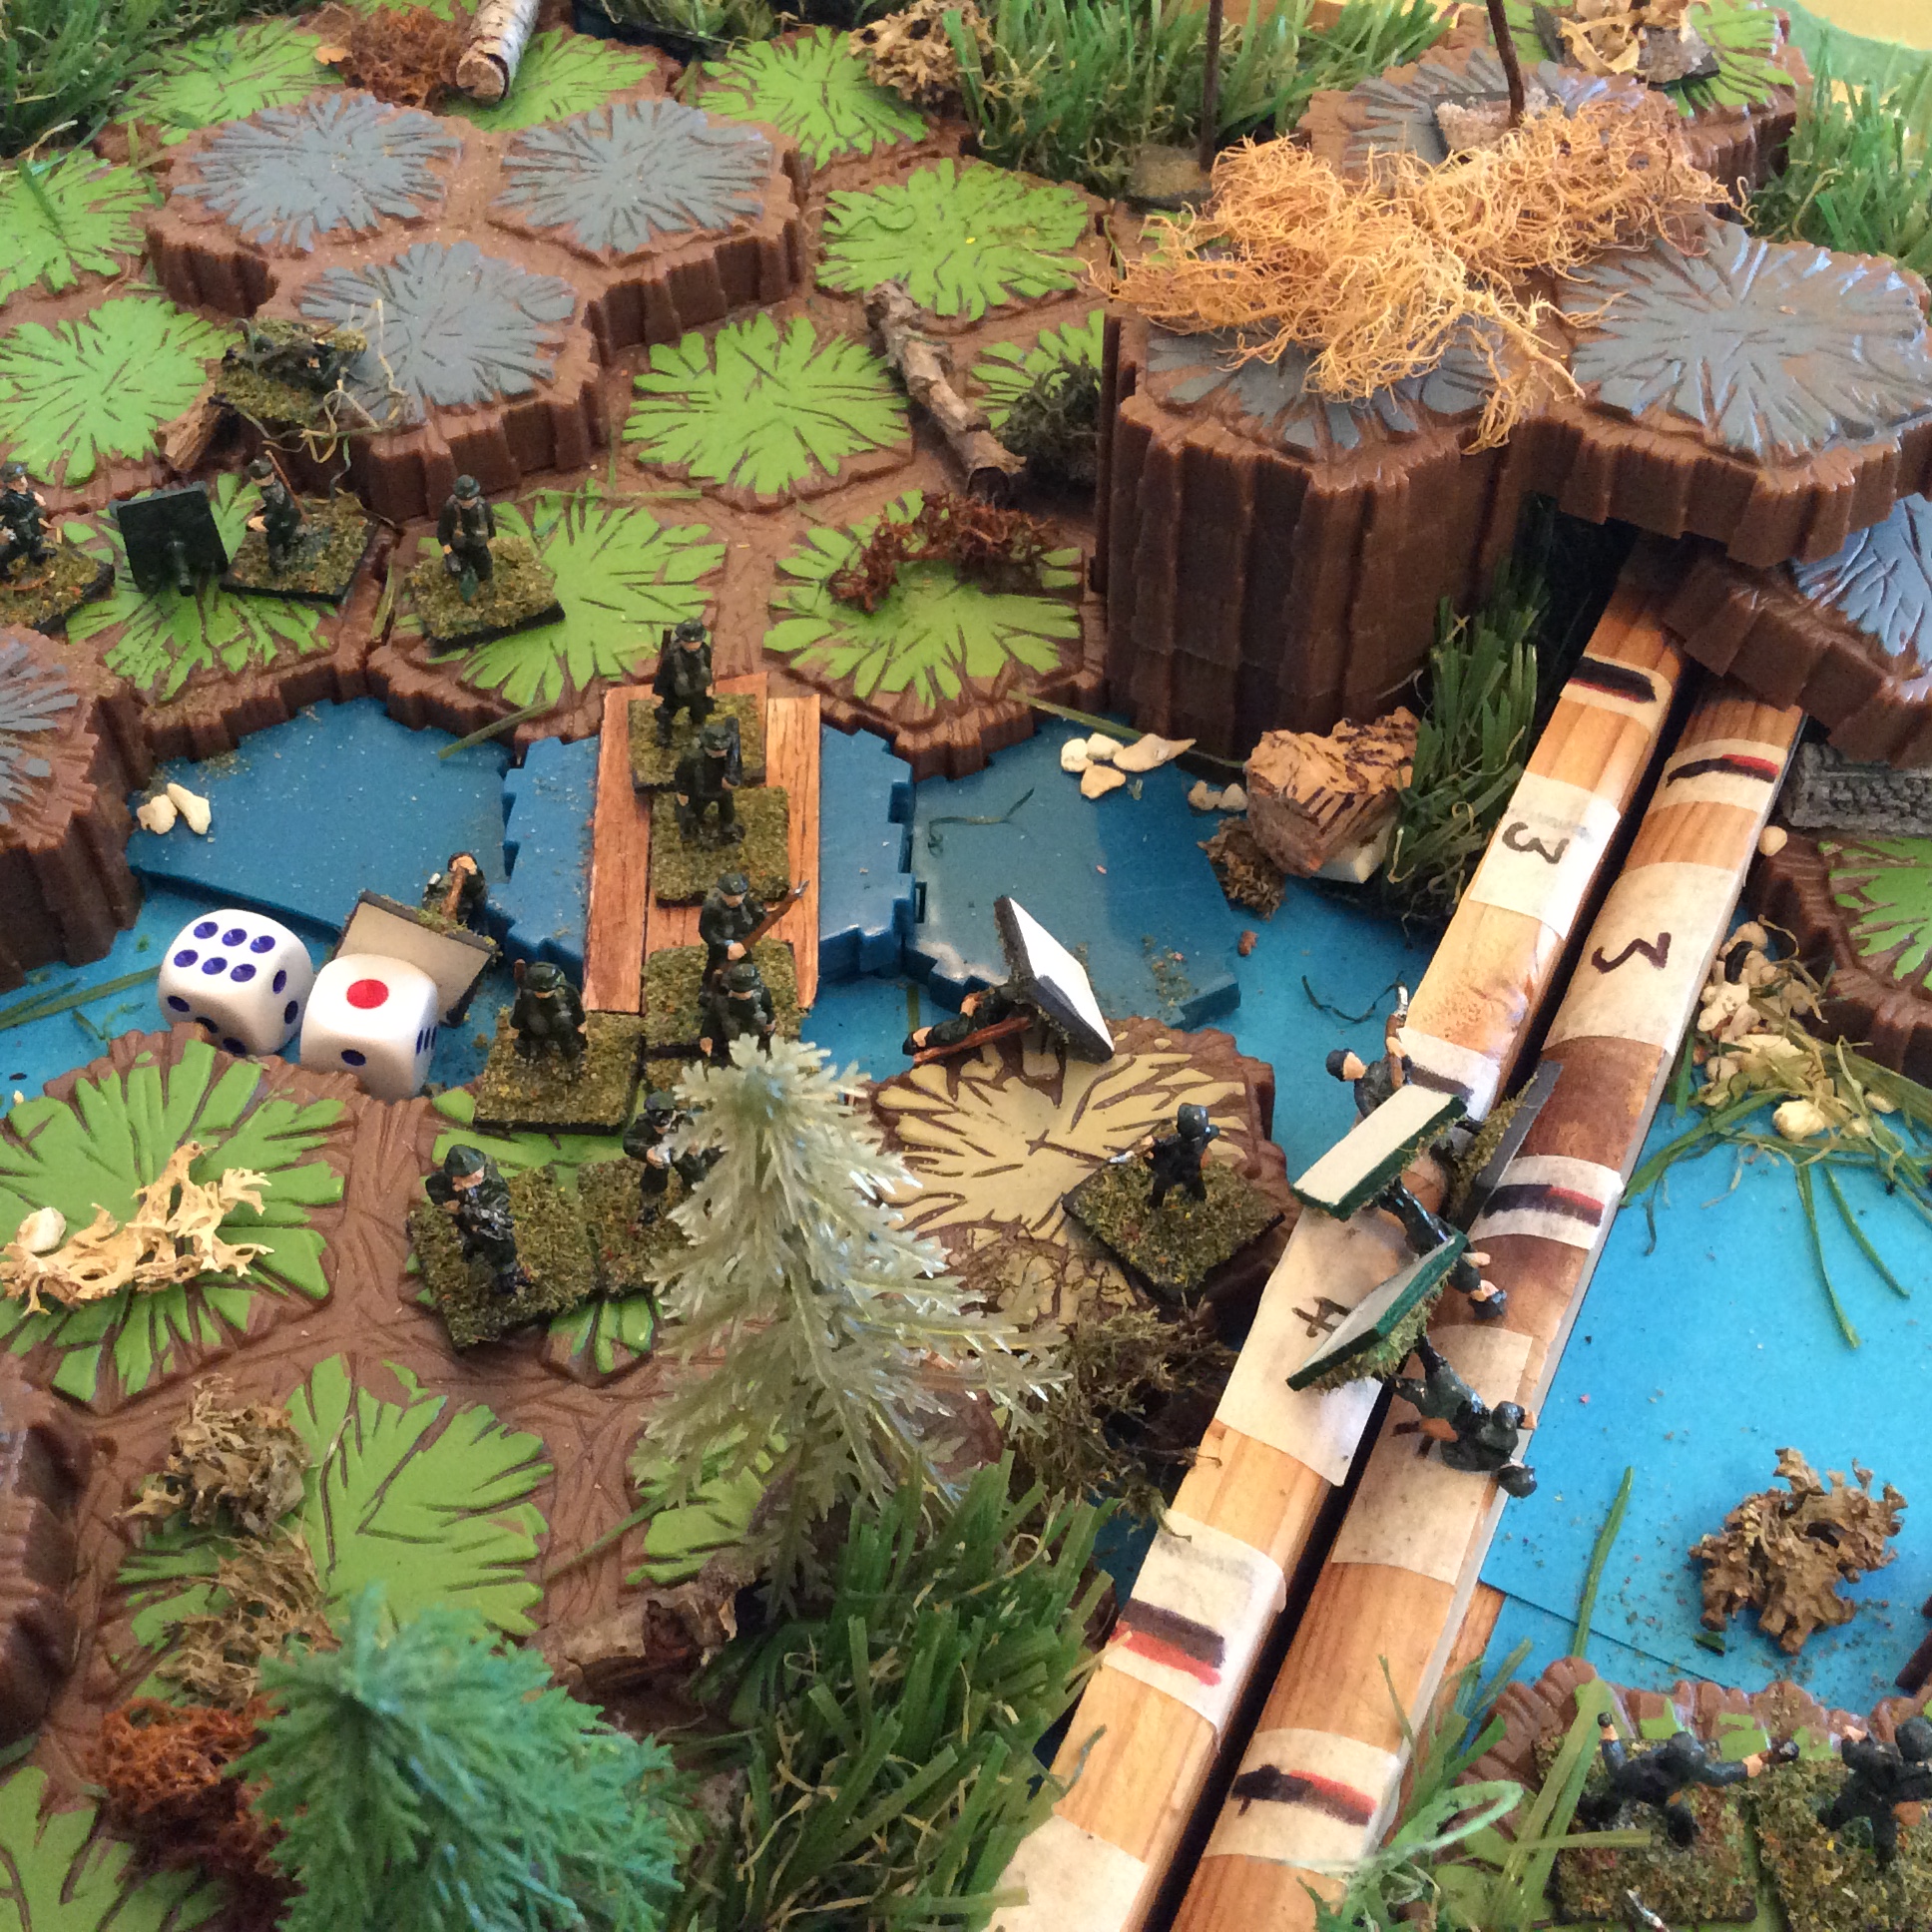
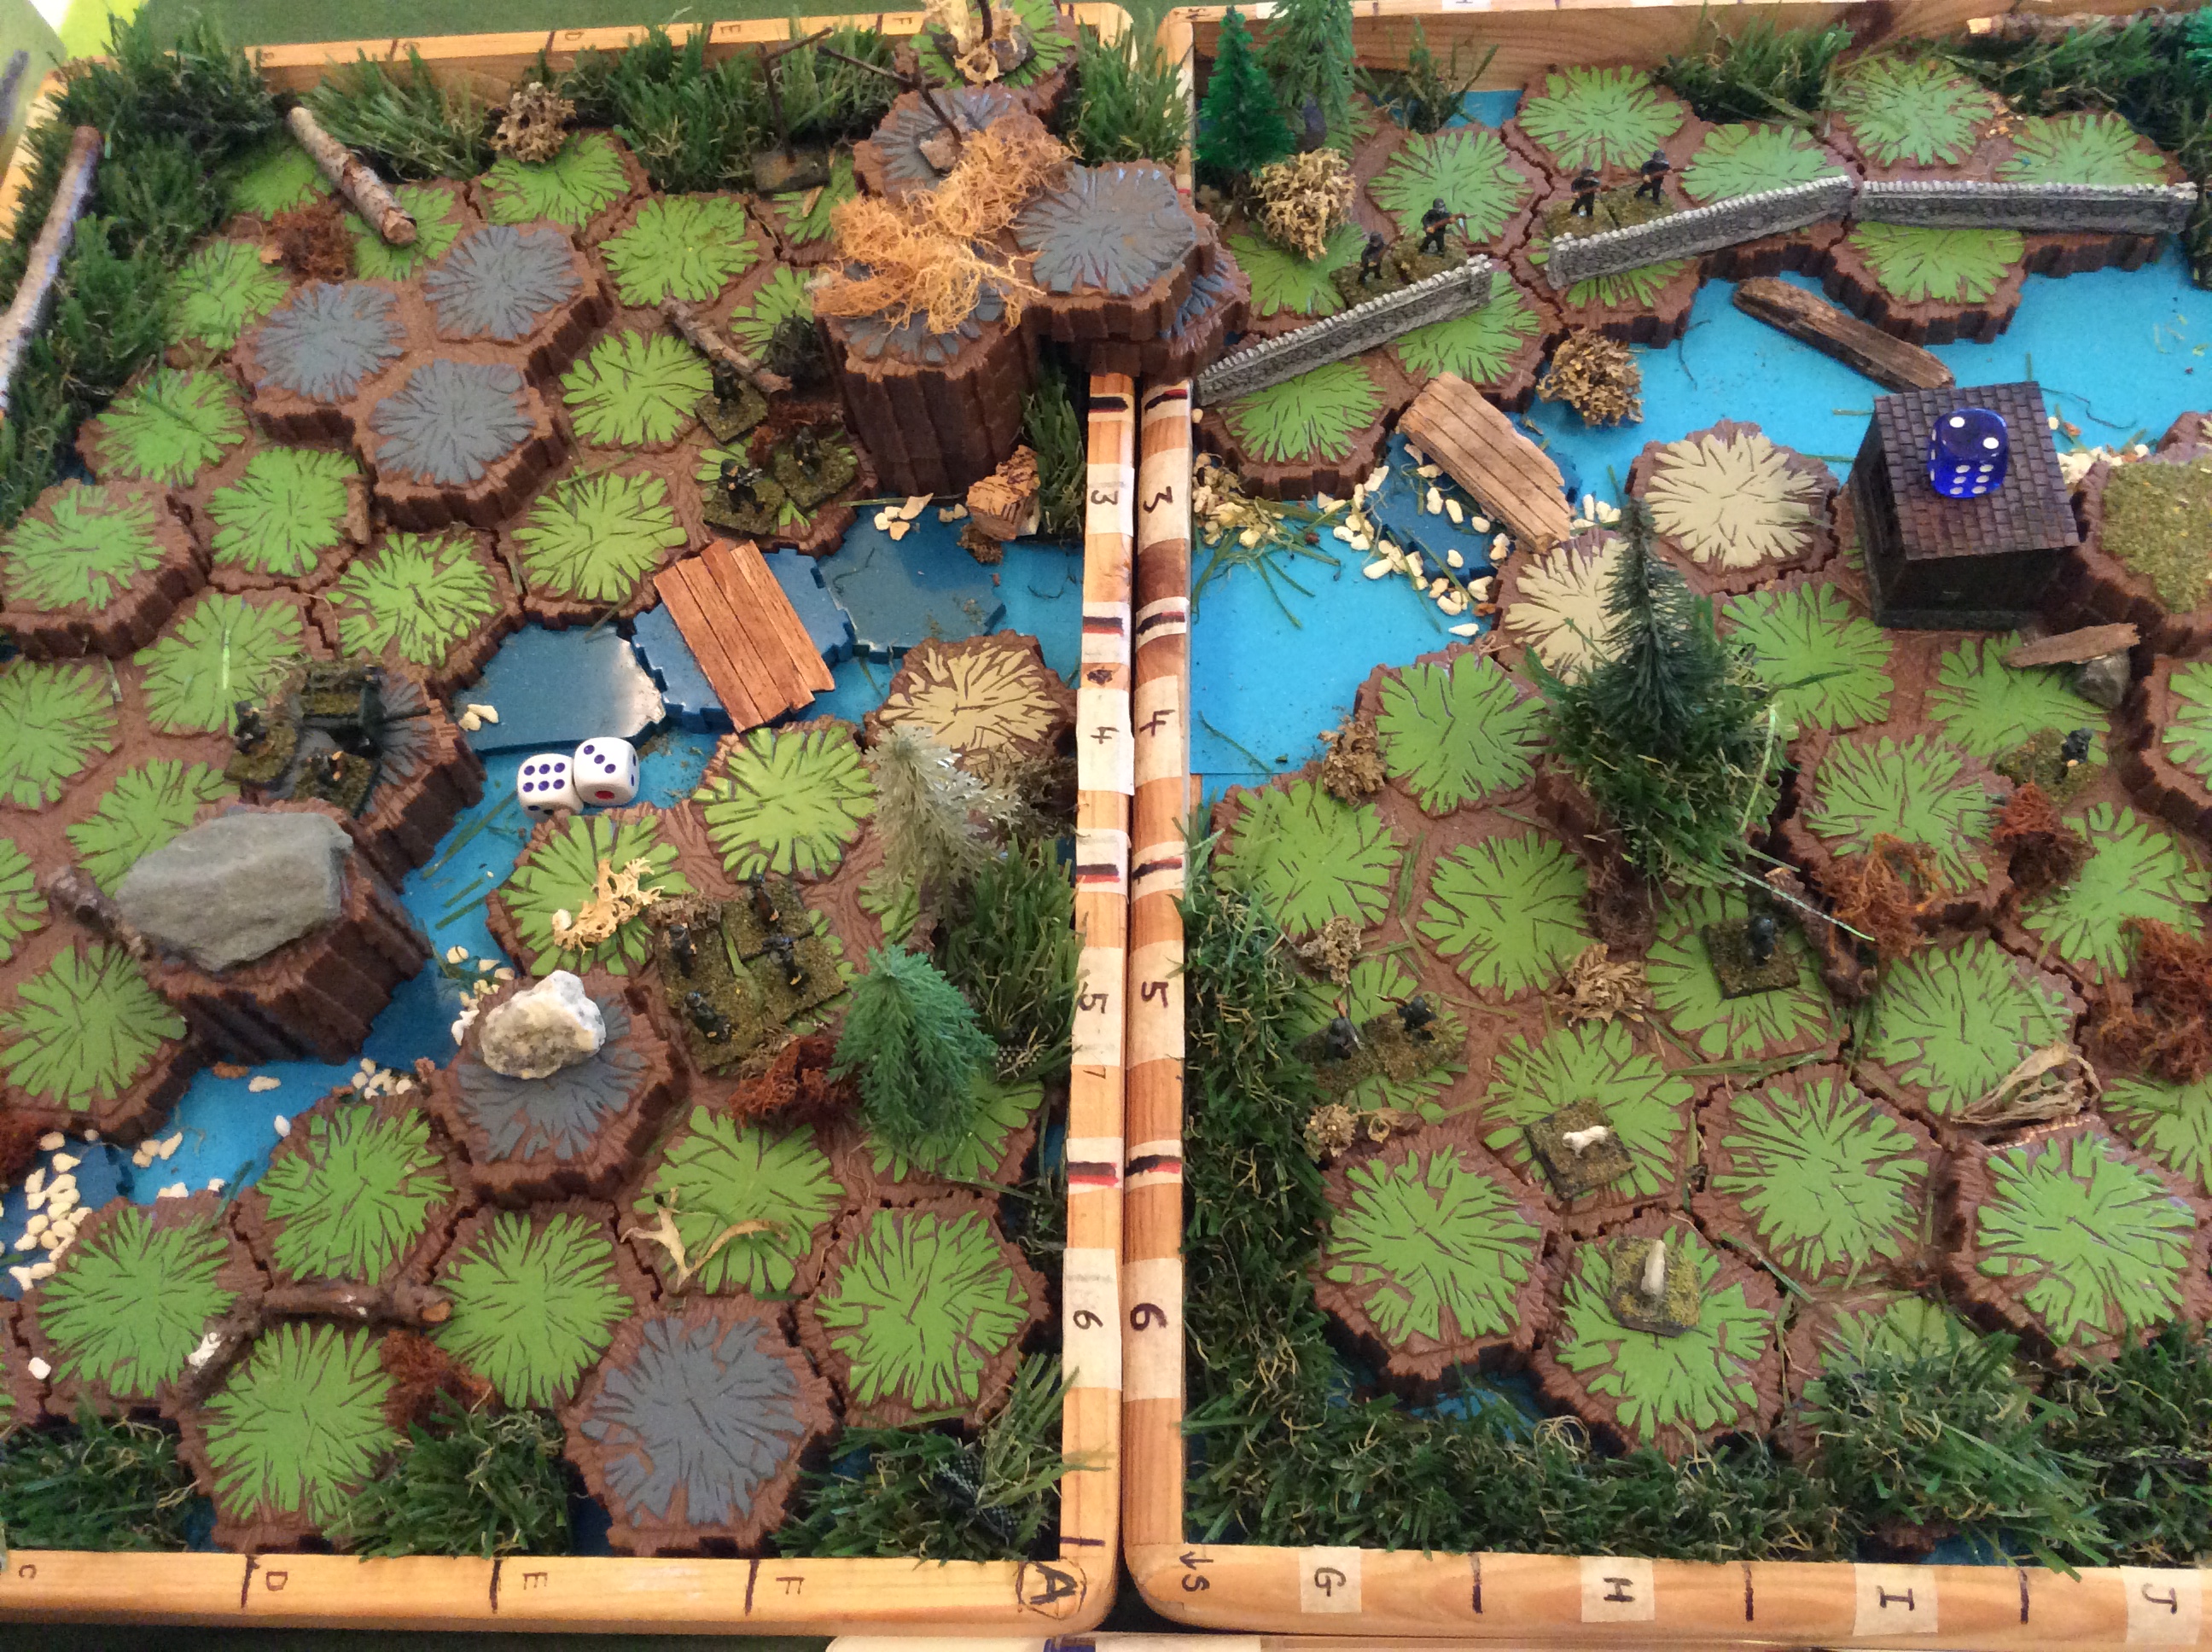
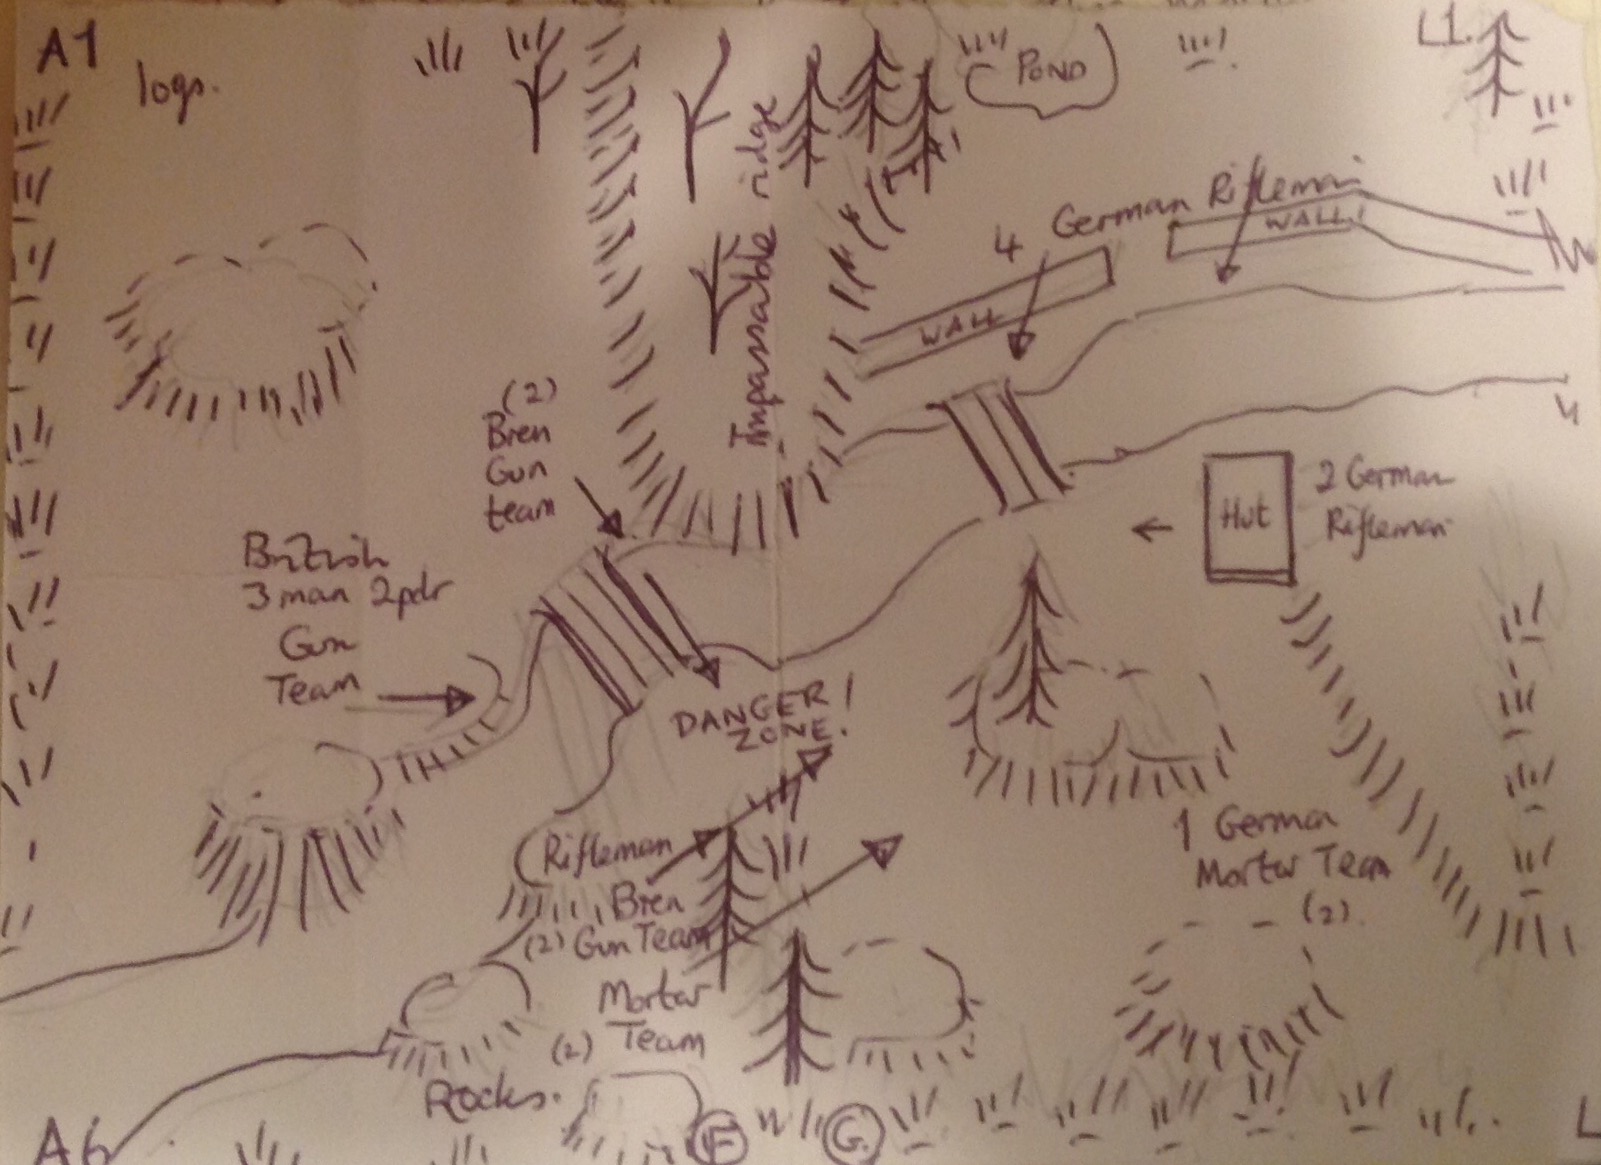
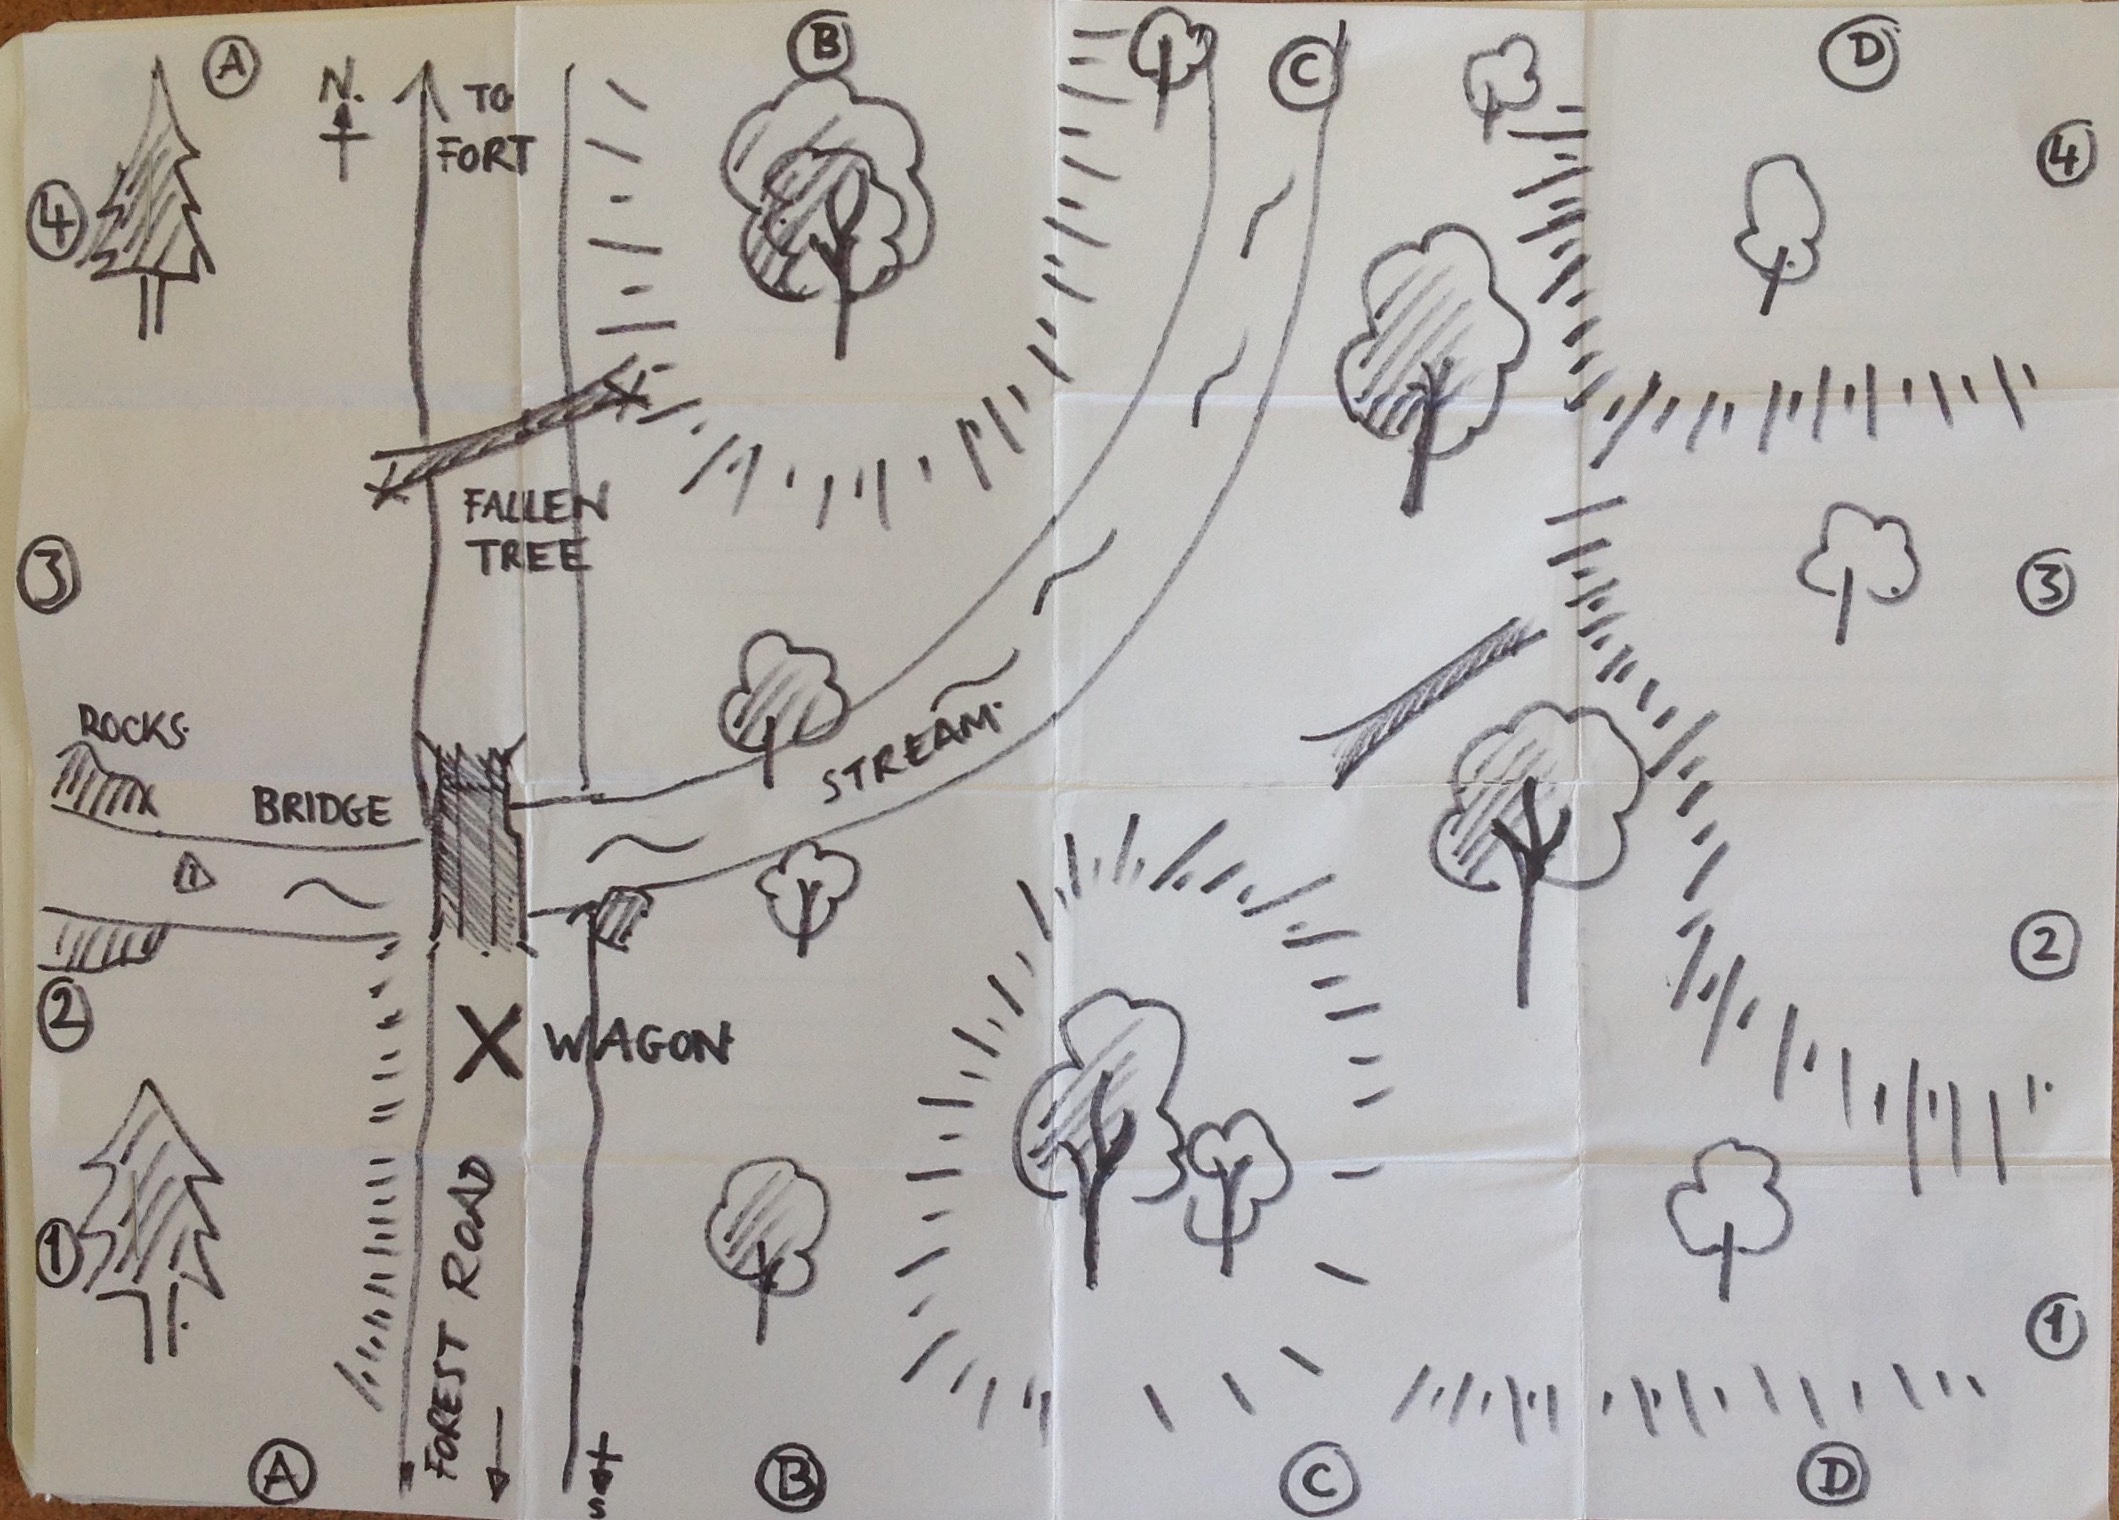
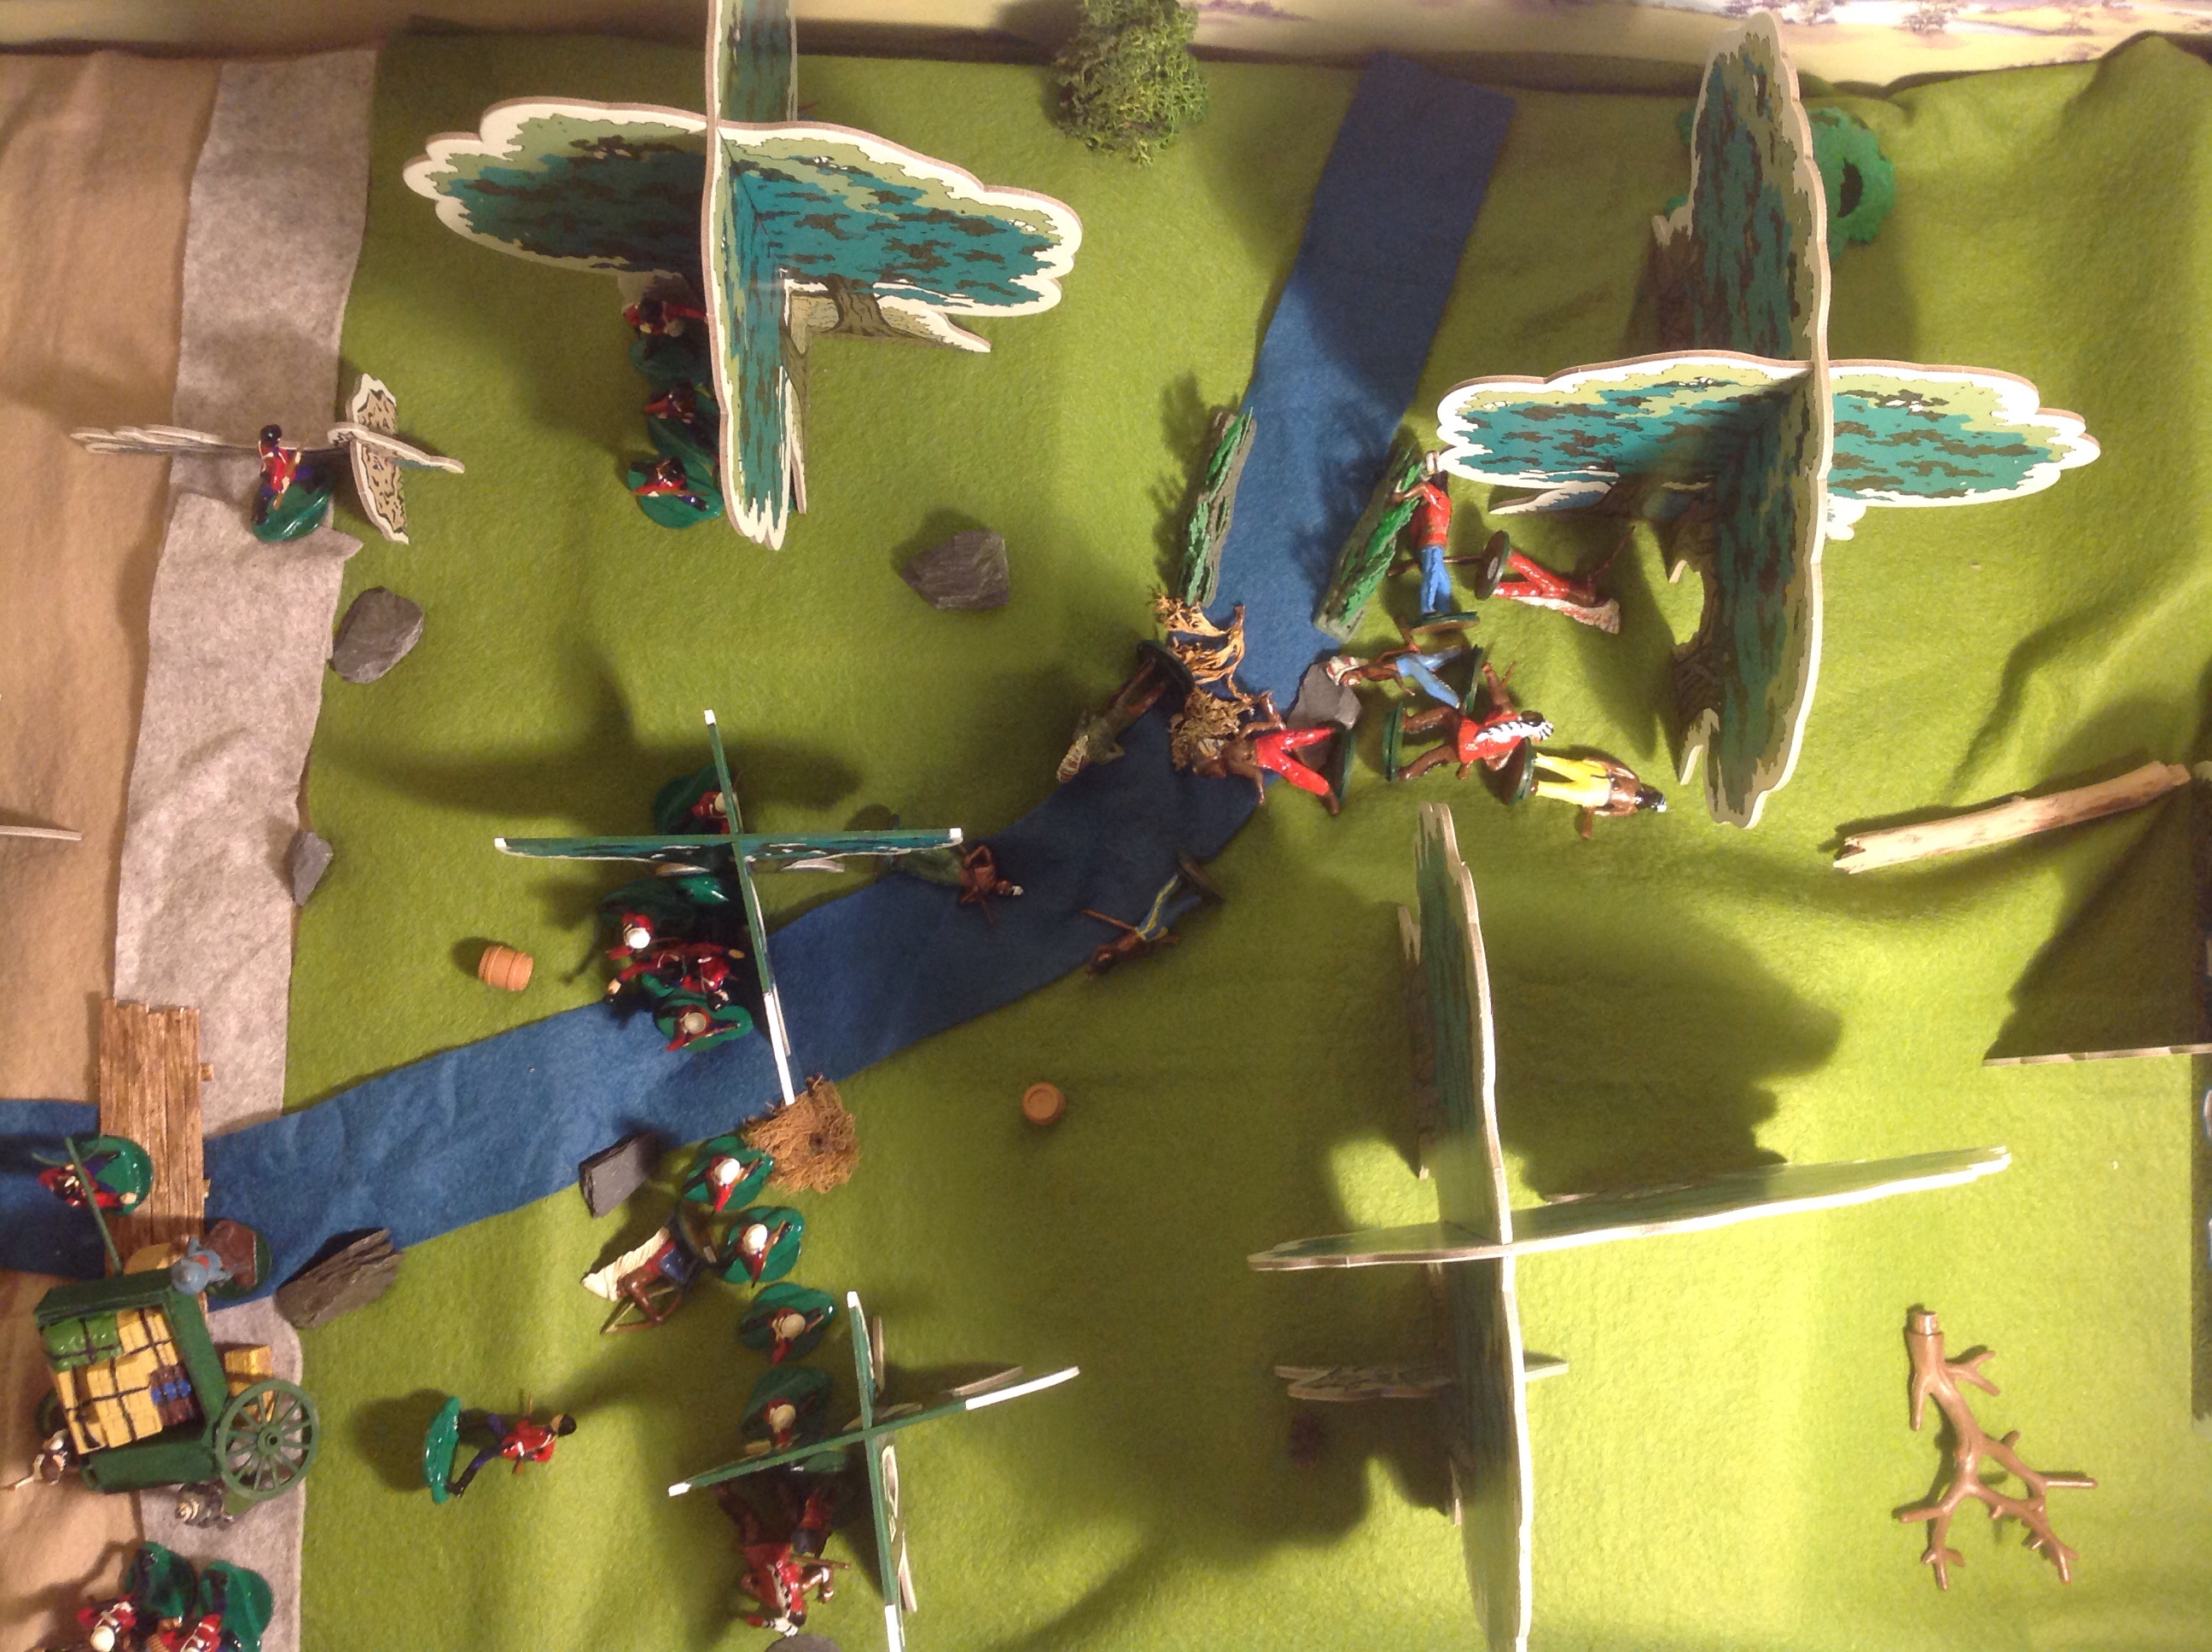
Scenario Map – Gridded into four by four
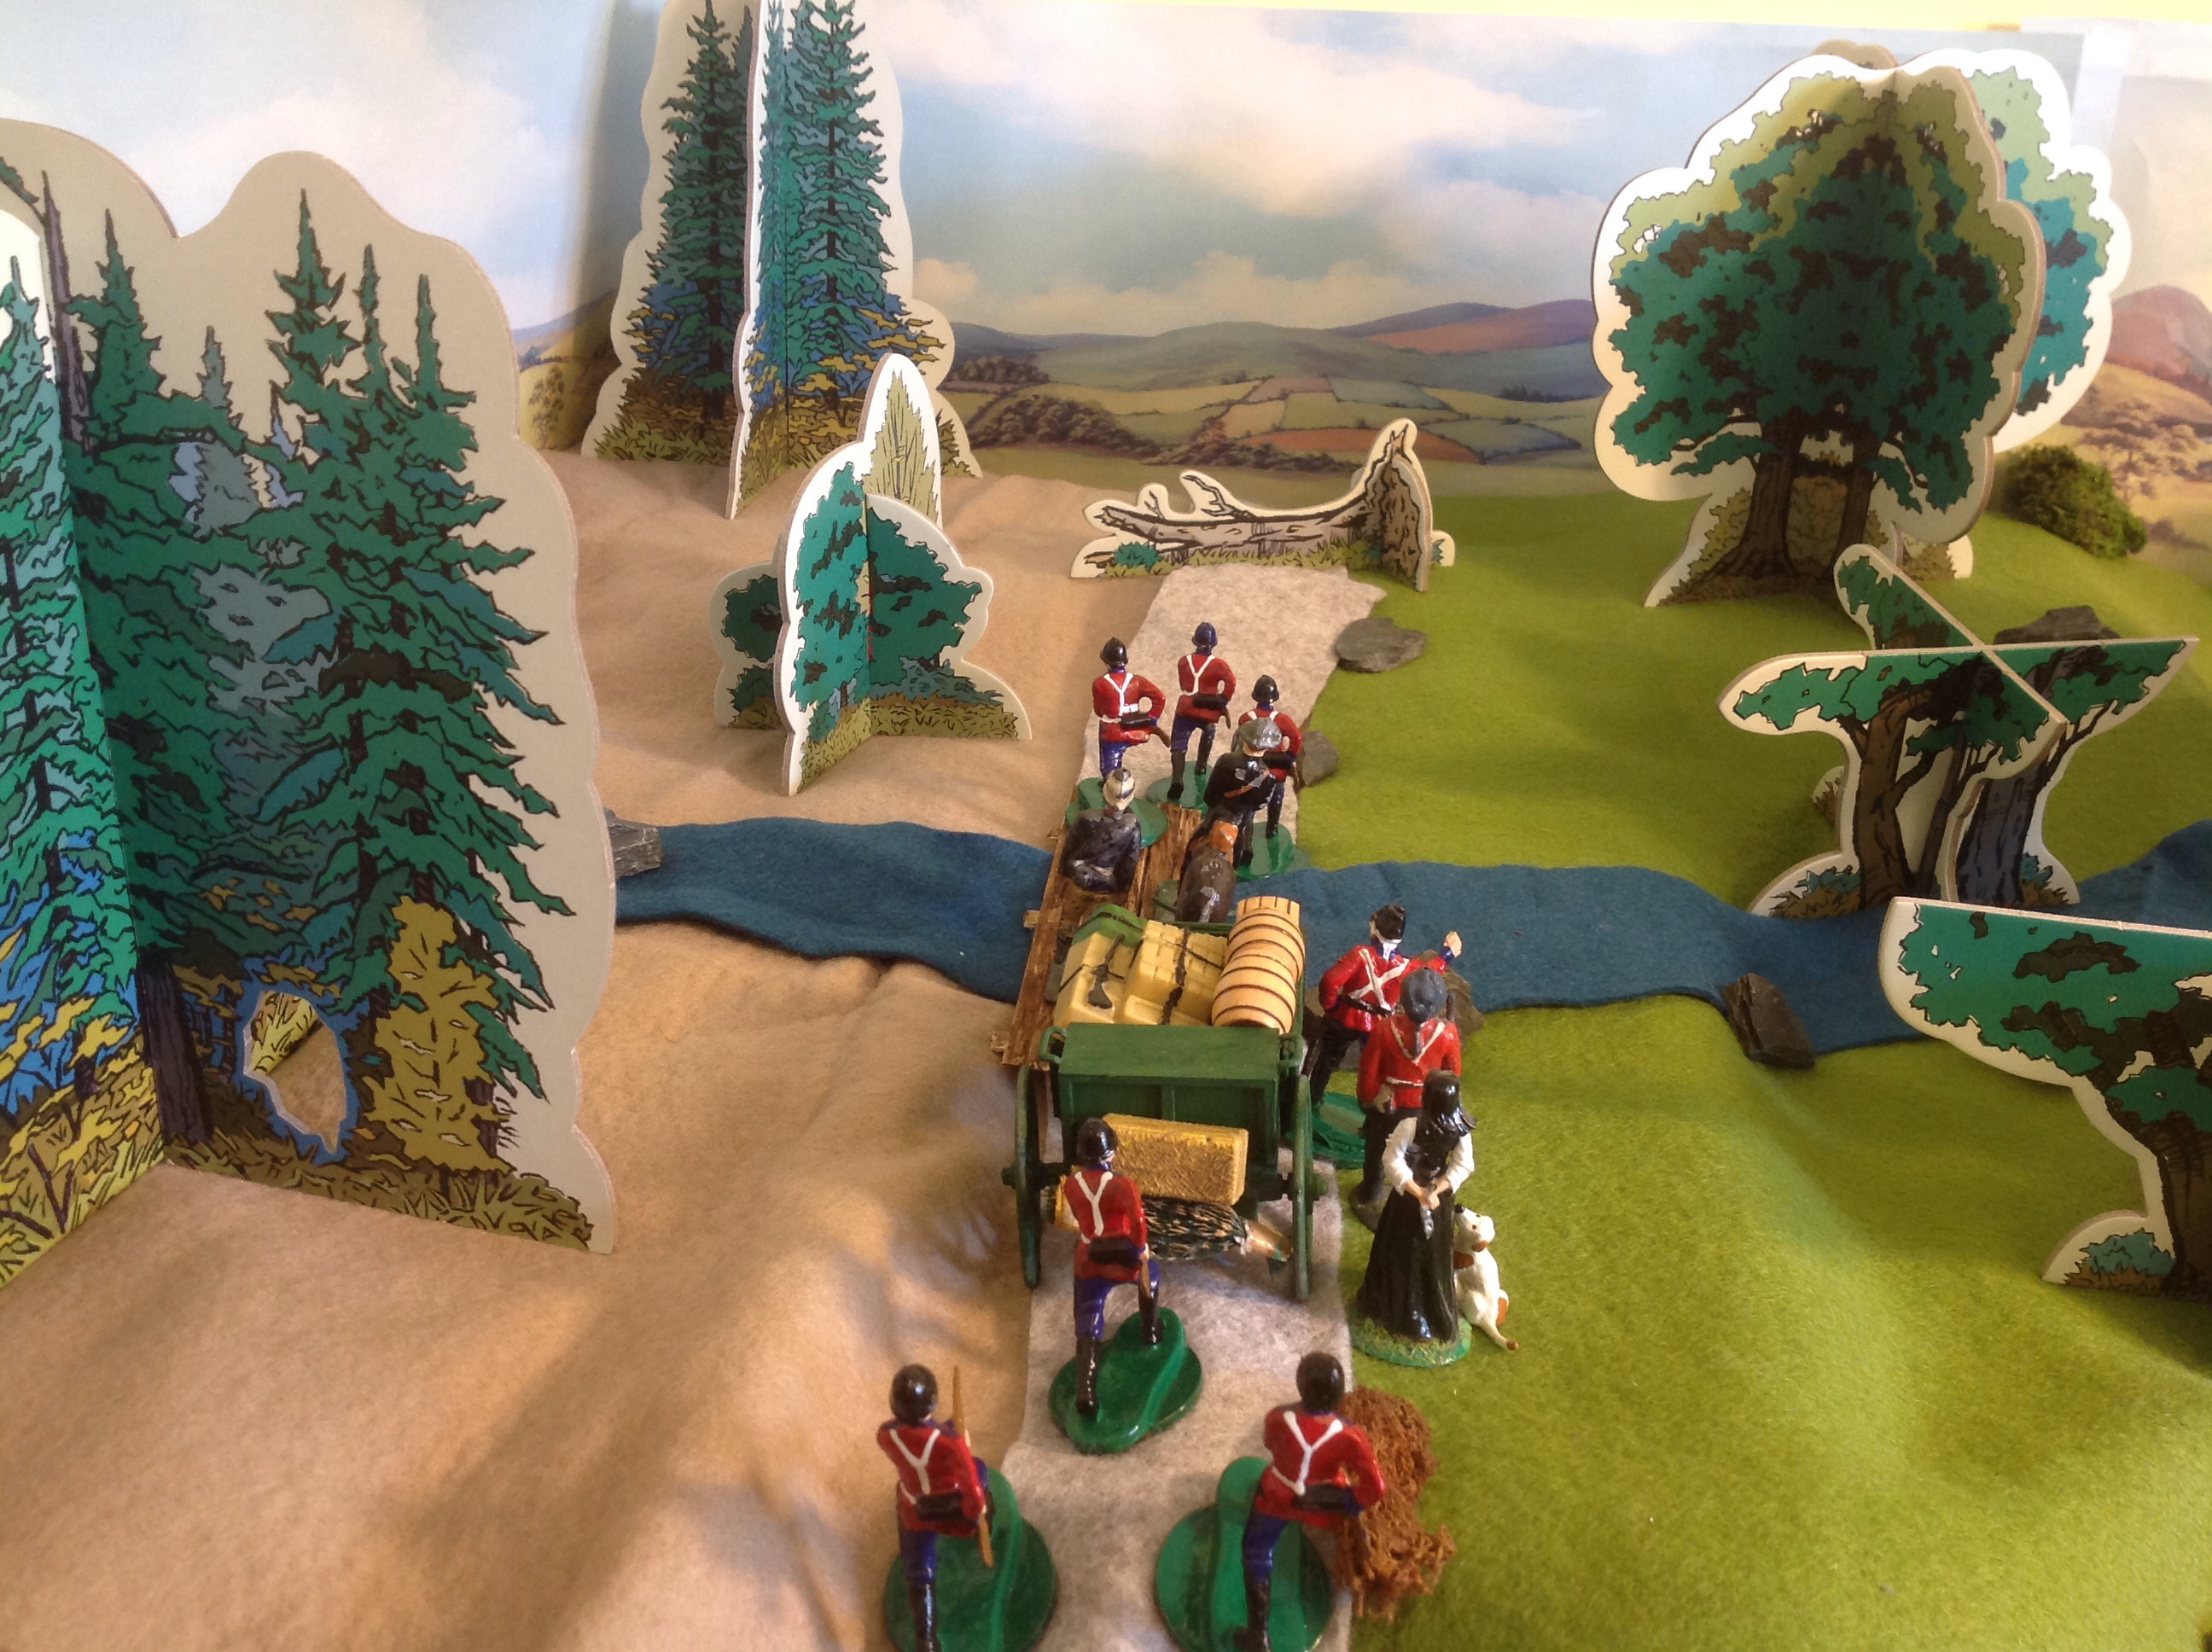
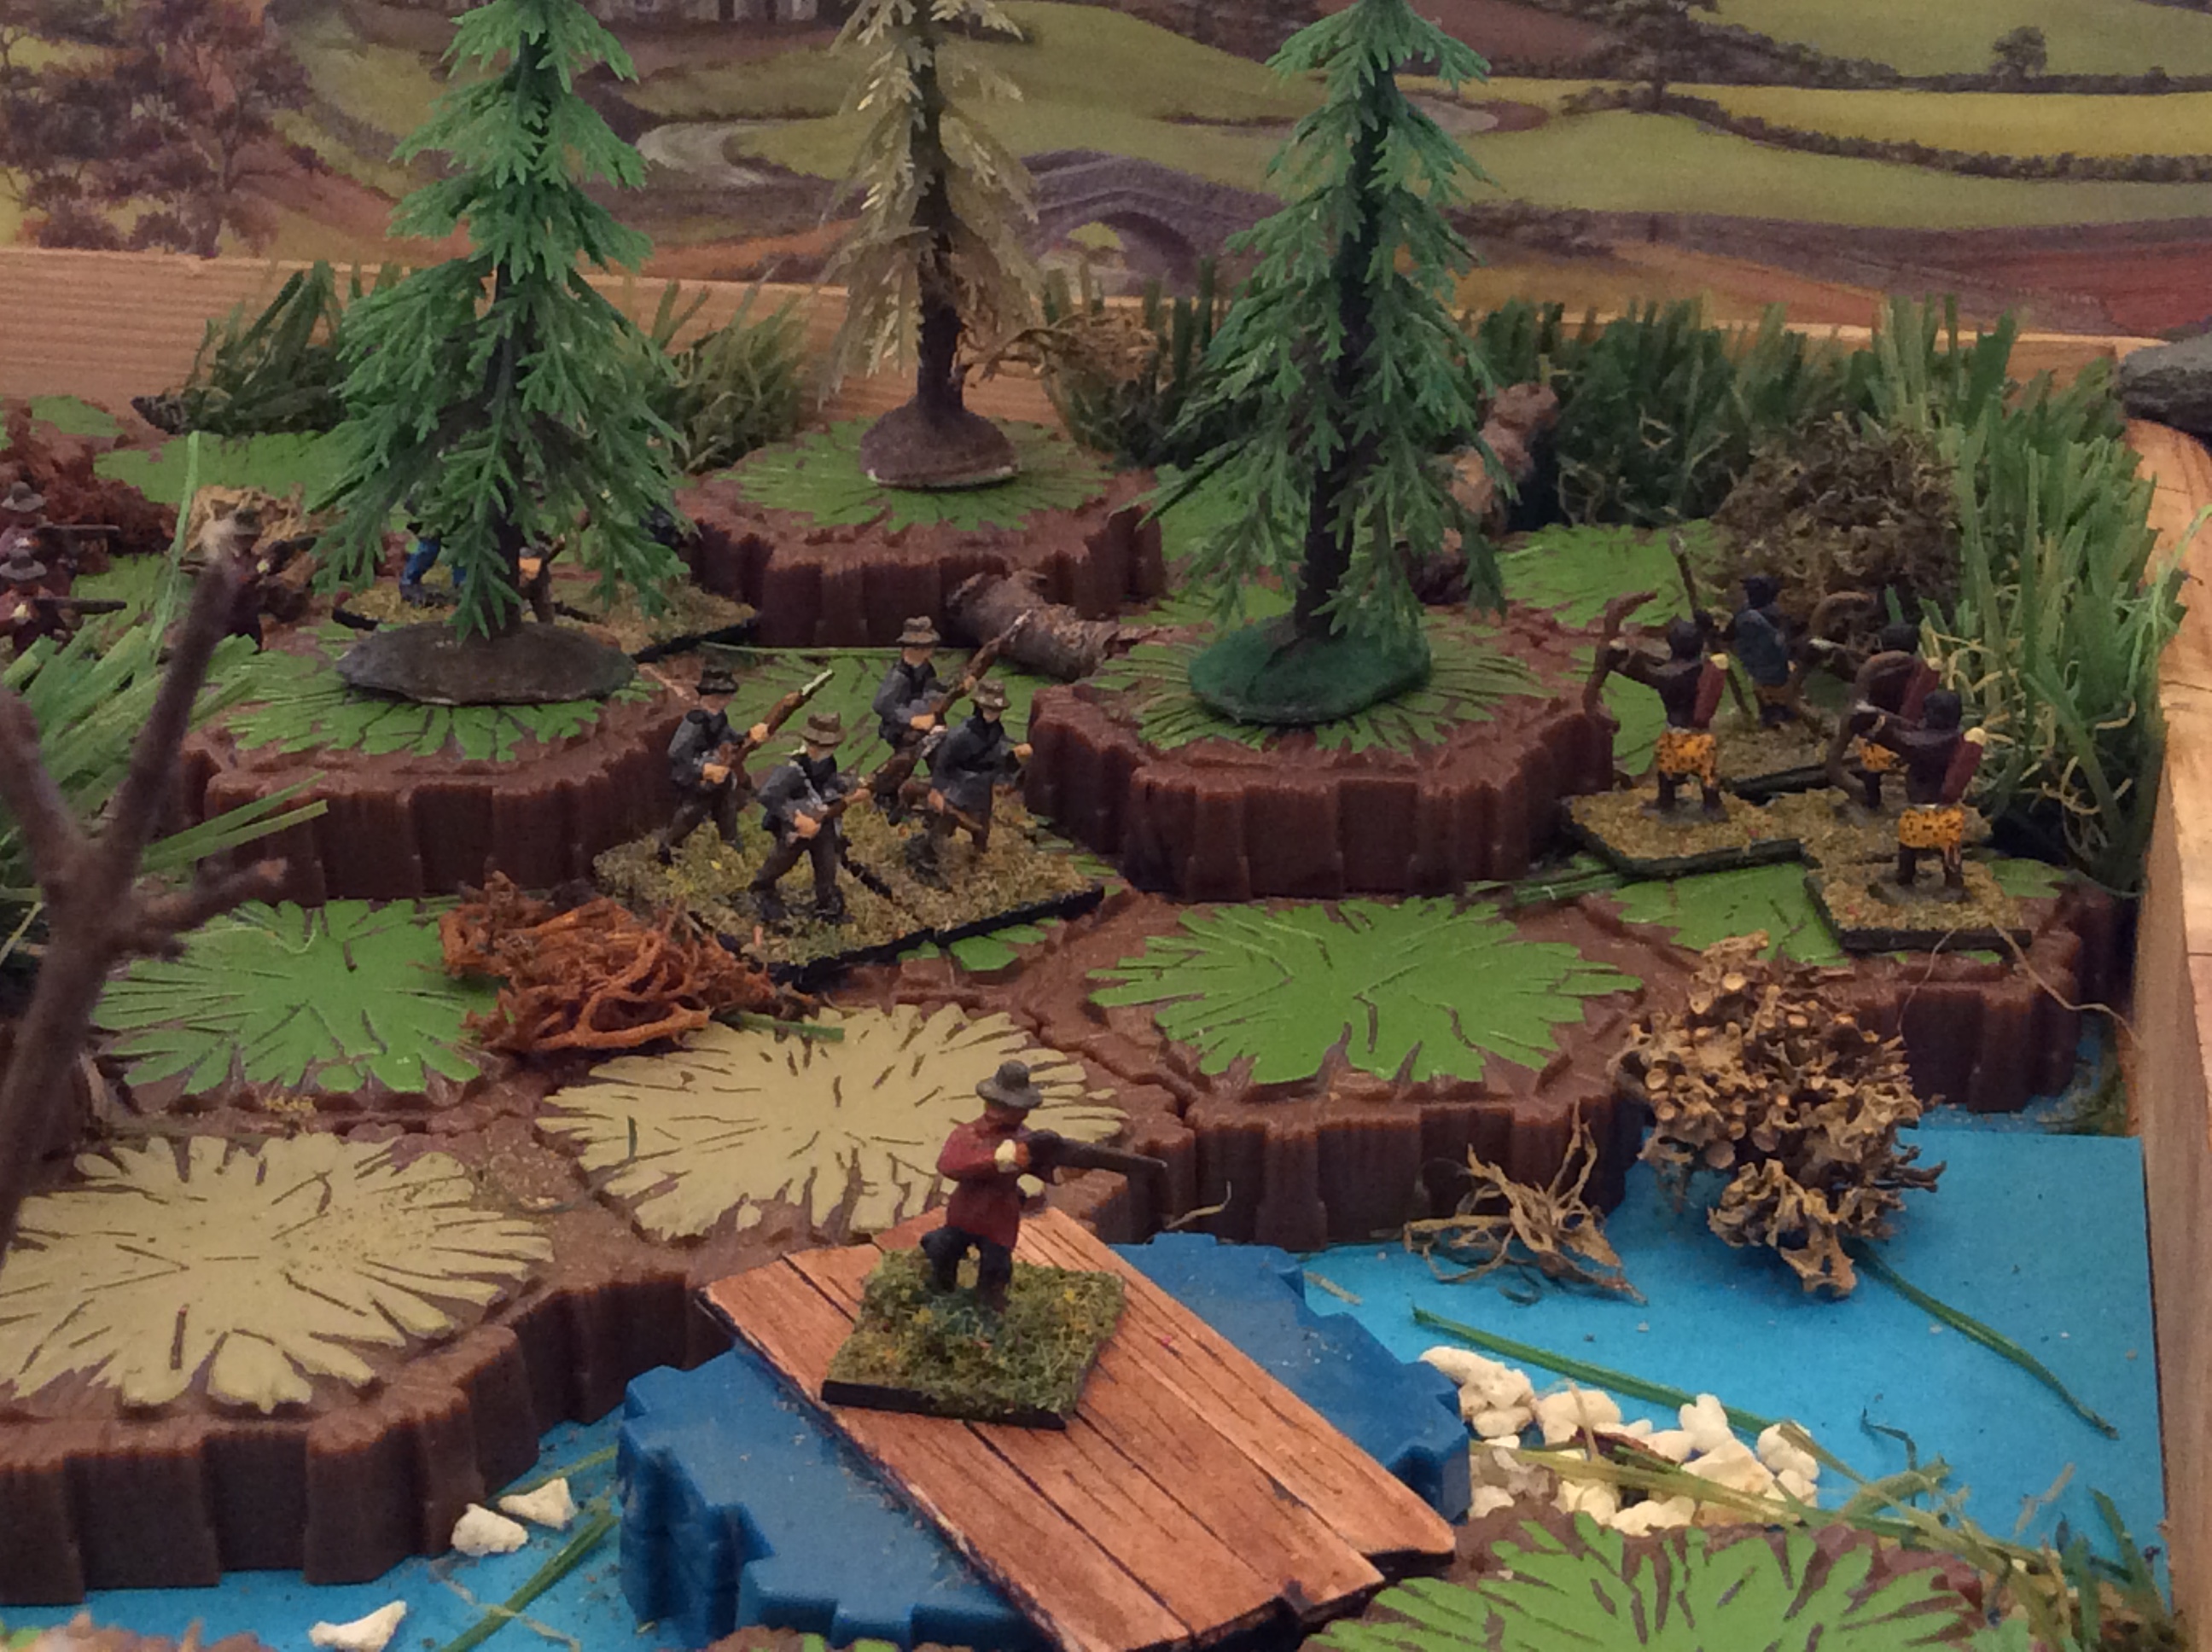
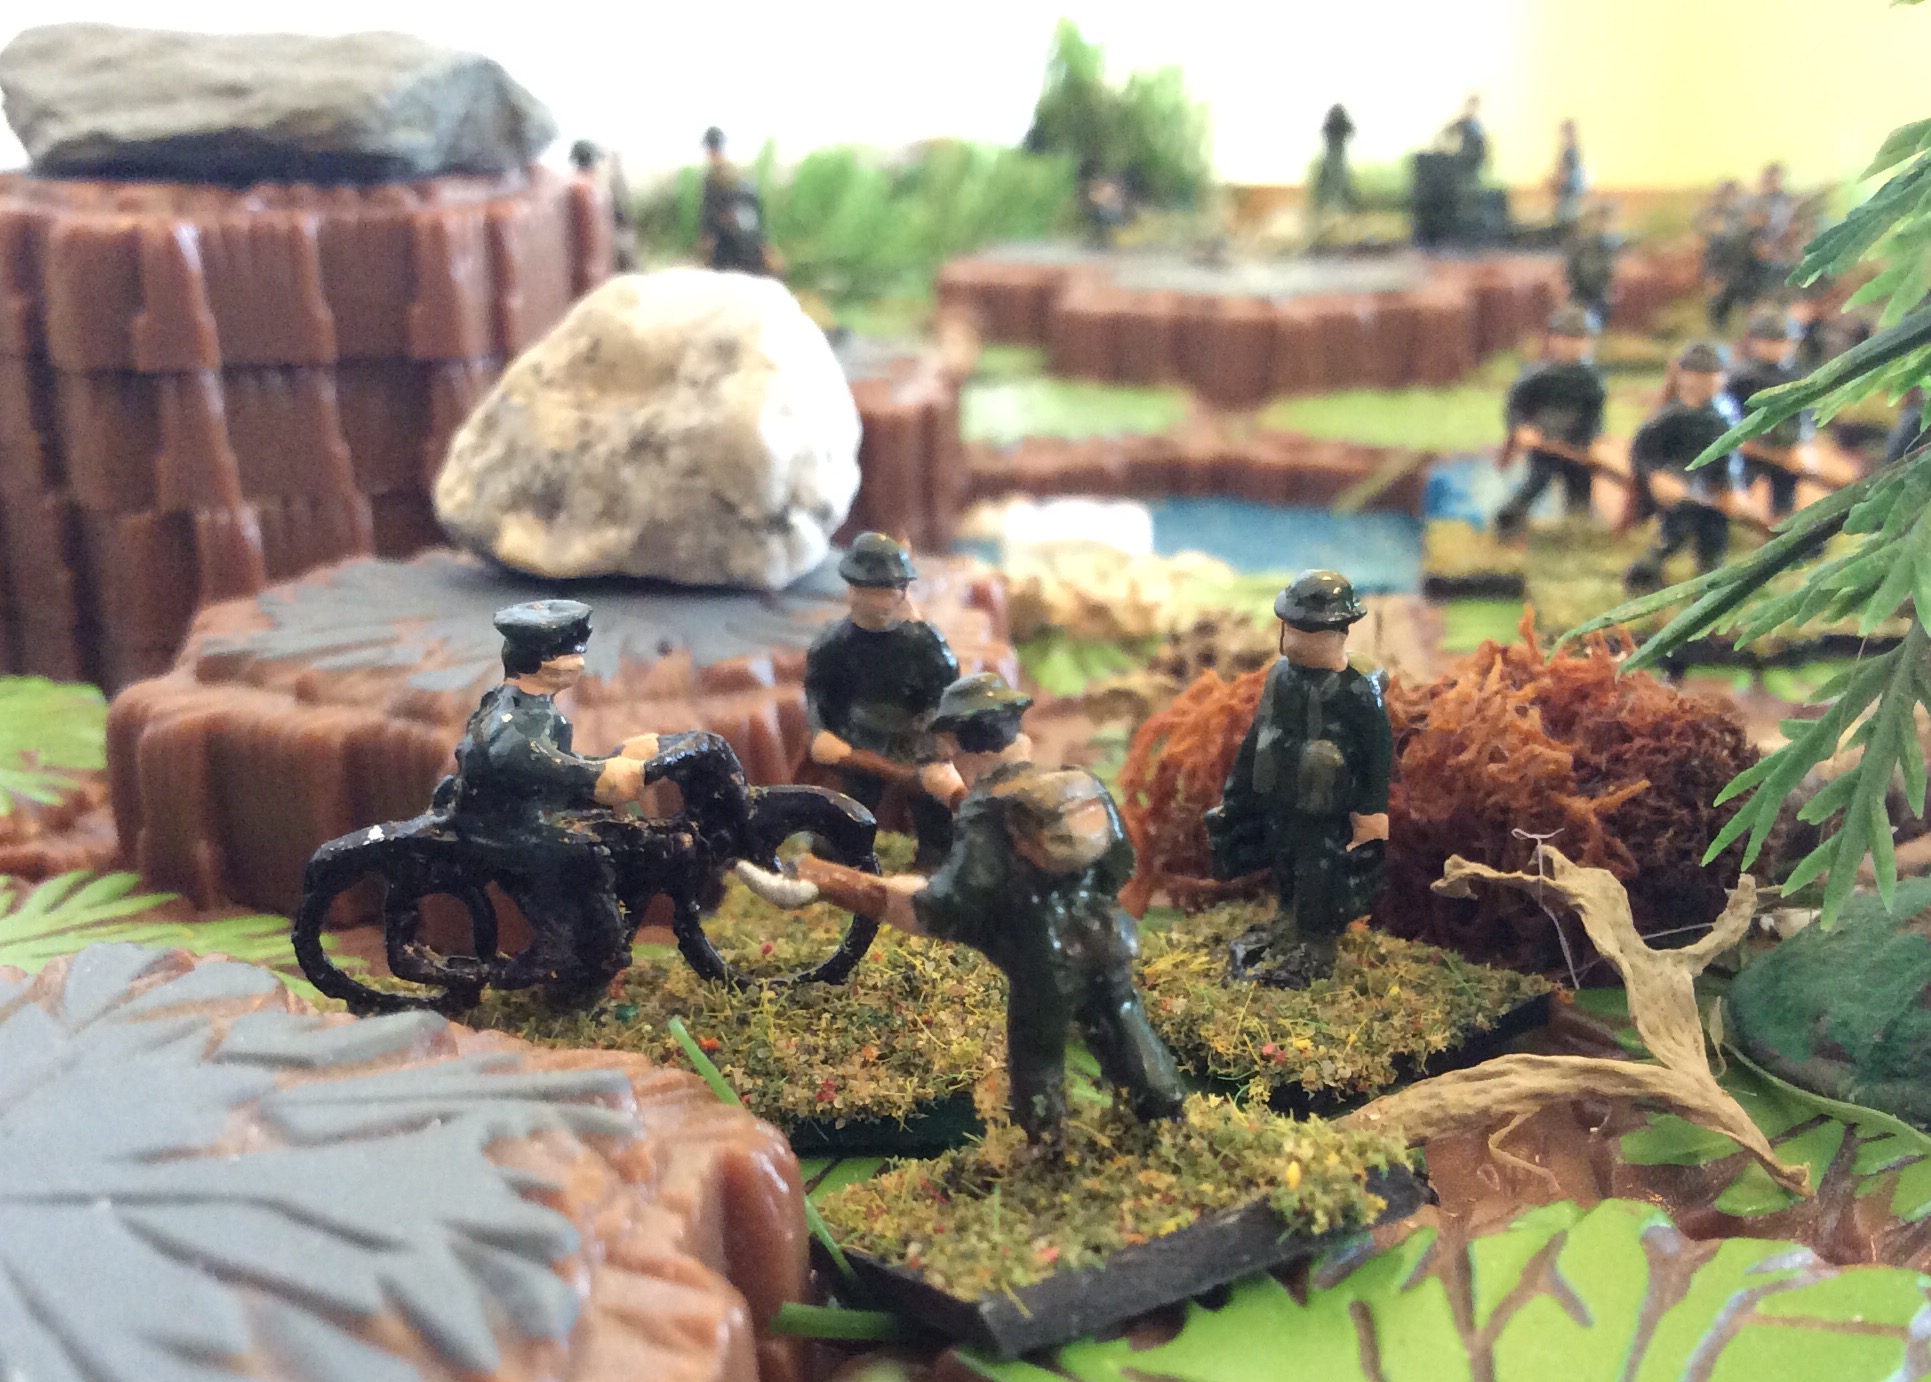
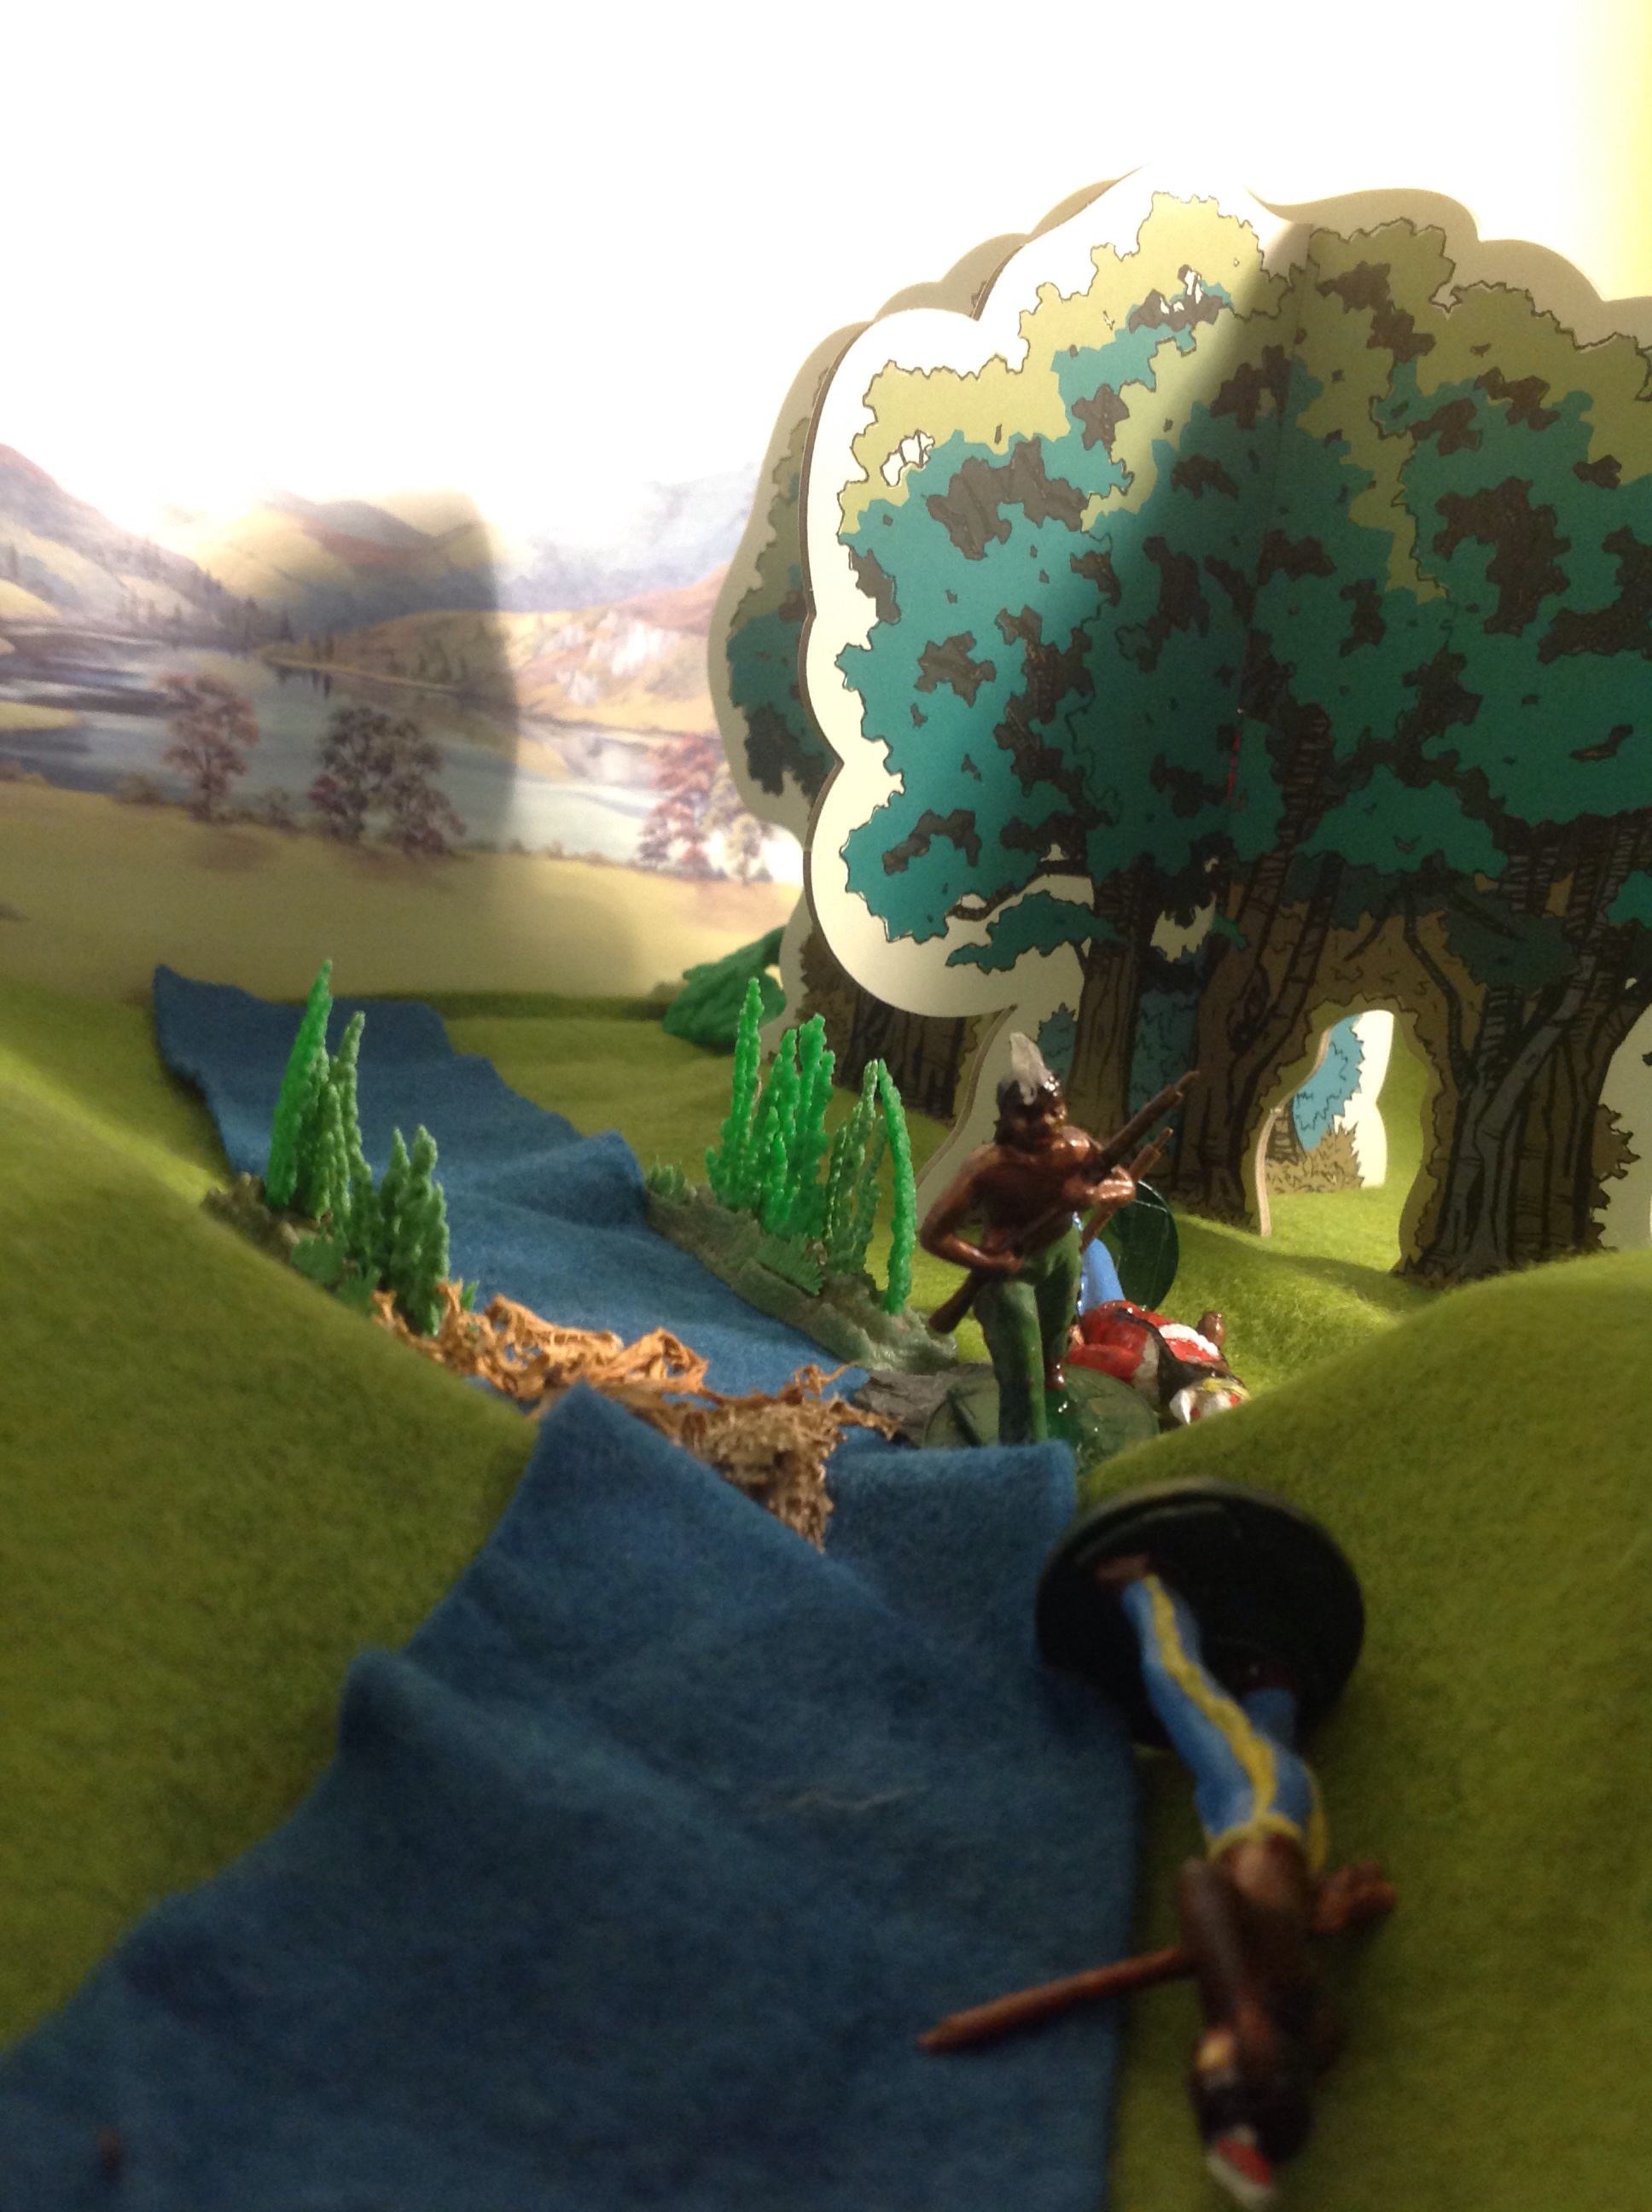
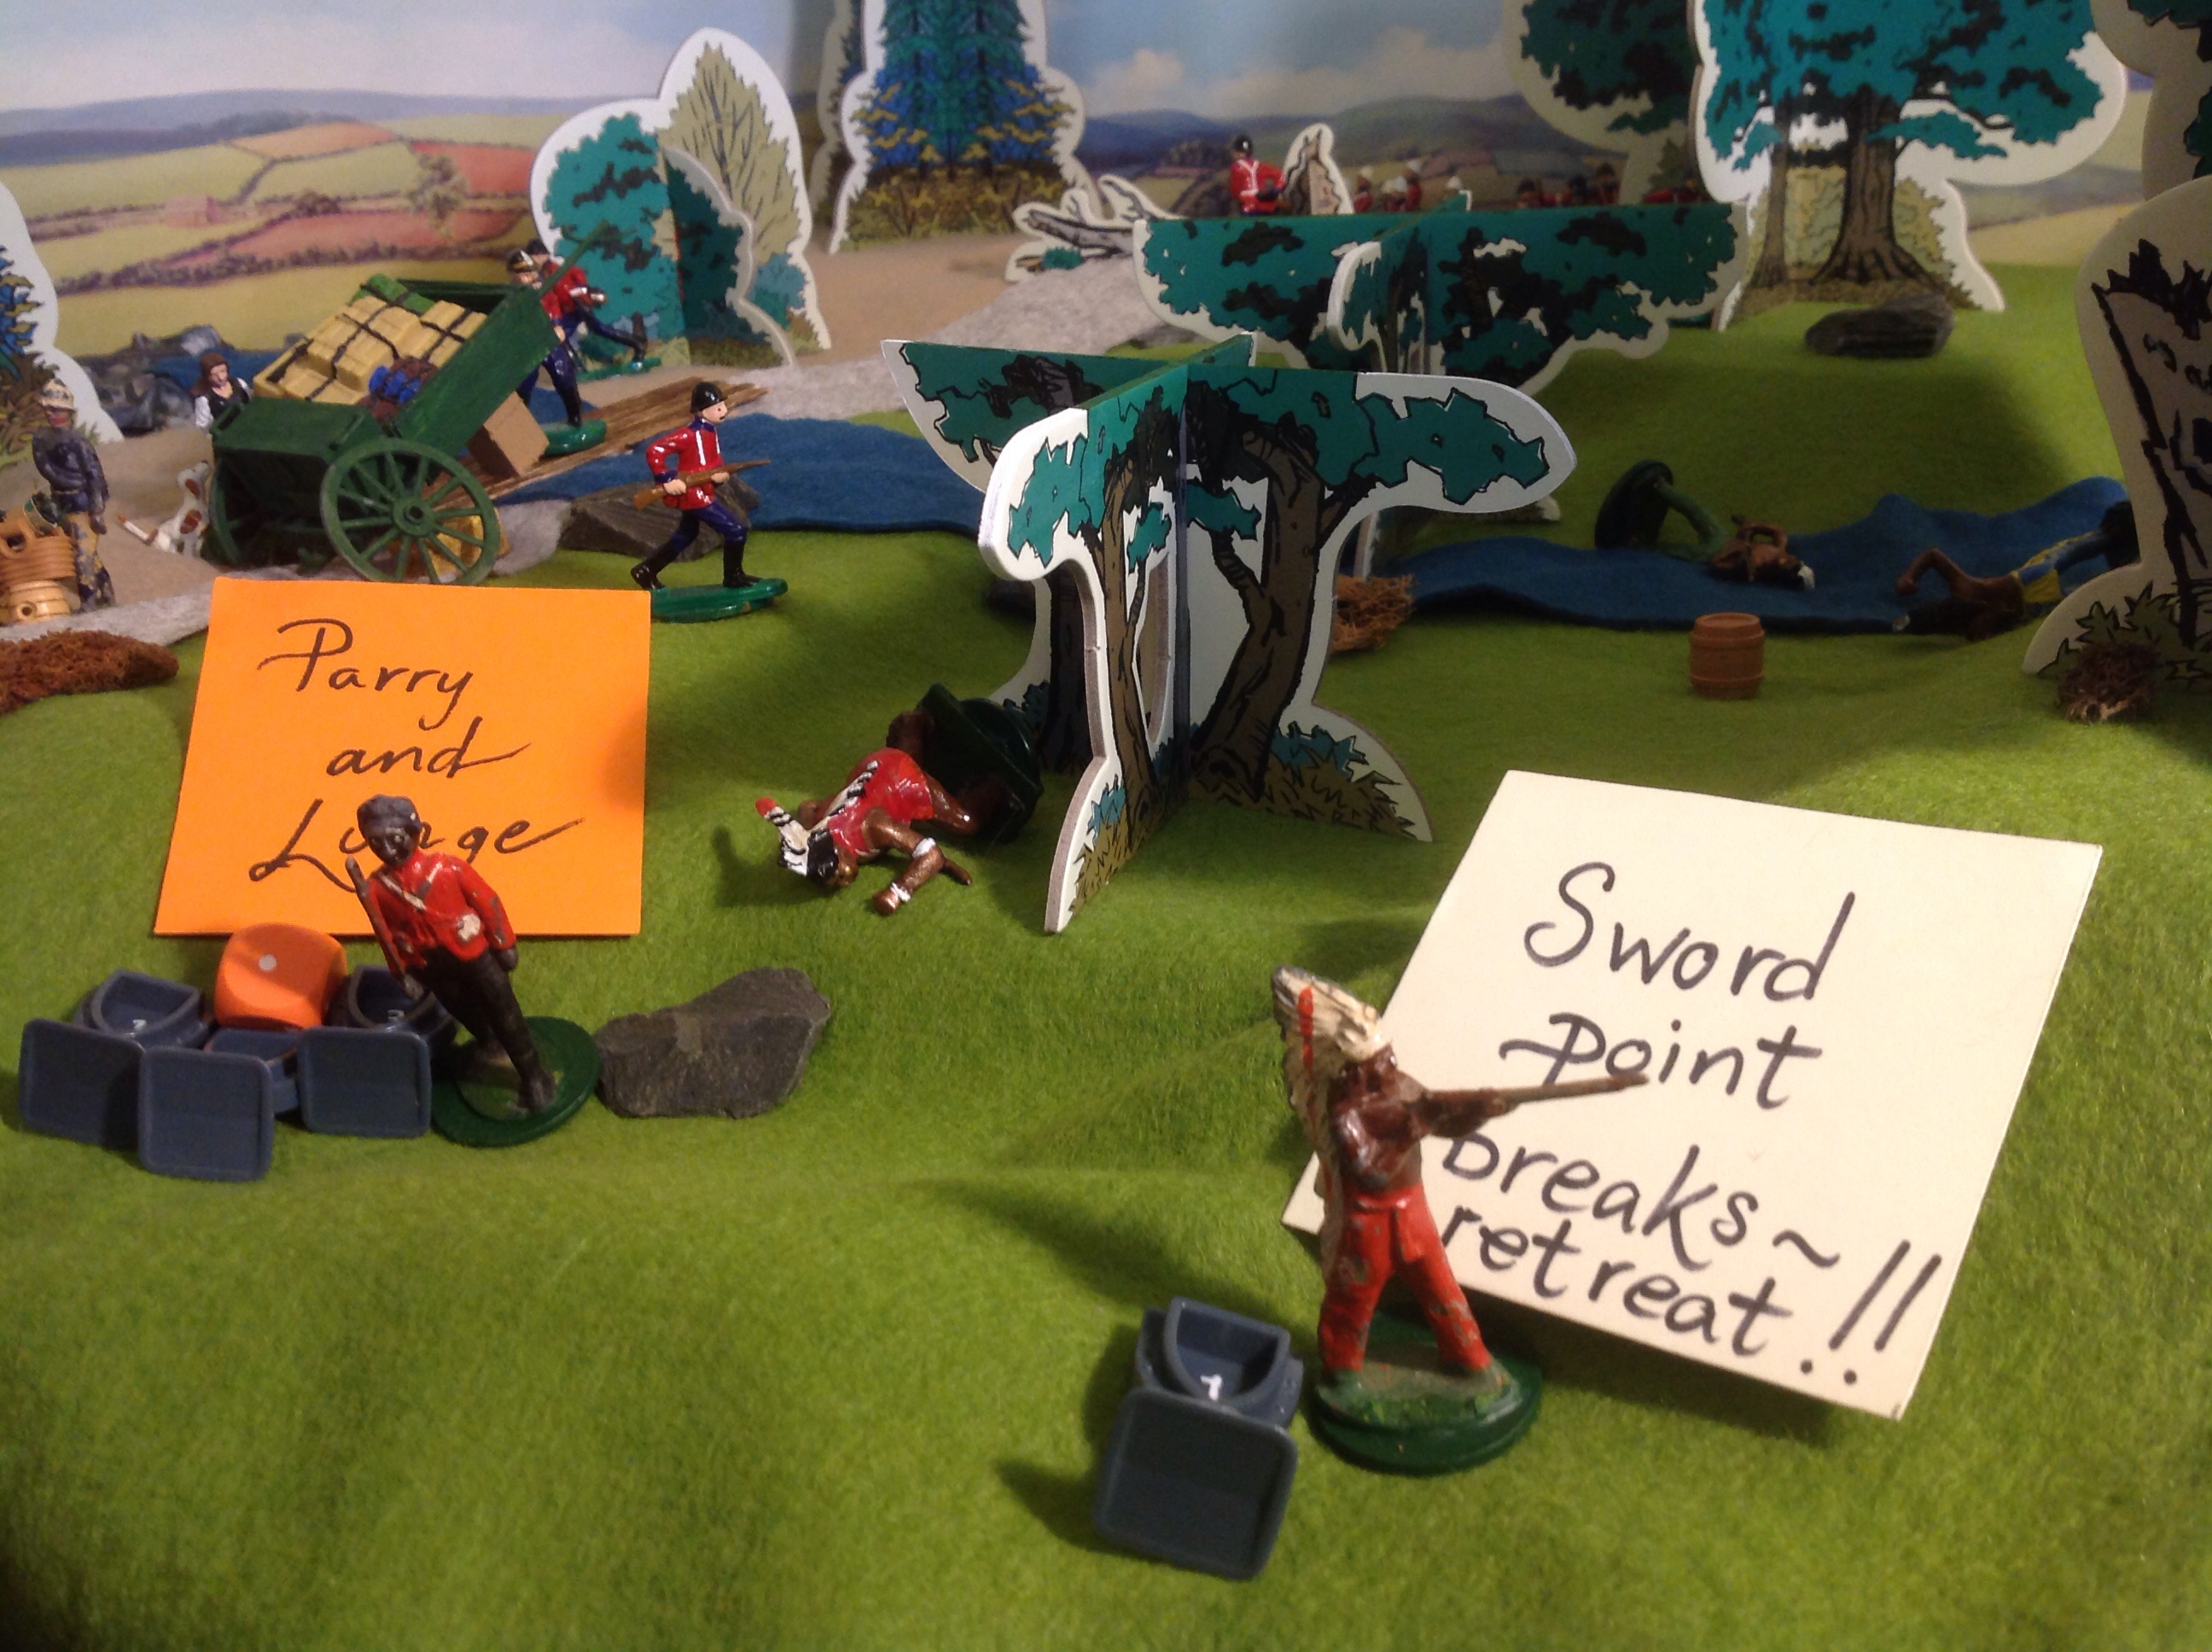
The Forests of North Gondal, 1870. A stranded wagon, its wheel off and axle broken. Awaiting rescue and surrounded, the small group of defenders listen to their Captain.
Captain Snortt of the Yestershires is busy briefing his Redcoats, drawing lines in the surface of the Forest Road with his swordpoint.
The Forest Road is a glorified name for a track to the Forest Fort and old Trading Post Fort MacGuffin to the North. Its edges were cleared of timber to make the Fort itself and also make it easier to spot an ambush.
Invading and clearing their sacred forests and hunting grounds had caused tension with the usually peaceful Forest Indians who over the years had traded and stolen many Redcoat muskets and rifles.
Snortt: “We can expect reinforcements to march from the Fort to the North here, unless Ambushed en route. Forest Indians may well appear from here and here to the East, as well as travelling in from the West. We will keep a sentry posted in cover at each point of the compass.”
Snortt: “On first sight of the enemy, fire when you sight them. Whilst it will reveal your location, we need to keep them at a distance and away from accurately counting our numbers. We need to keep them at long range and stop them from closing in too quickly. They will be sounding us out. We need to give them an idea that we have troops all around the perimeter.”
“Only when they are too close and you are likely to be surrounded, may you fall back towards the wagon using what cover you can.”
Snortt: “Meanwhile, Private Fuller and you Miss MacGuffin will remain with the wagon and try to fix the axle and wheel whilst we wait for the repair team and reinforcements from the fort. Miss MacGuffin has also volunteered along with myself to make sure you have enough ammunition.”
“We also have taken off the Wagon two small barrels of gunpowder supplied for the Fort’s cannons that we can explode if we need.”
“Good luck, Men. To your posts. You too, Miss MacGuffin.”
Snortt saluted Major MacGuffin’s daughter and hurried off to post his few men at compass points around the Wagon.
Thus began the desperate situation of the Yestershire Regiment’s daily supply column to Fort MacGuffin, broken down with a damaged wheel and axle, stranded at the plank bridge. The Forest Indian Drums have been heard and glimpses of movement amongst the trees.
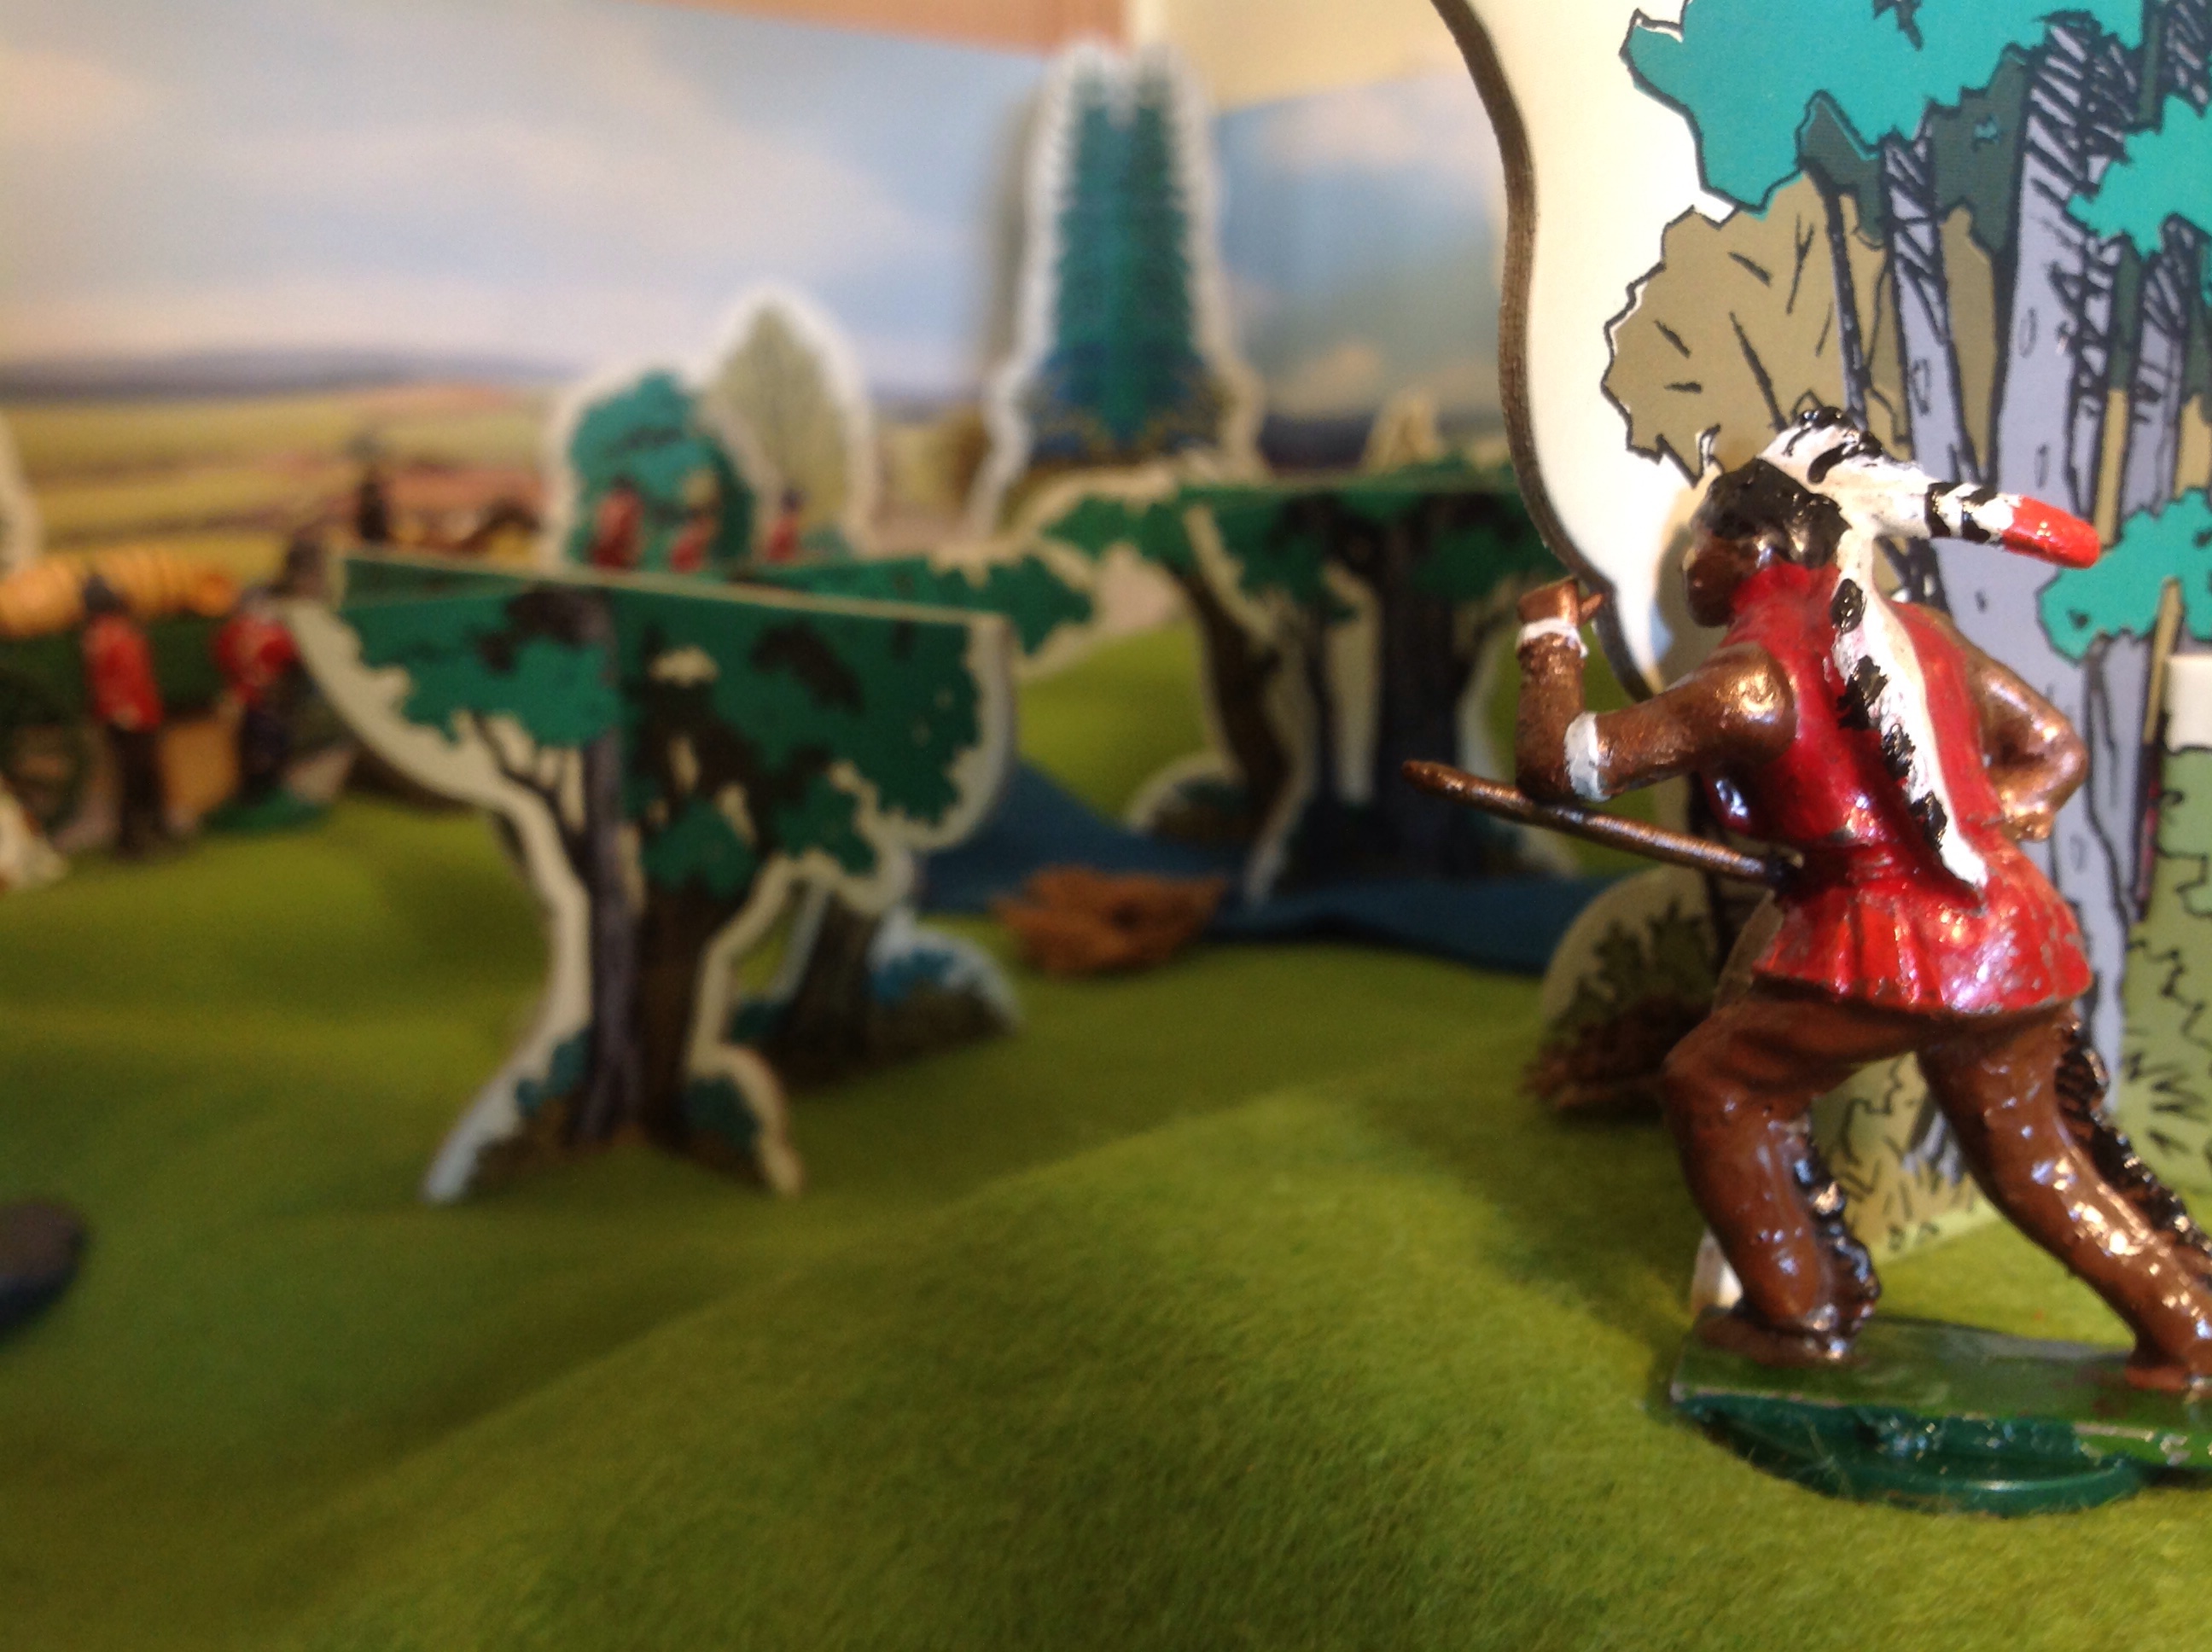
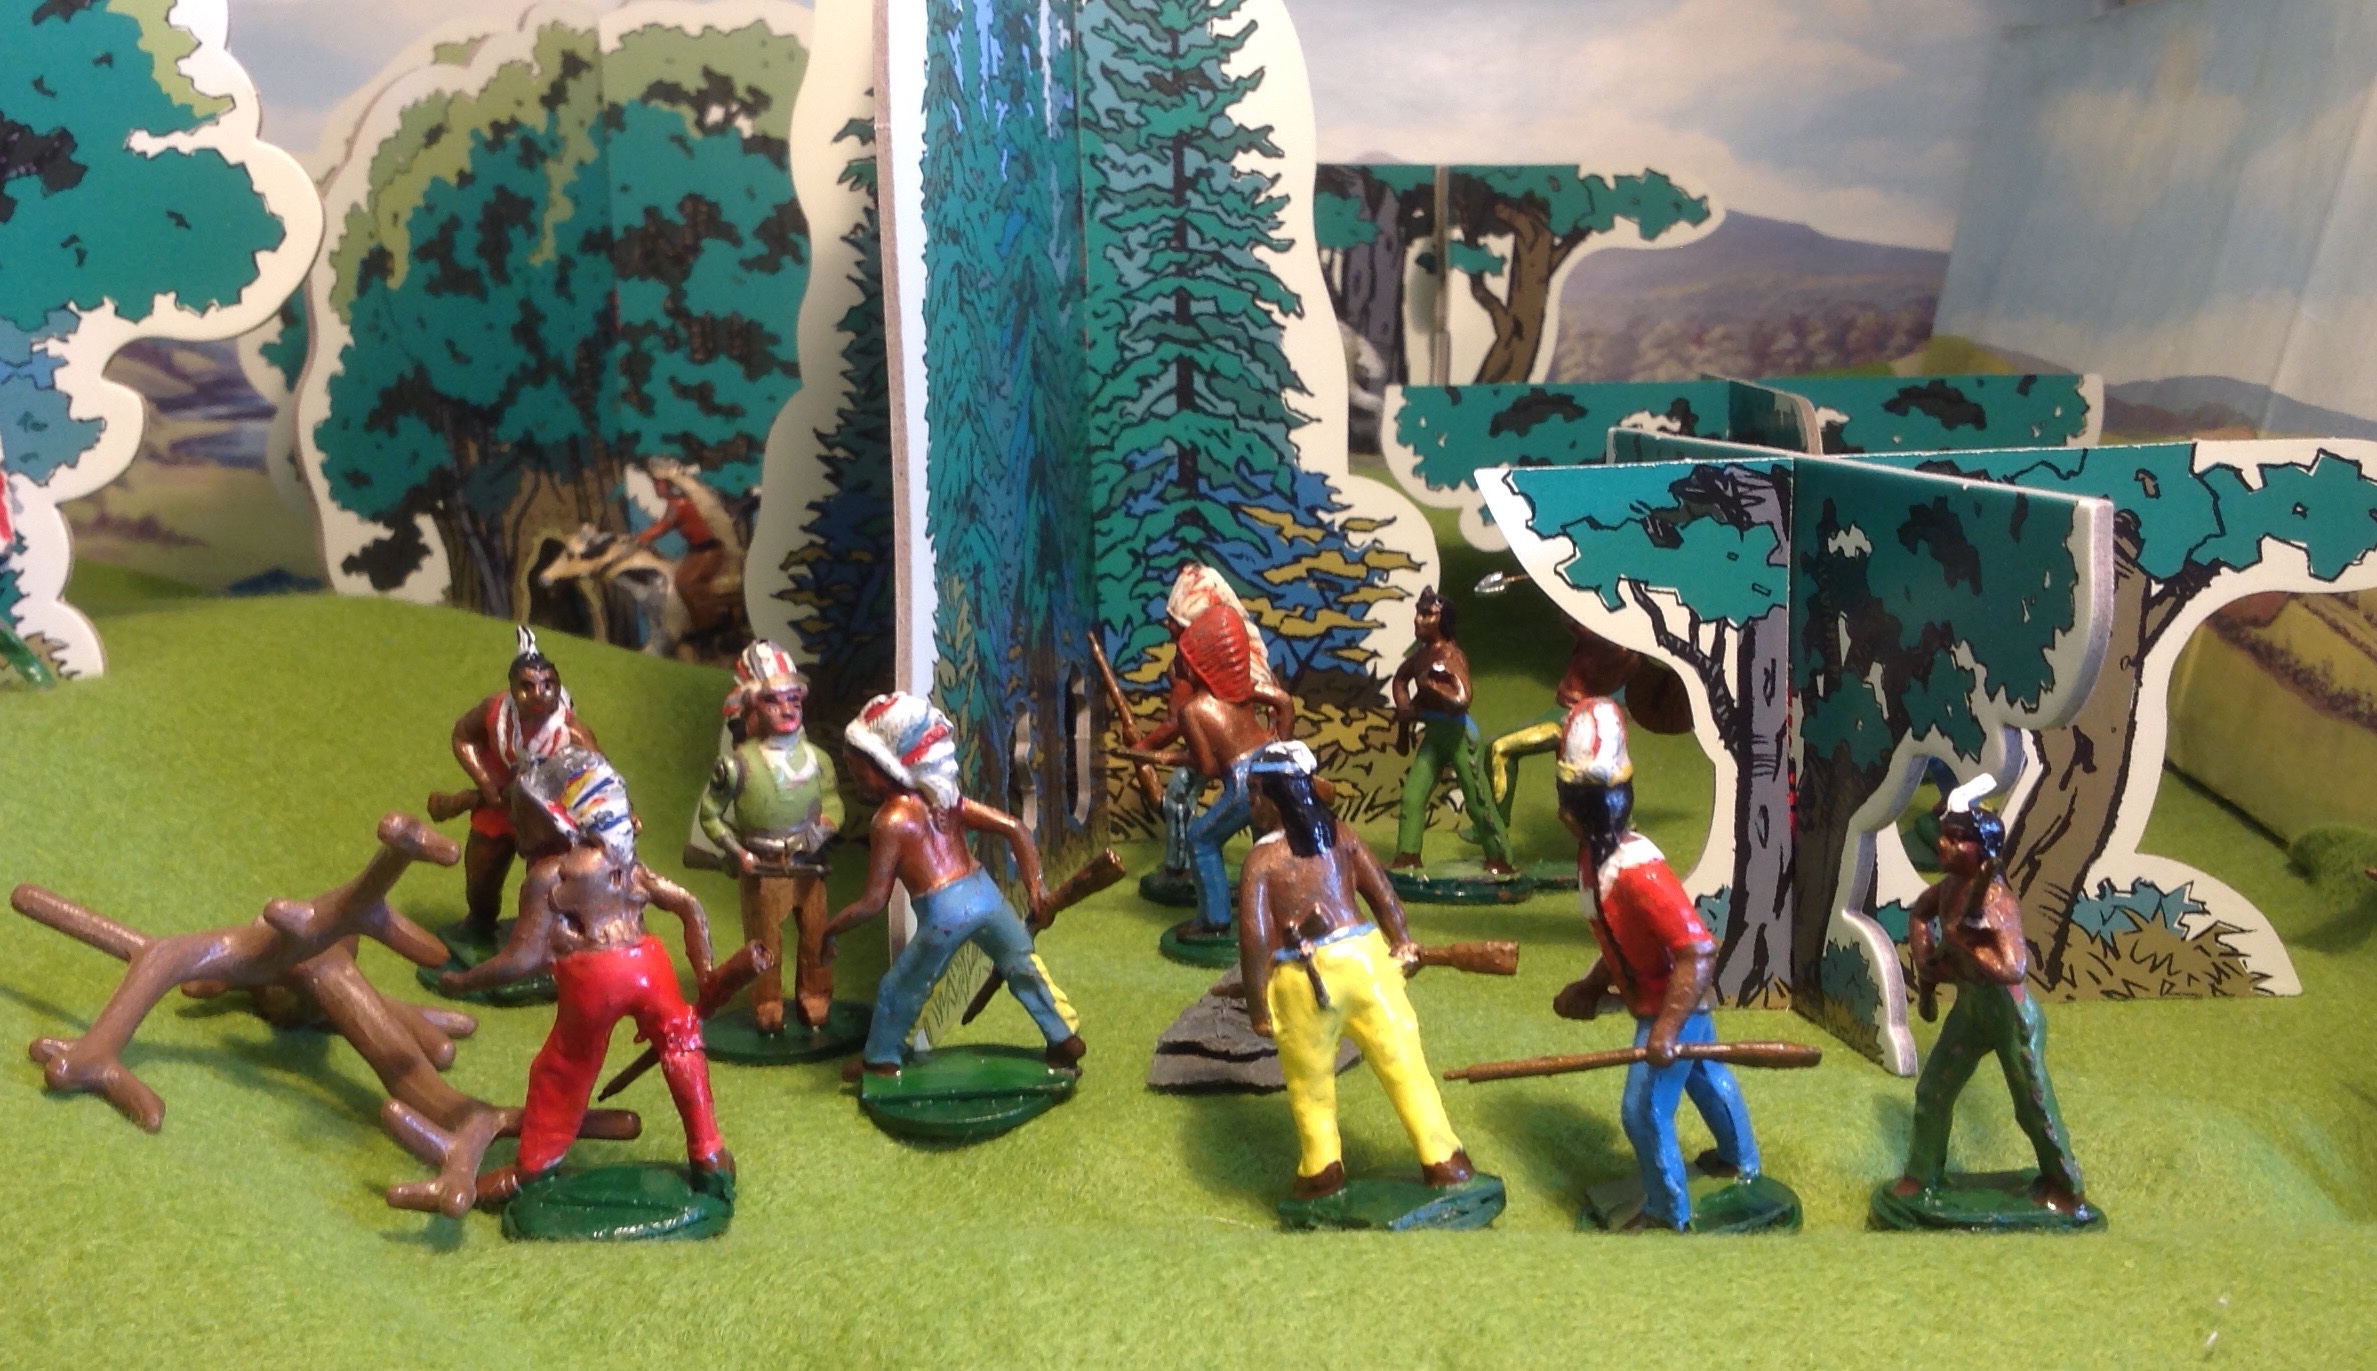
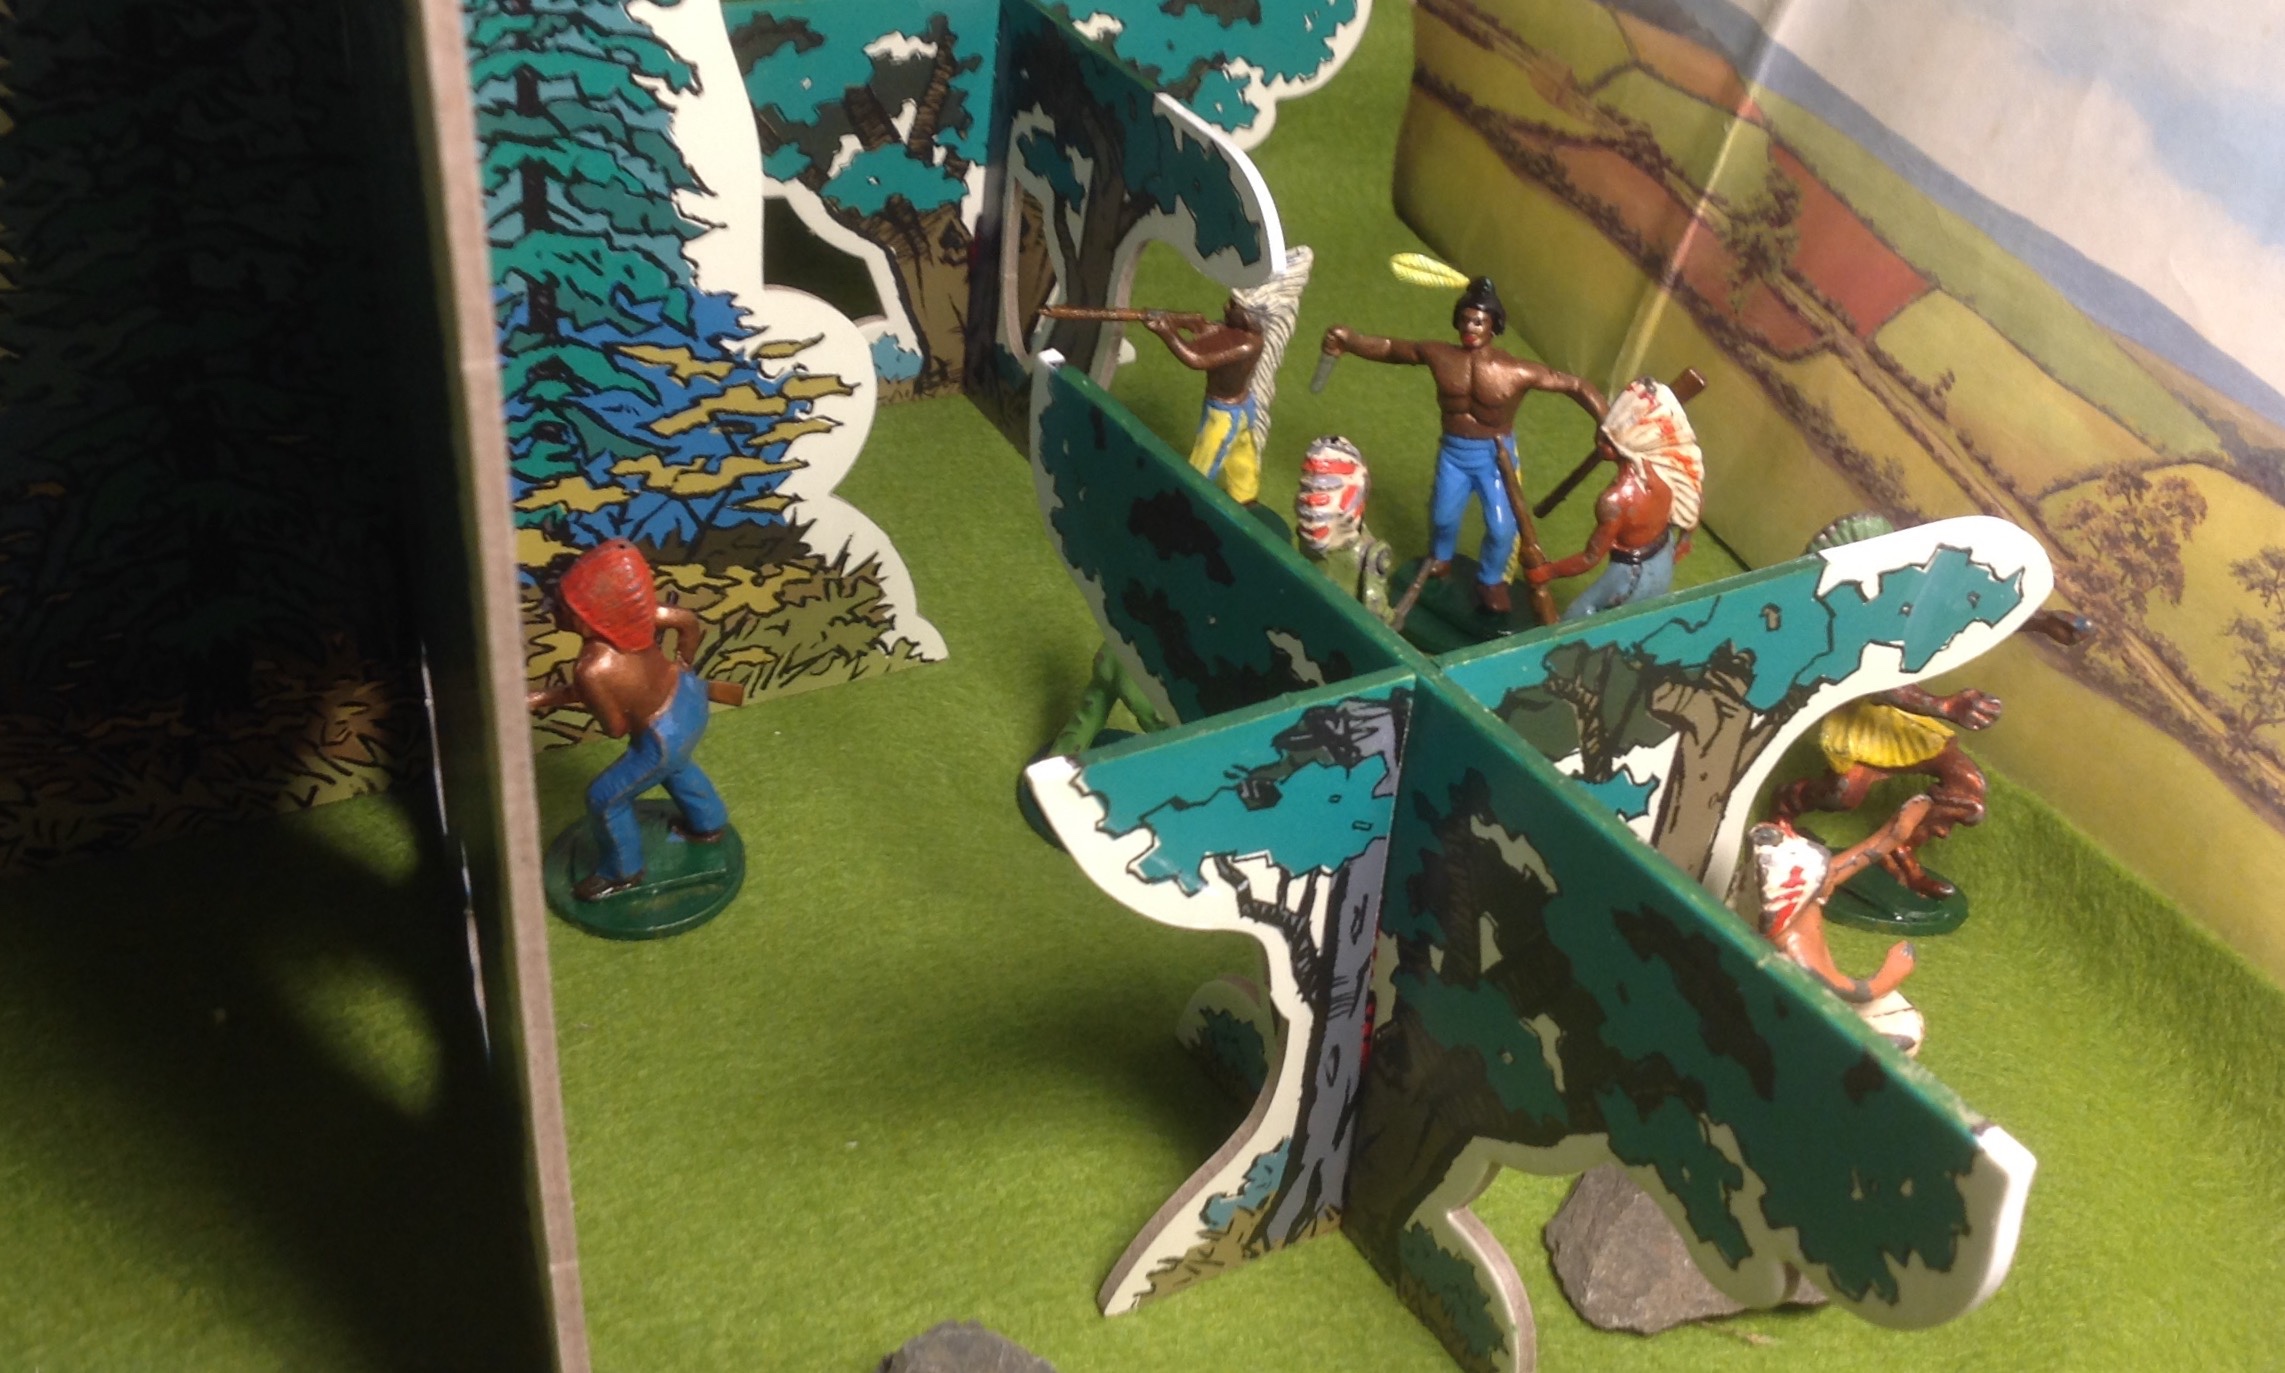
Addressing his Braves and Hunting Parties – Forest Indian Chief Old Wooden Legs
A big 54mm game in a small space.
Post 2: The Skirmish
Forest Indian Chief Old Wooden Legs spoke to his assembled braves, now arriving in the grove, from hunting parties across their forest.
Translation of Old Wooden Legs’ words: “I will split you into three groups, one to travel north and circle round to delay any reinforcements and appear to the North and the West side.
“The other two hunting parties will split up and approach through the trees and stream valley to their East.”
“We will raid their supplies, take civilian hostages to barter with the Redcoats and make the Forest Fort Warriors fearful of their supply wagons being attacked again.”
“They rely too much on their slow beast of two wheels, rather than hunting the swift beasts on four legs. The Redcoats are foolish and have not learned to live off the land as we can without destroying it.”
“When they see we can strike without warning and melt away again into the trees like spirits of the mist, maybe then they will become fearful and wise enough to leave our Forests in peace and return to their own places.”
“To your places and may the hunting go well with you!”
The Forest Indians disappeared back into the forest.
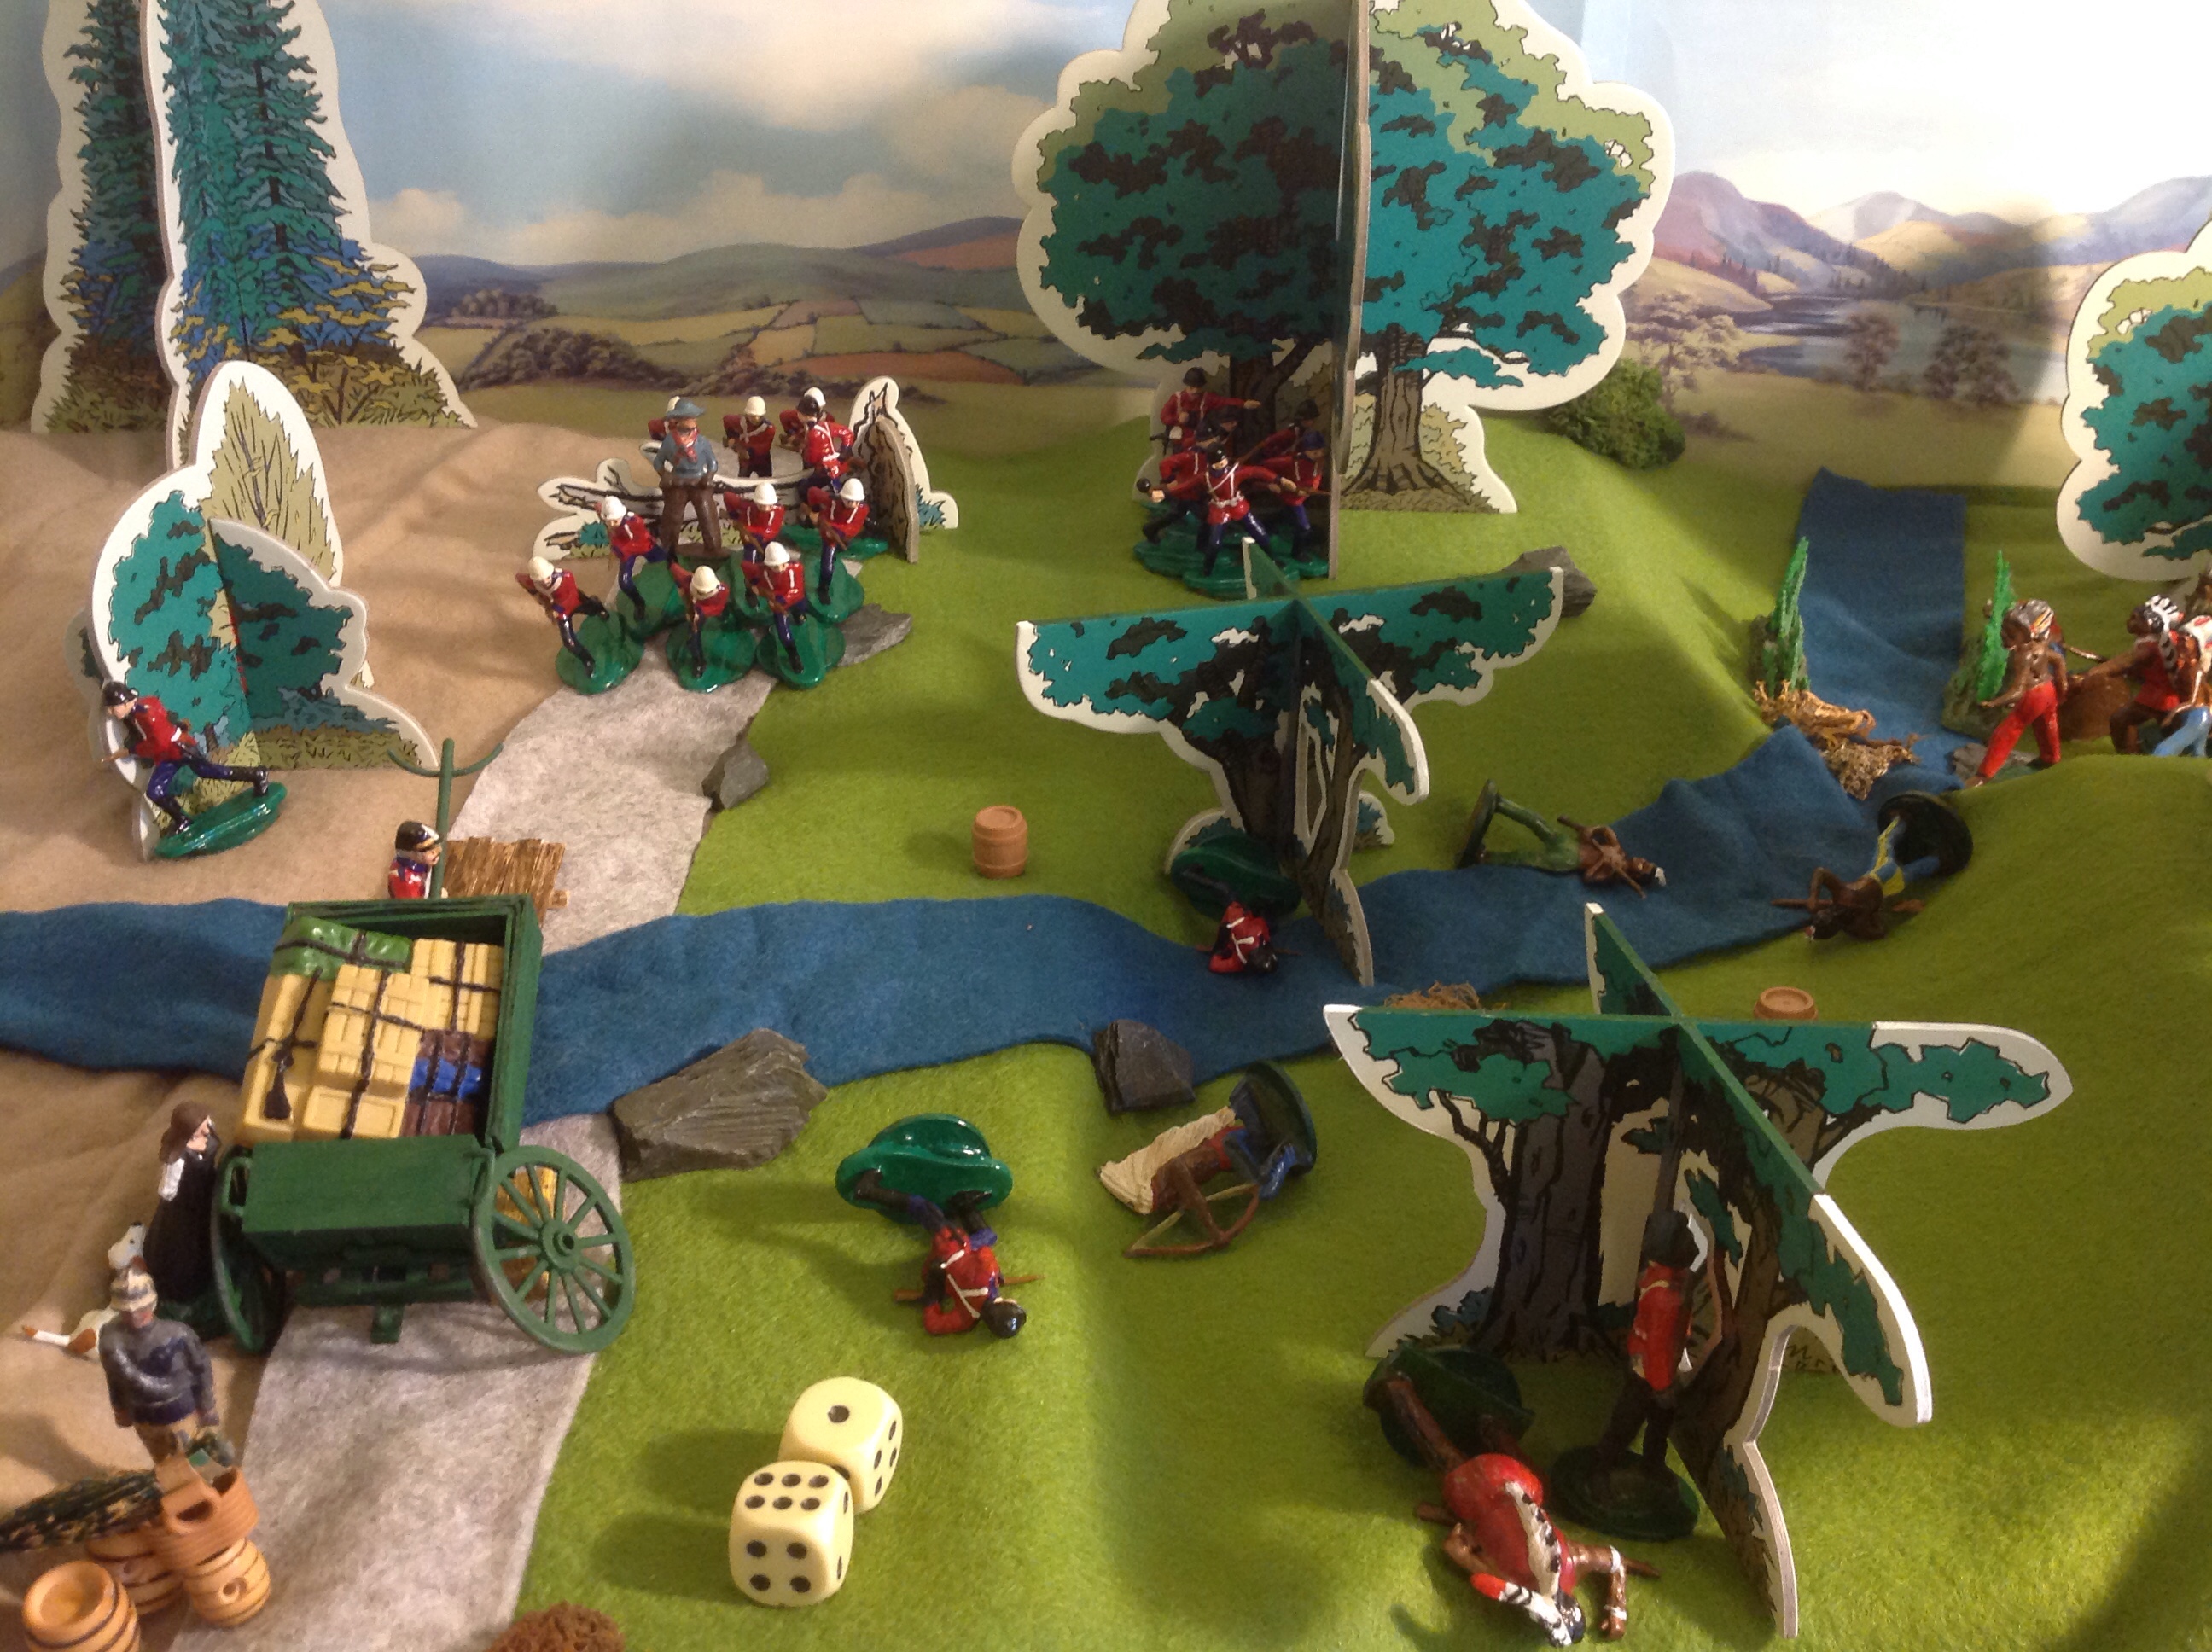
Pre-dice roll depositions
2xD6 thrown to decide when the Forest Fort reinforcements will arrive from the North forest road. On Turn 6, Snortt’s reinforcements will arrive on foot at the northern baseline at 4A.
The Forest Indians do not know how many soldiers there are with the wagon or how many will be sent to rescue them.
Snortt did not send the Major’s daughter back to the safety of the Fort on horseback as he did not know if his rider will got through with the message until he hears two of the Forest Fort guns fired in recognition. The Forest Indians will also have heard this sound echoing down the valley.
The Relief Party is setting out on foot. There is a shortage of horses and pack animals in general in Gondal in 1870 due to the ‘Tropical Yorkshire’ North Pacific climate and the horse sickness, horses not being native to the island or the four kingdoms of Gondal. The Forest Indians have become adept at stealing and hiding those horses that are imported and bred.
D6 are thrown for letter and number coordinates on the map
Forest Indian Hunting Party 1 starts out from map point D1 on Turn 1.
Hunting Party 2 from map point D4, starting out on Turn 6.
Hunting Party 3 from map point 4C starting out on Turn 10.
Wheel takes 1xd6 turns to repair once the Engineer arrives, in this case six turns.
D6 to decide if the Redcoat Relief Party appearing at Turn 6 is in one or two groups and how many turns apart. D6 1,3, 5 Apart or d6 2,4,6 Together. Dice roll says – They will arrive together.
.
Close Little Wars Rules tweak 1
Playing on a small corner table 2 foot by 4 foot meant that the generous Wells and Featherstone movement rates of 9 to 12 inches were too big and the game would come to blows too fast. This is stealthy forest movement in cluttered terrain of logs and hills, marsh and swamp. I simply cut movement rates and terrain modifiers in half but kept all weapons ranges the same. The effect is of halving each turn into two turns to reflect short skirmish times.
Going up hills, across streams and marshes really does cut into rapid movement.
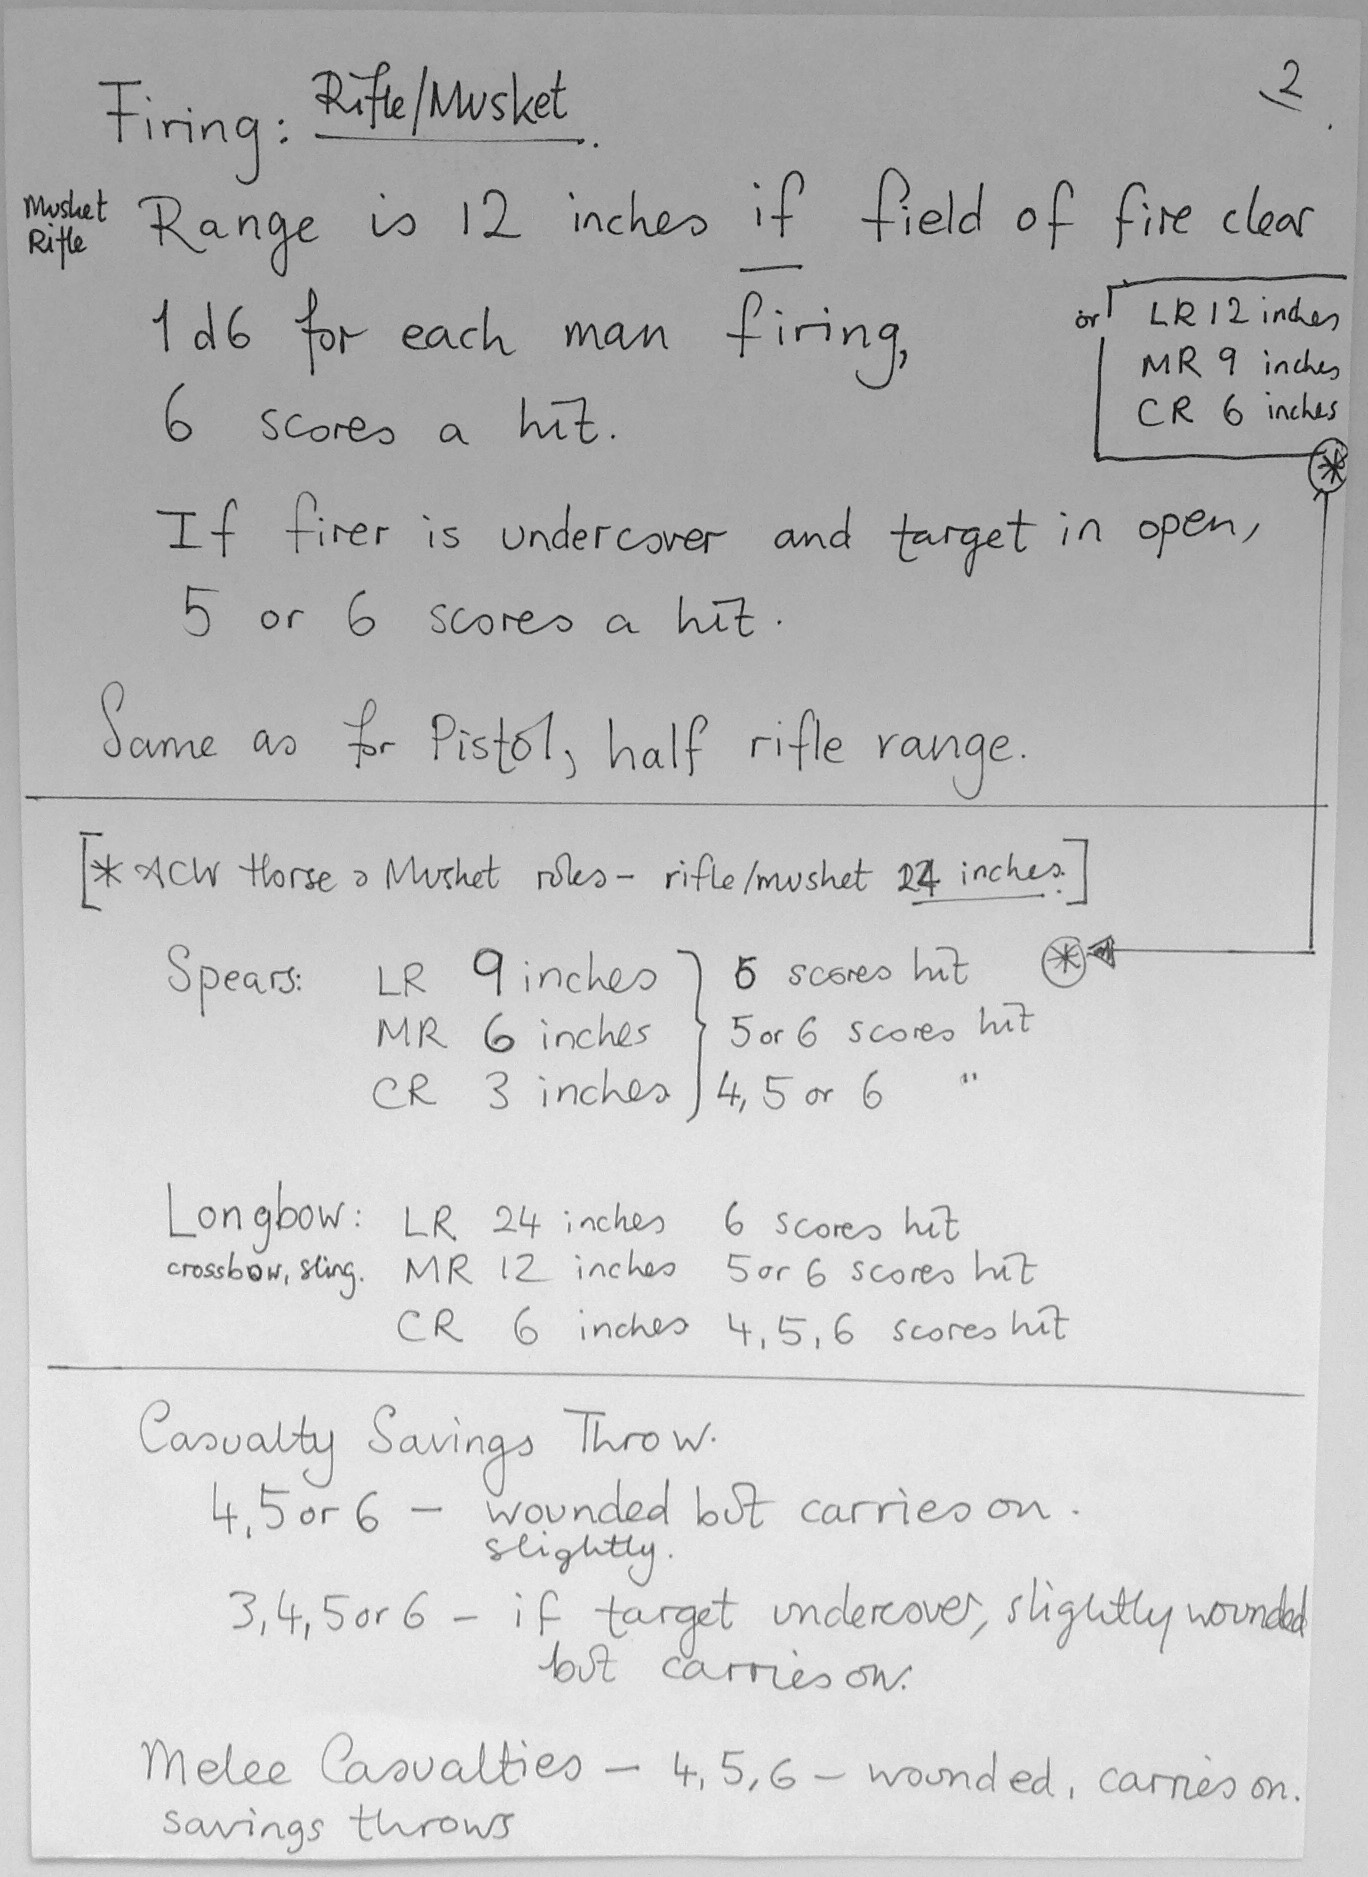
Firing from cover or sometimes blindly at cover in confined spaces and cluttered terrain of Bold Frontiers trees, hills and streams requires the dice modifiers of casualty savings throws and extras for cover or no cover. Bullets and arrows get blocked by trees and rocks.
If firer is undercover and target in open, 5 or 6 scores a hit.
Casualty Savings Throws if hit
4, 5,6 – slightly / not wounded, carries on
3, 4, 5, 6 – If target undercover, slightly / not wounded, carries on.
.
.
Turn 1 and Turn 2
Close Wars rules. IGOYUGO. Dice thrown for A who moves first, sort out melee, B who moves second, sort out melee, A shoots first, B shoots second. End of Turn.
Redcoats assume their compass positions in cover around the wagon as centre. Sentries at N, NW, E, SE, S, SW and W.
Forest Indian Hunting Party move off from D1 towards wooded hill at B1 /C1.
No shooting – none within range.
Edited and coloured maps to show Redcoat sentry and Hunting Party movements
Turn 3
First firing by Redcoat sentries to East of wagon – several hits on Forest Indians along the stream bed B3/C3. One killed, others saved by casualty savings throws.
Turn 4
Further exchanges of fire between both sides sees another Forest Indian killed by the stream.
Turn 4 and two Forest Indians from Hunting Party 1 have fallen
Turn 4
Position of Indians on Wooded Hill revealed when firing at the Redcoat sentries SE.
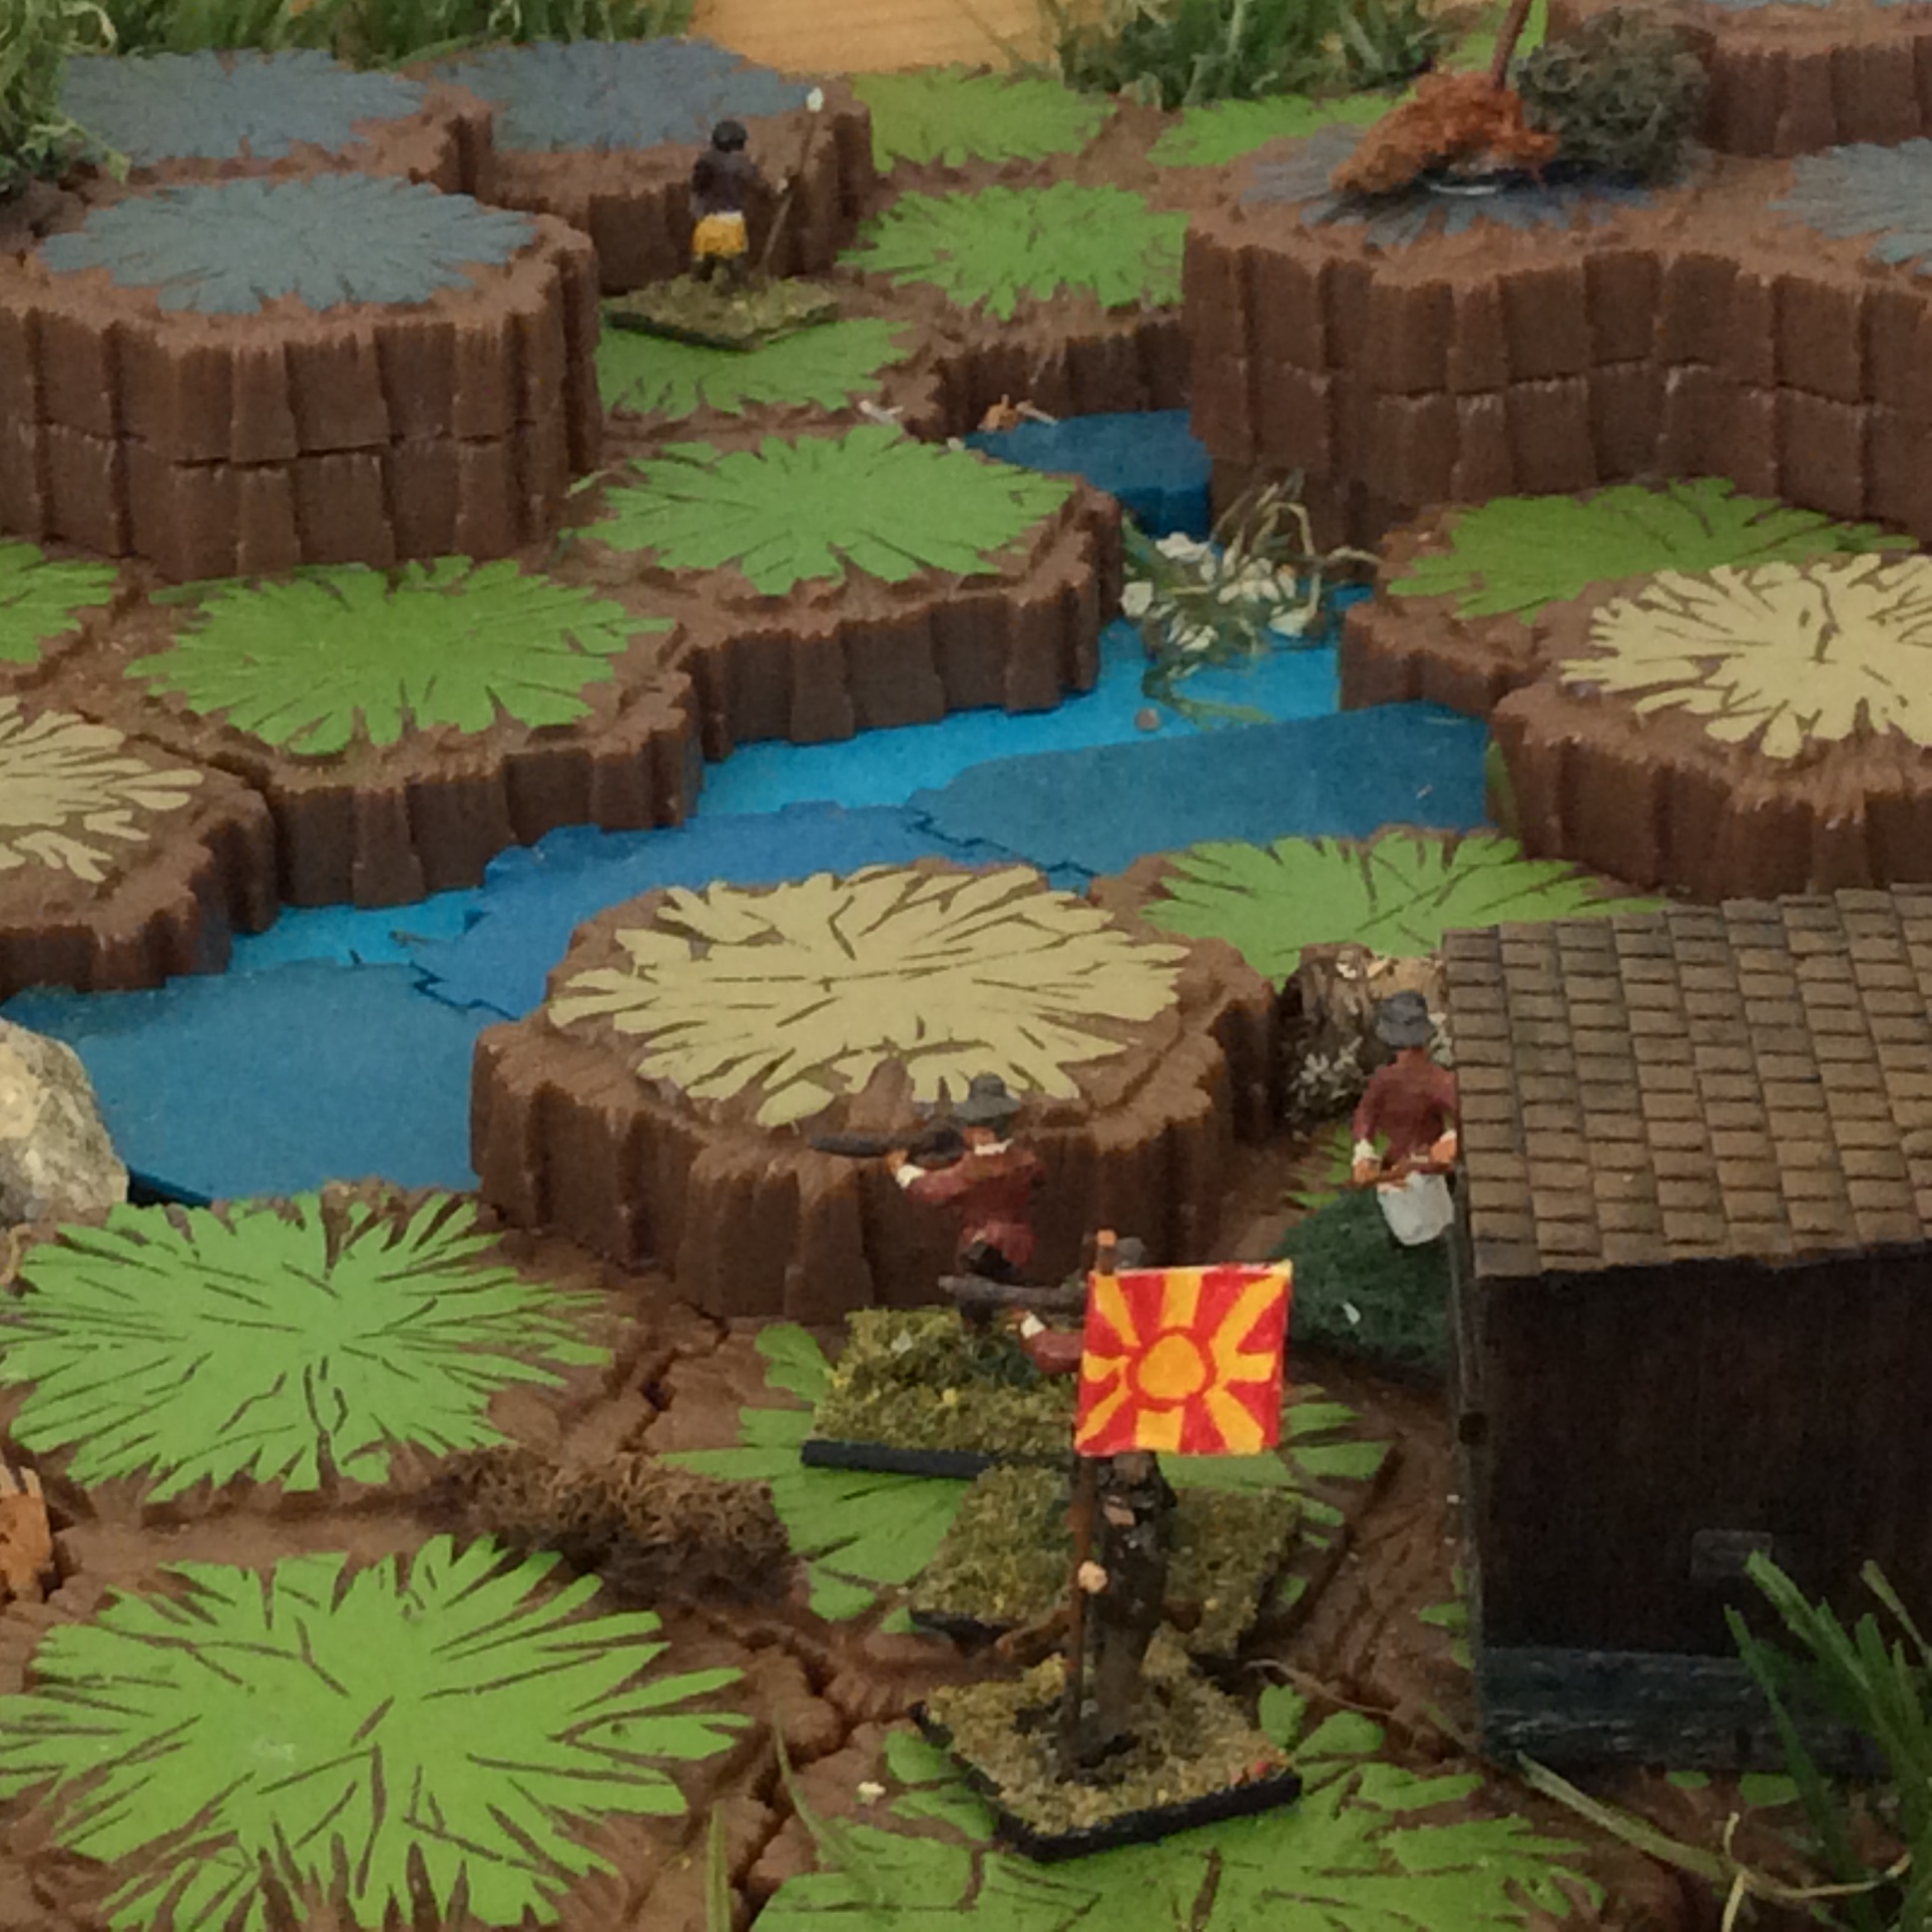
Turn 5
Both parts of Hunting Party 1 are now moving in from the stream bed and downhill from the wooded hill, firing on the Redcoat sentries at E and SE positions. The Redcoat sentry at East by the stream is killed. Third Indian in the stream bed area is killed by Redcoat fire.
However three Forest Indians are closing in on the wagon, close to sentry posts around the E and SE positions.
Aware of the risk, Captain Snortt and Miss MacGuffin draw rifles from the wagon and stand behind it, ready to see off any marauding Forest Indians from raiding the supplies and taking Miss MacGuffin hostage.
Turn 6
Relief party of the Yestershires sighted in the distance on the road coming up the hill.
However the immediate threat remains the three Forest Indians getting close to the wagon. Two Indians engage the Redcoat sentry at SE (the Redcoat with the turban) in Melee.
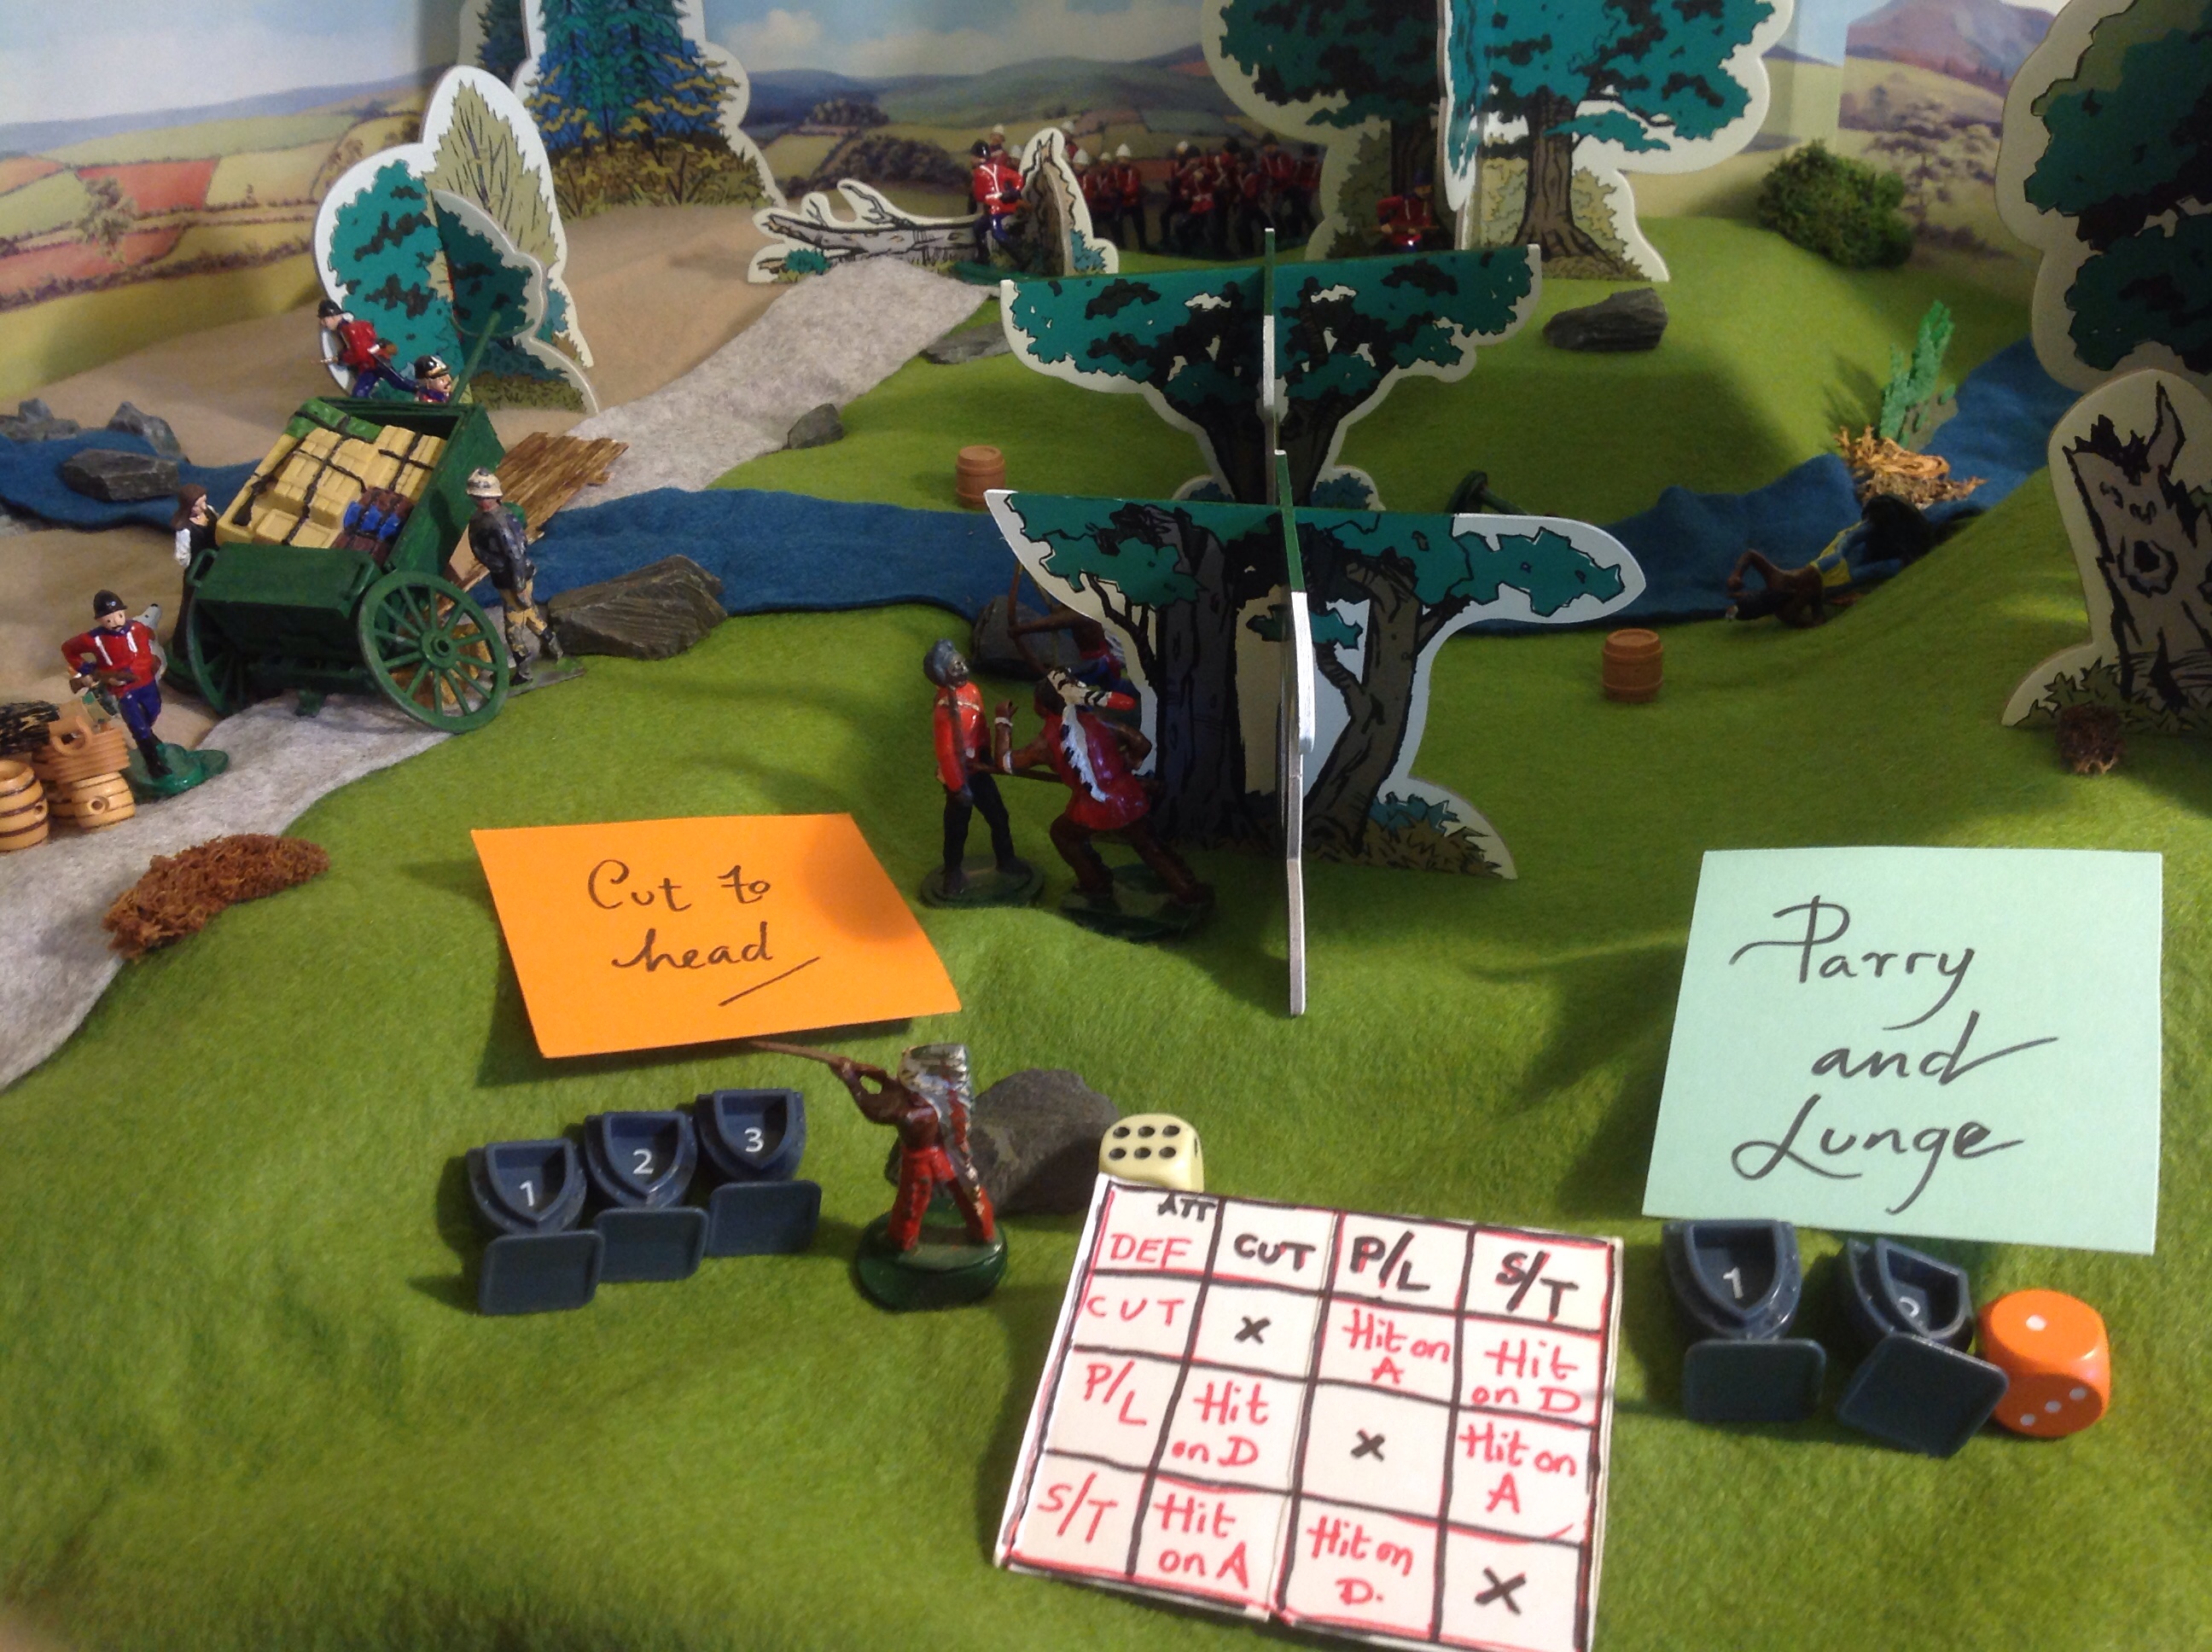
Point markers for duelling from the old Heroscape Game.
The Hunting Party moves in on the wagon – Miss MacGuffin and Captain Snortt unpack rifles.
Redcoat sentries to the southeast engage in hand to hand duelling with rifles and bayonets. Three life points given to each, attacker is the Indian. Card each detailing at random which blows and blocking blows are dealt are hit points removed. The Redcoat Sentry at SE sees off first one Indian, then the second Indian closes in.
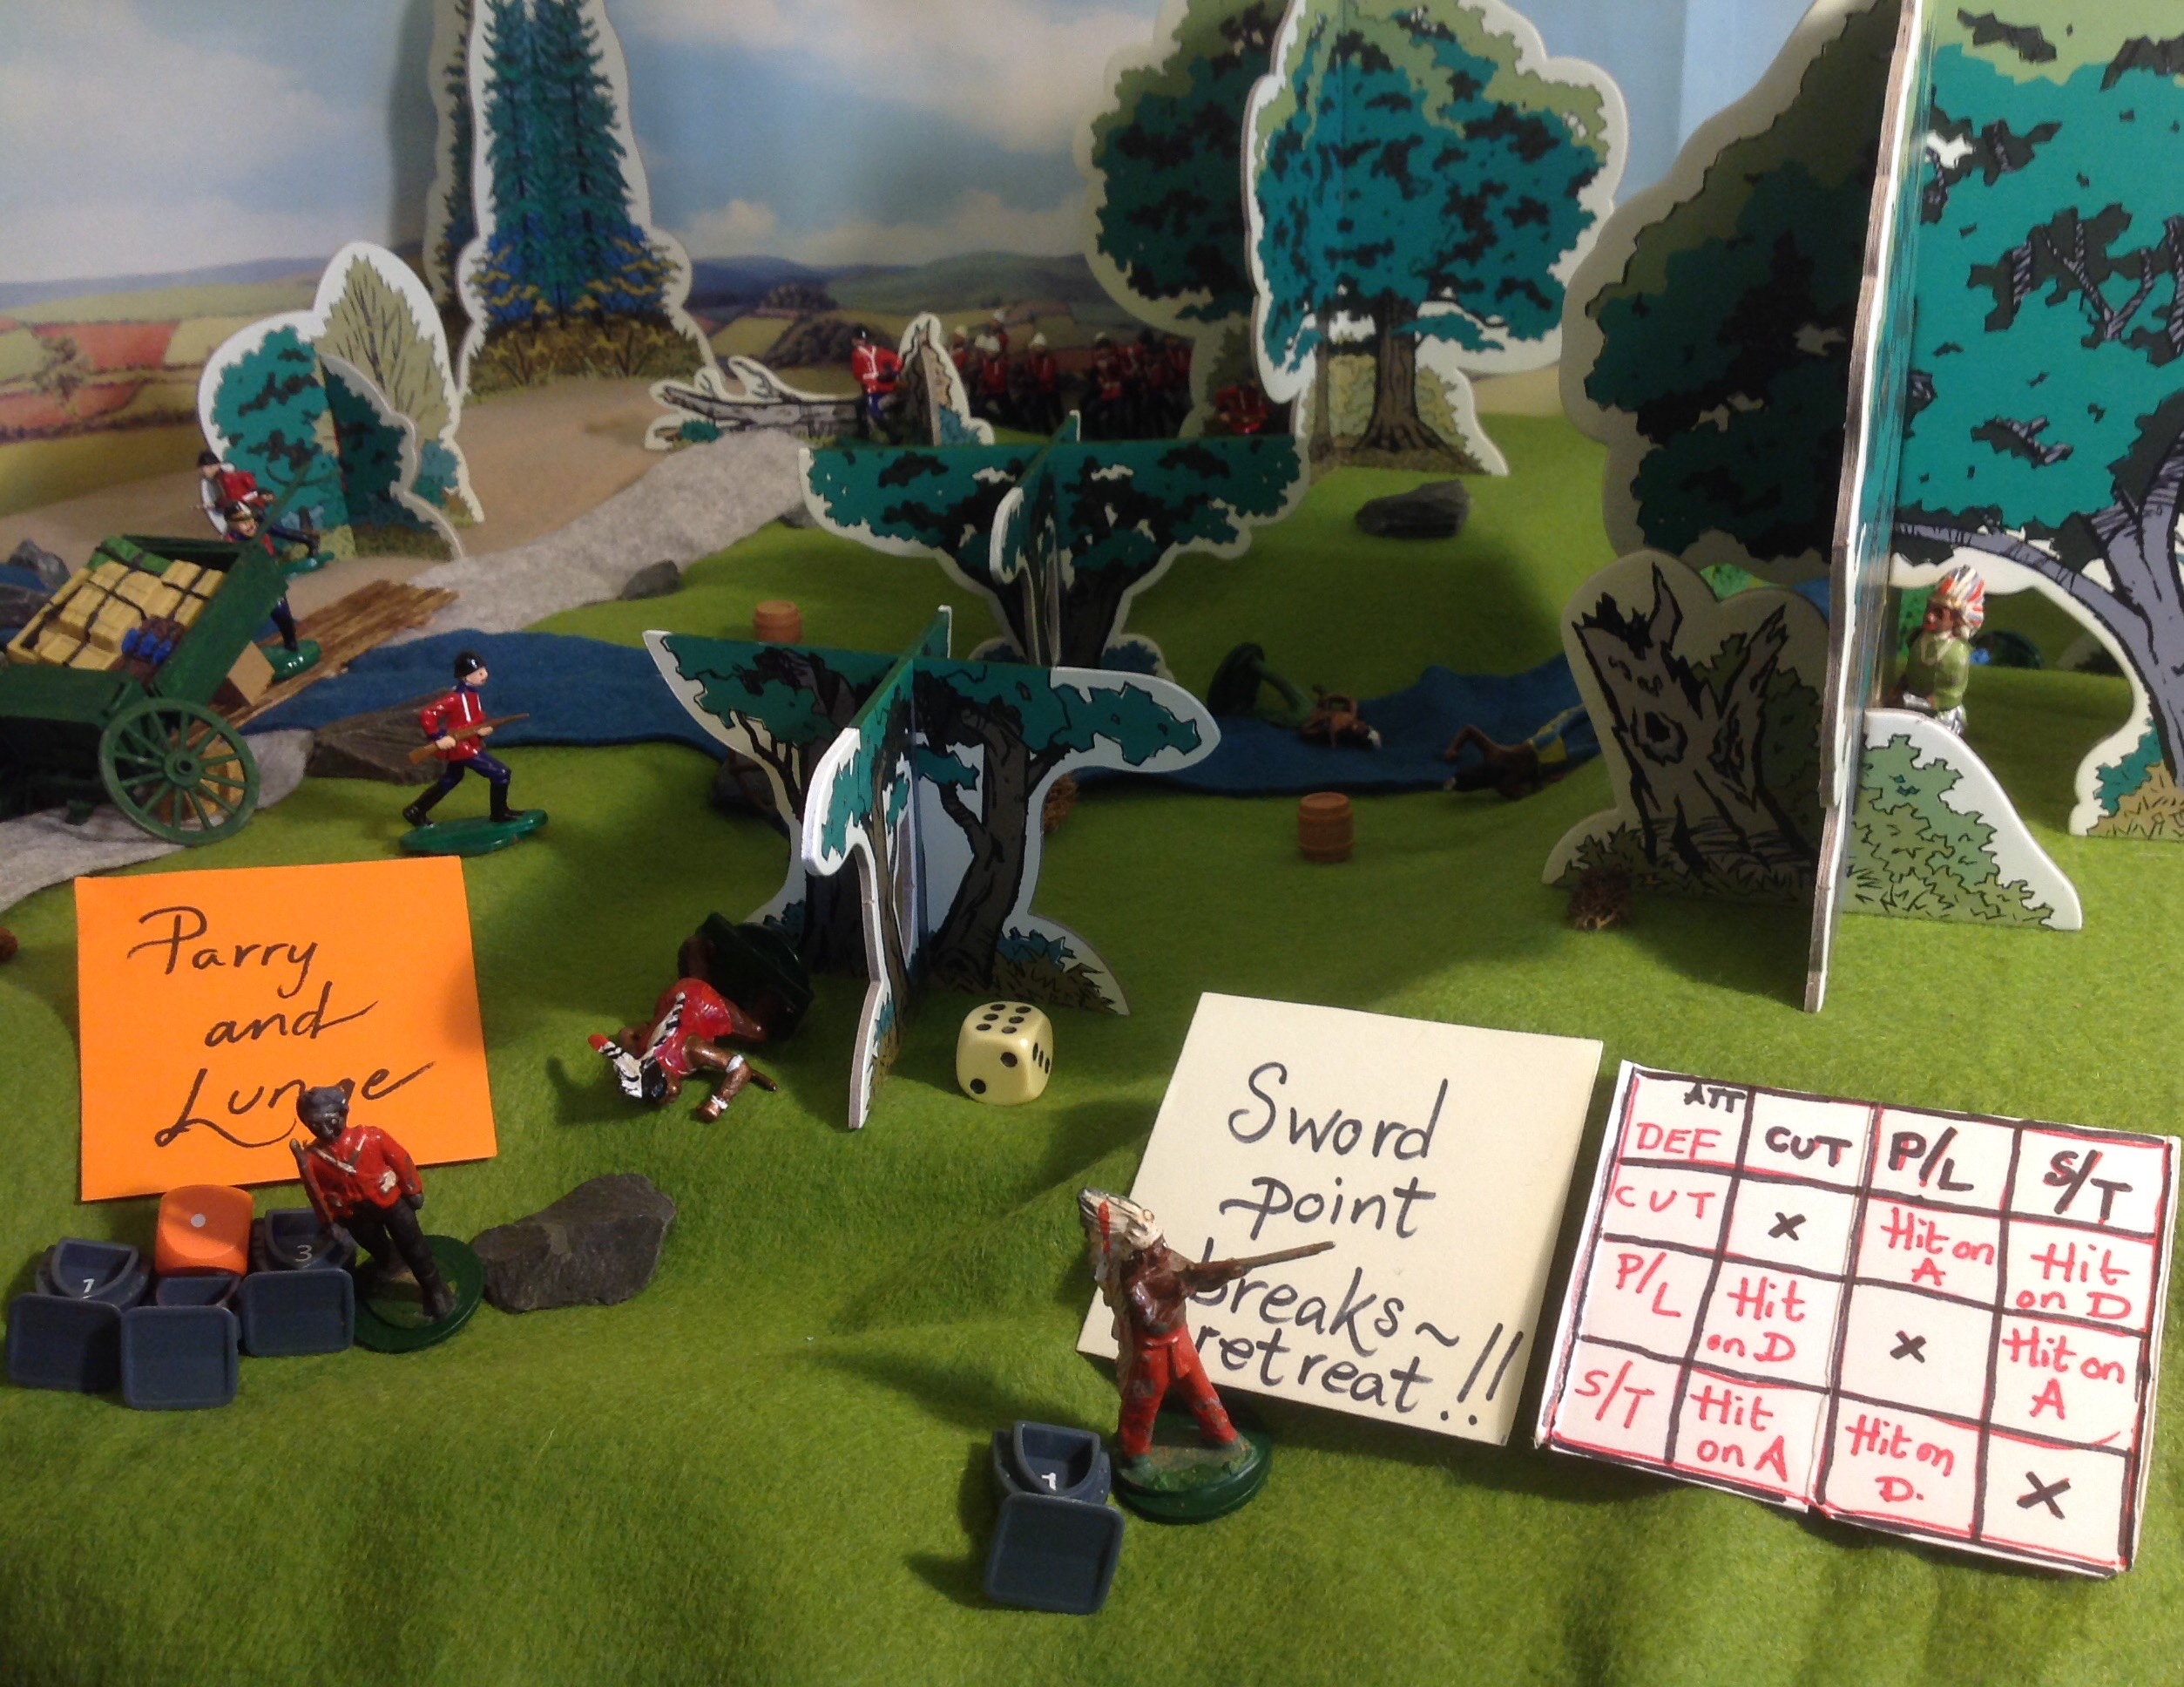
Melee Duel 2 – cards reset, melee begins and one of the random cards sees the second Forest Indian retreat, his weapon broken.
A lucky escape for the Indian – retreat with a damaged weapon. Chief Old Wooden Legs keeps watch.
Over the next few turns, the retreating Indian heads back up the wooded hill for safety to join Chief Old Wooden Legs, where he looks to pick up a spare musket or rifle from one of his fallen comrades.
The sentry due south on the road rushes over to cover the fallen E. sentry and is brought down by the Indian archer.
However Captain Snortt and Miss MacGuffin steady their rifles from behind the wagon and aim at the archer. He is brought down by Captain Snortt’s first shot, removing the nearest threat to the wagon and its defenders.
Turn 7
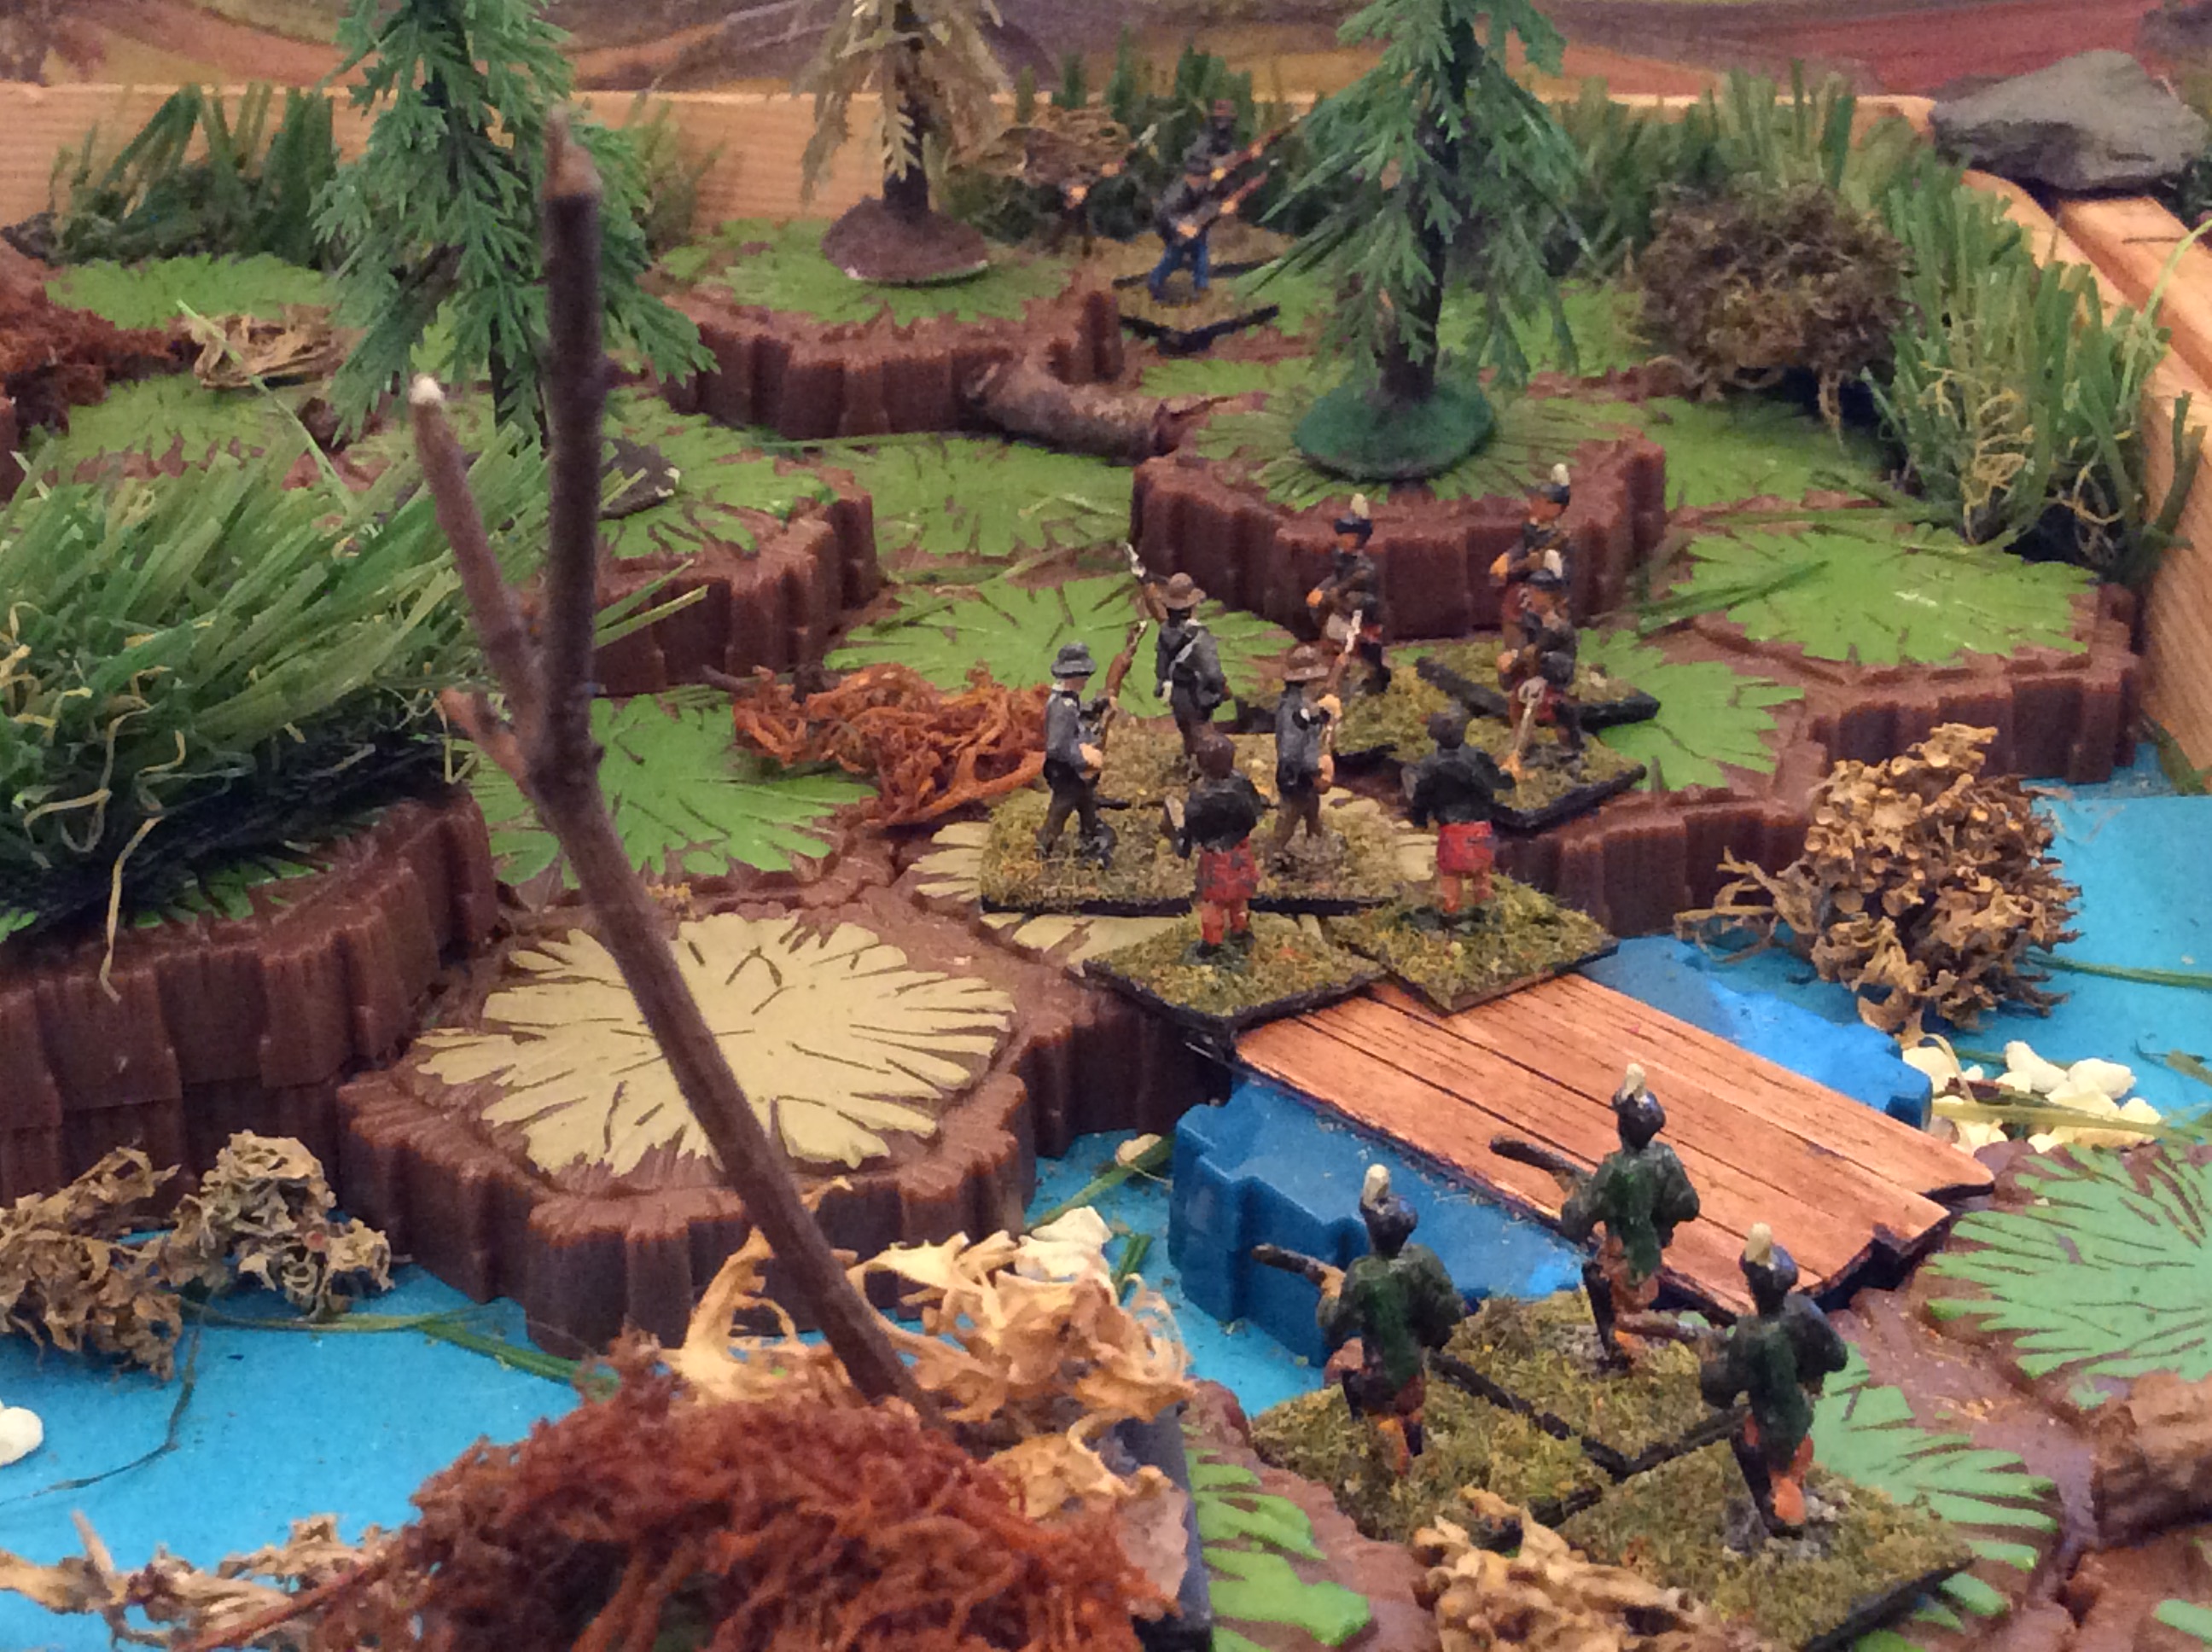
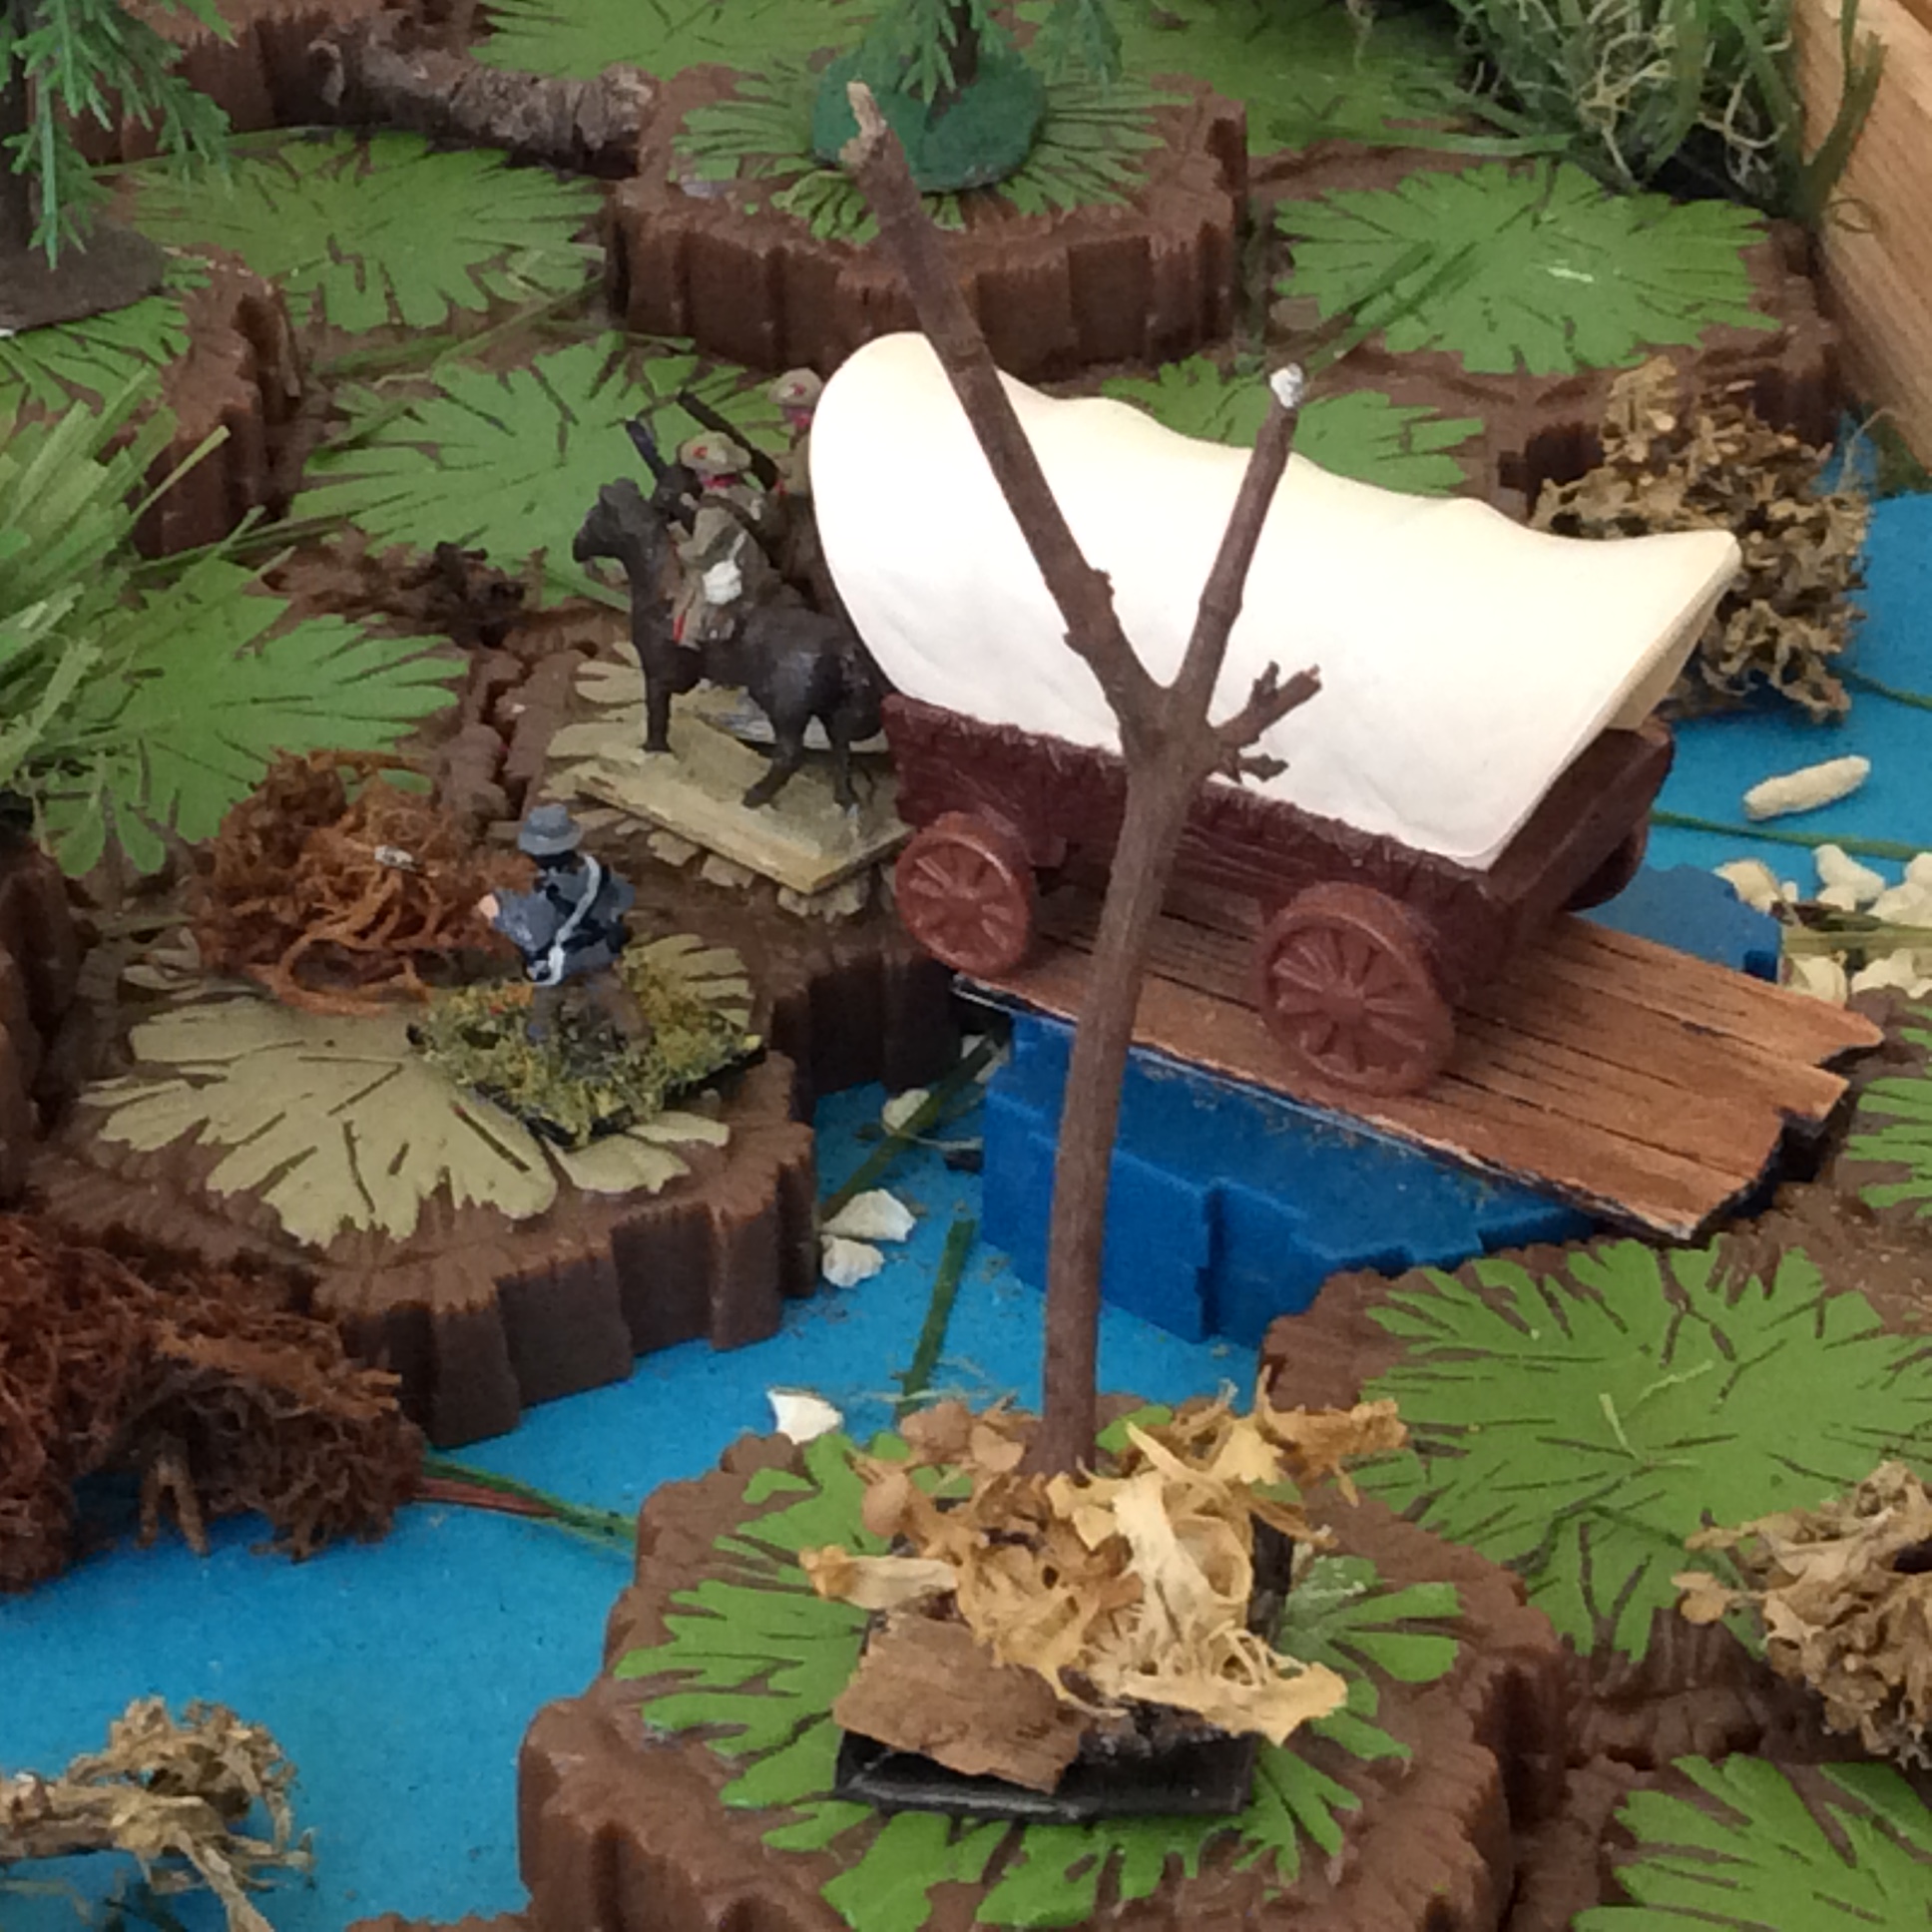
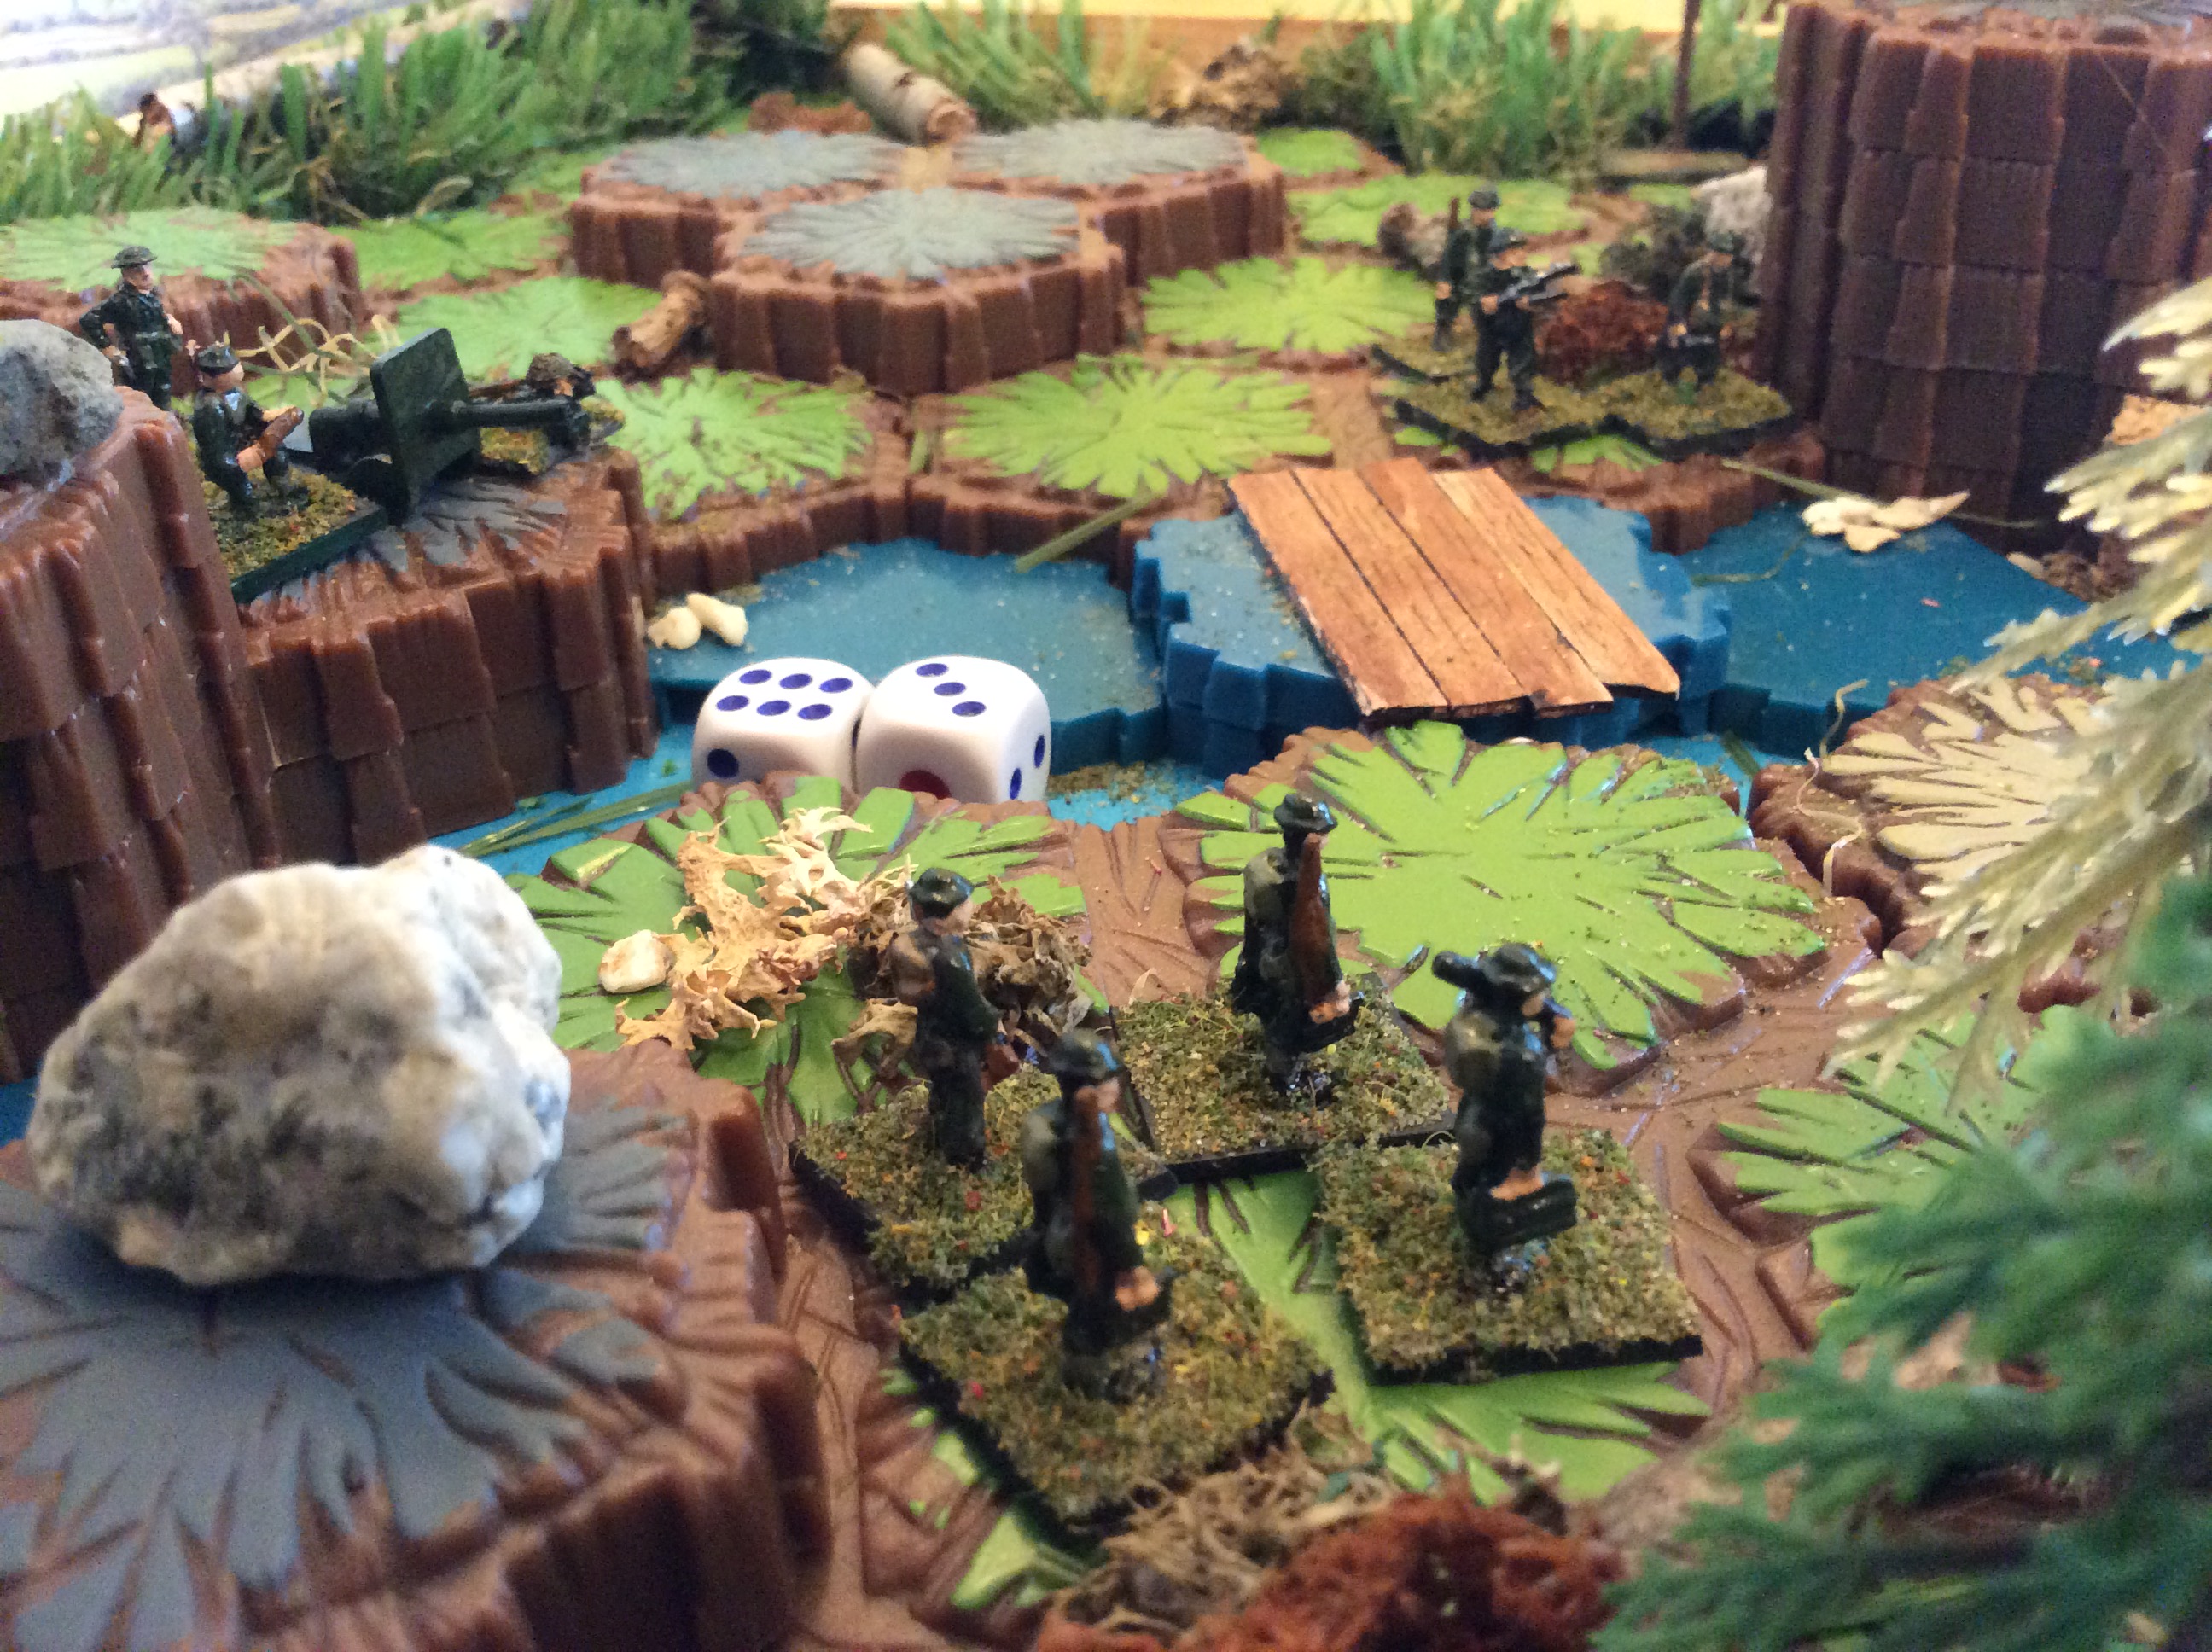
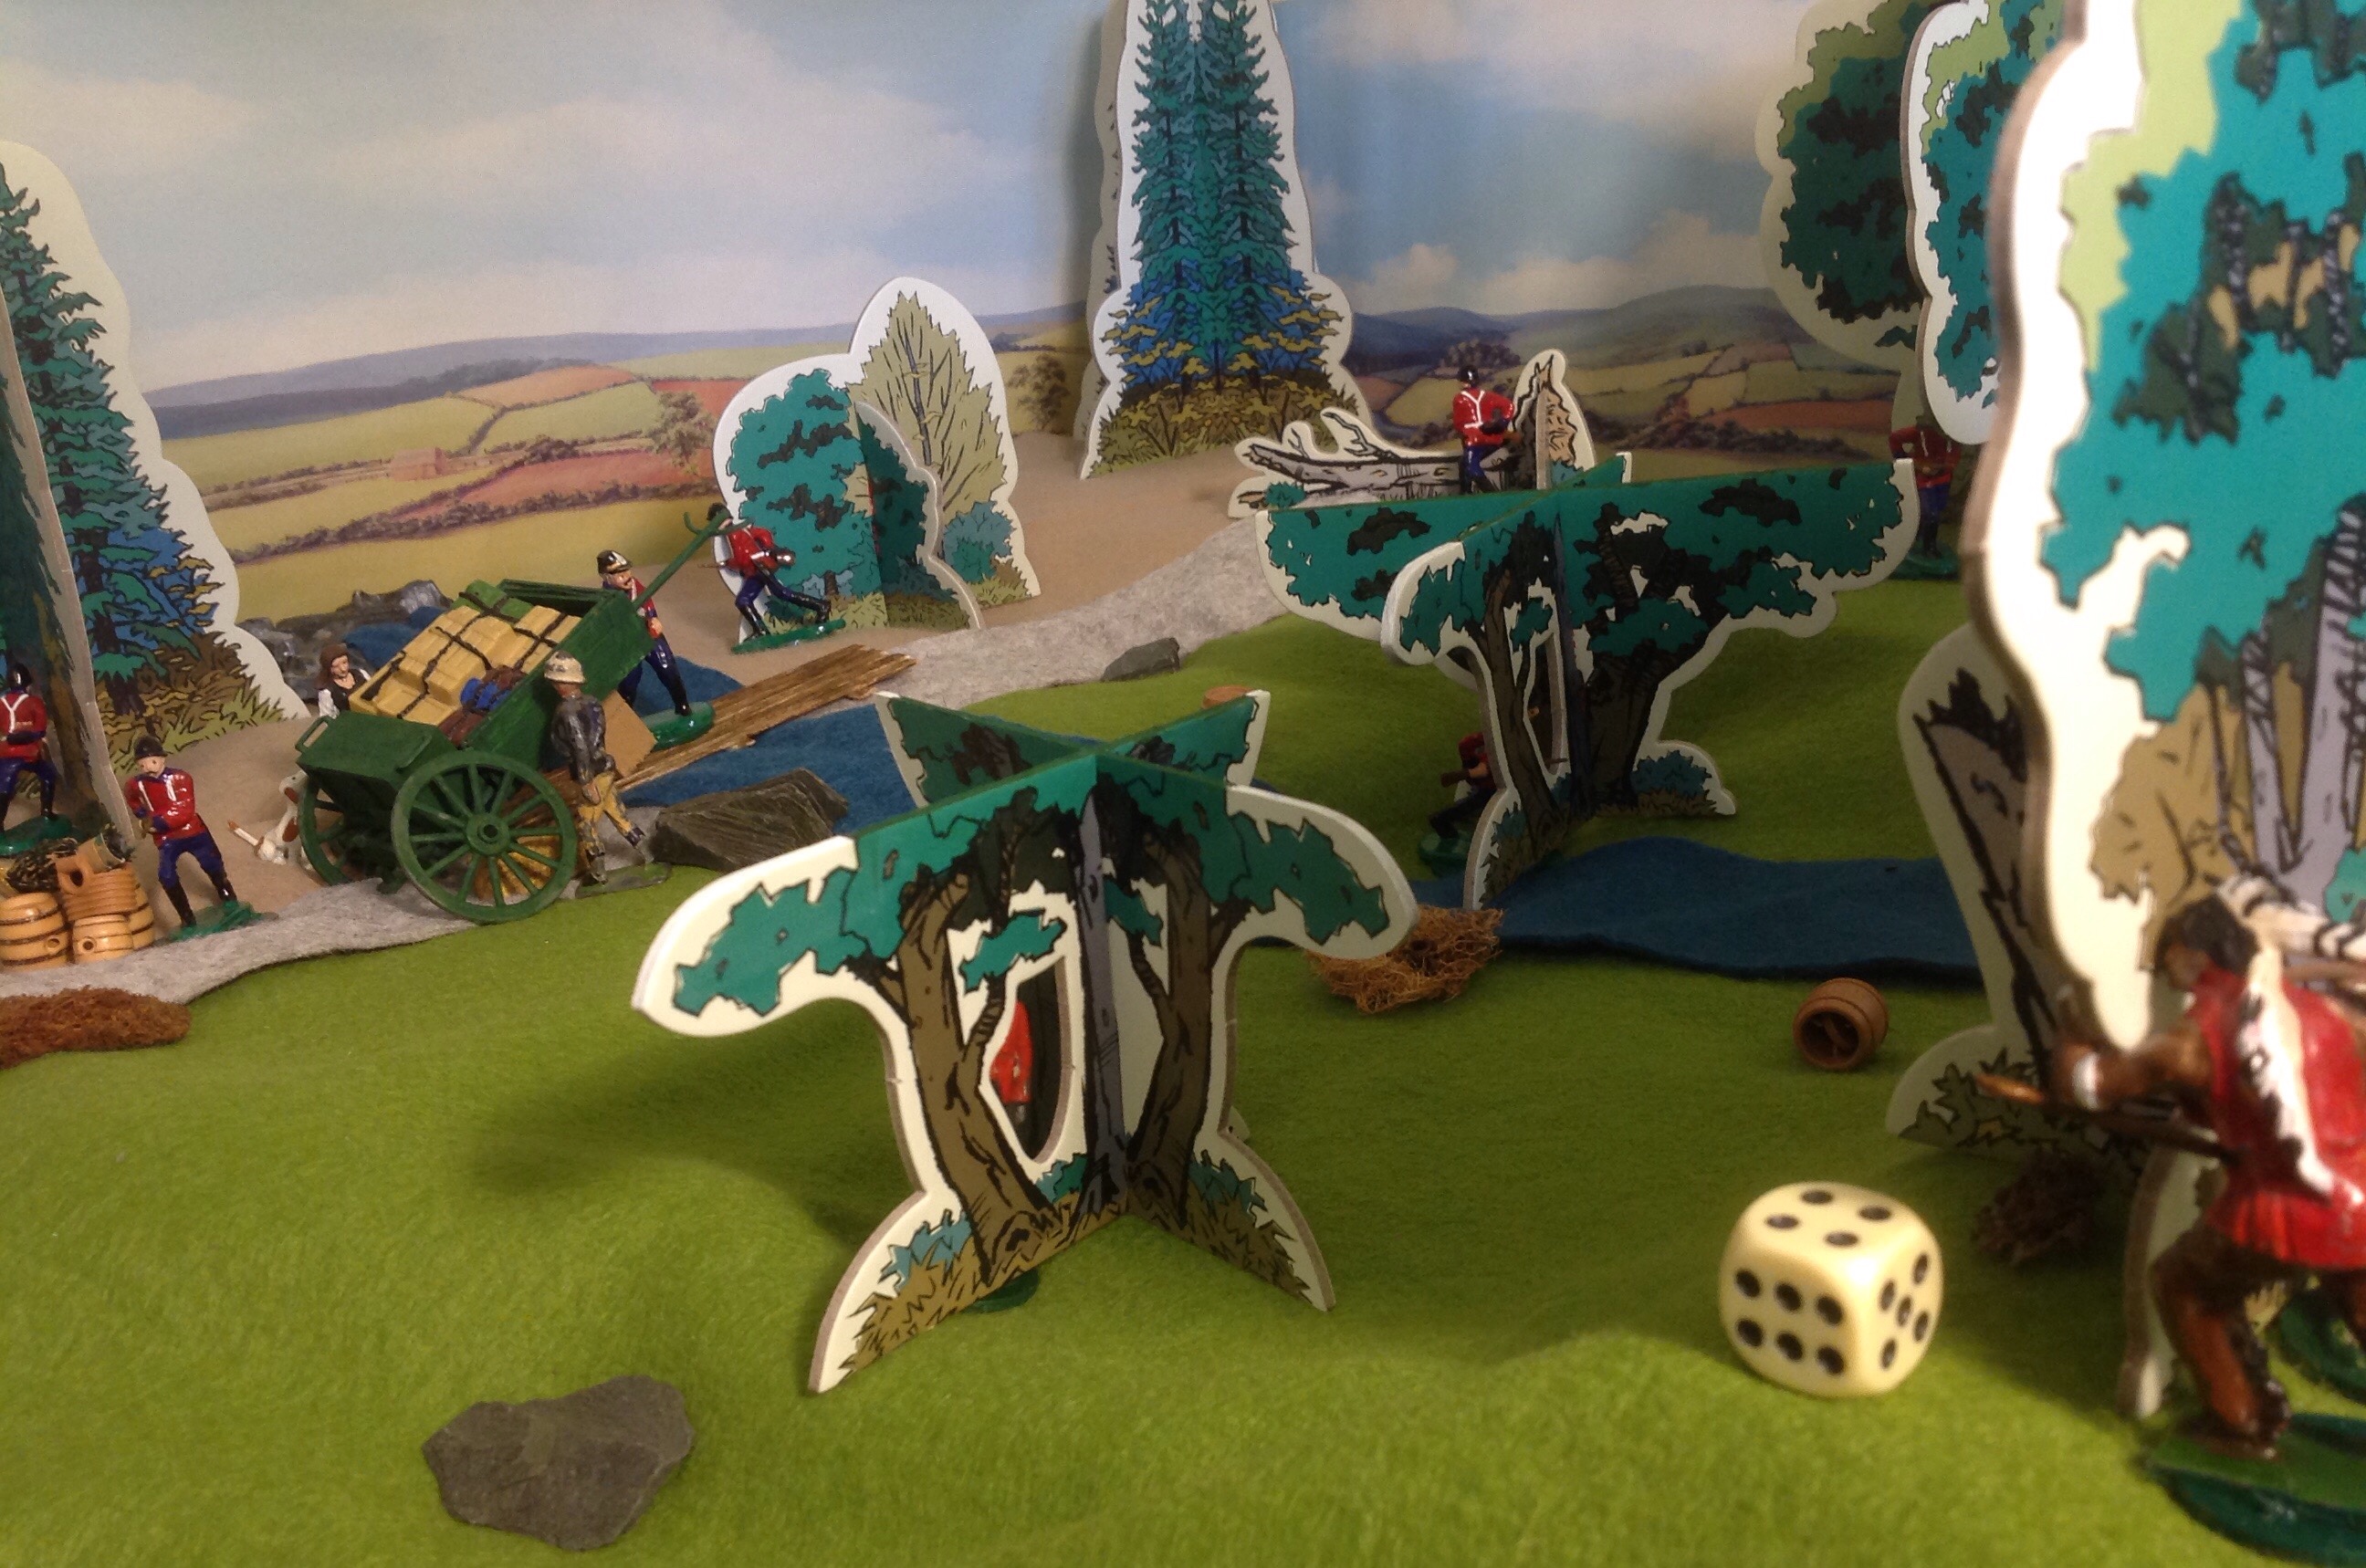
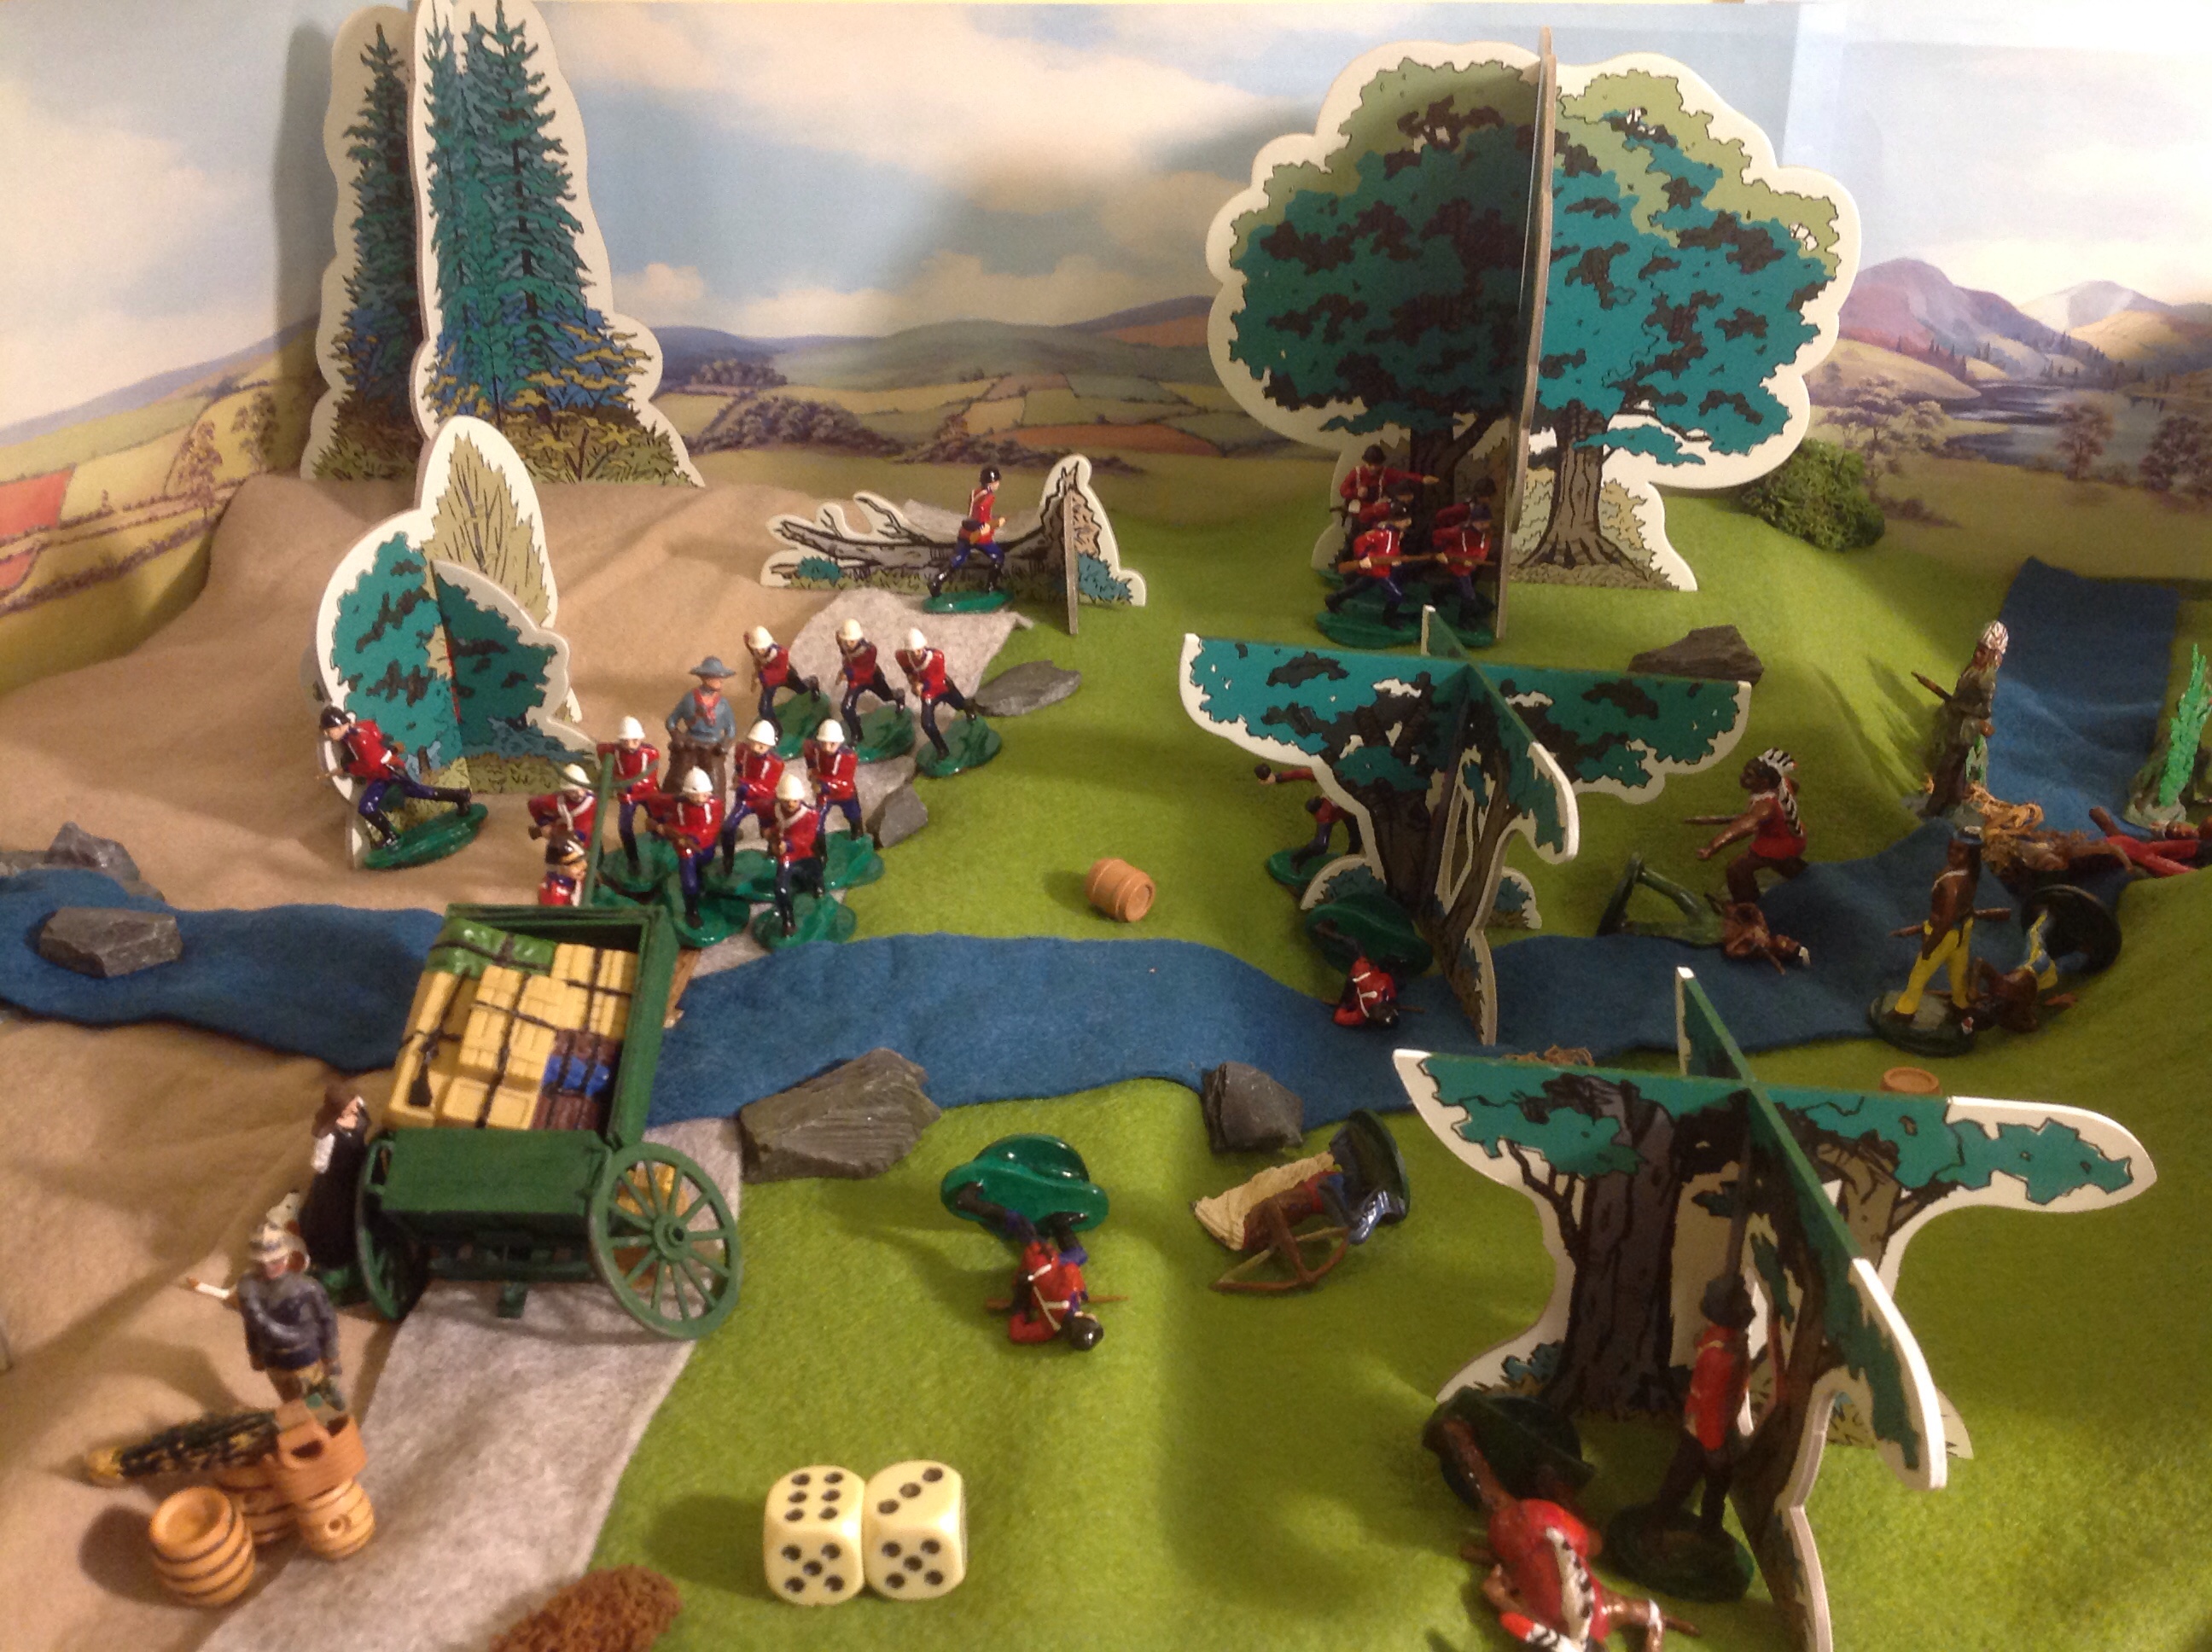
The Redcoat Relief Party of the Yestershires passes the Fallen Tree across the road. The black helmeted section spread out into the trees, whilst the white helmeted section head up the road to surround the wagon. Amongst them you can glimpse the Fort Engineer in his bush hat, ready to fix the wagon axle and wheel over the next six turns.
The Forest Indian Hunting Party 2, who set off at Turn 6, continue up the stream valley closer into range. They are now outnumbered by the Relief Party.
Redcoat reinforcements fan out into the perimeter tree cover
Turn 8
The Forest Indian Hunting Party 2 in the stream bed fire at the Redcoat sentries at long range but fail to kill one. Fire is returned and two further Indians are brought down.
The chief Old Wooden Legs notices that his forces are now down close to half strength, even with the third Hunting Party due to appear at Turn 10. Should he call them and recall them to fight another day?
Turn 9
A further exchange of fire between the remaining Indians on the Stream valley, including a Redcoat grenade being thrown. There was one further Indian dead, with no further Redcoat casualties, once casualty savings throws and being undercover taken into consideration.
The Redcoat Relief Party and Fort Engineer cross the bridge and begin work on repairing the wheel.
Unwisely the second Native Hunting Party moves forward as the Relief Redcoats spread into cover.
Turn 10
The Indian Chief calls to the Hunting Party 2 and 3 to retreat as they are now past 50% casualties and outnumbered.
The Redcoats fire upon these retreating Indians in the stream valley and bring down these three Indian. The battle is over – for now.
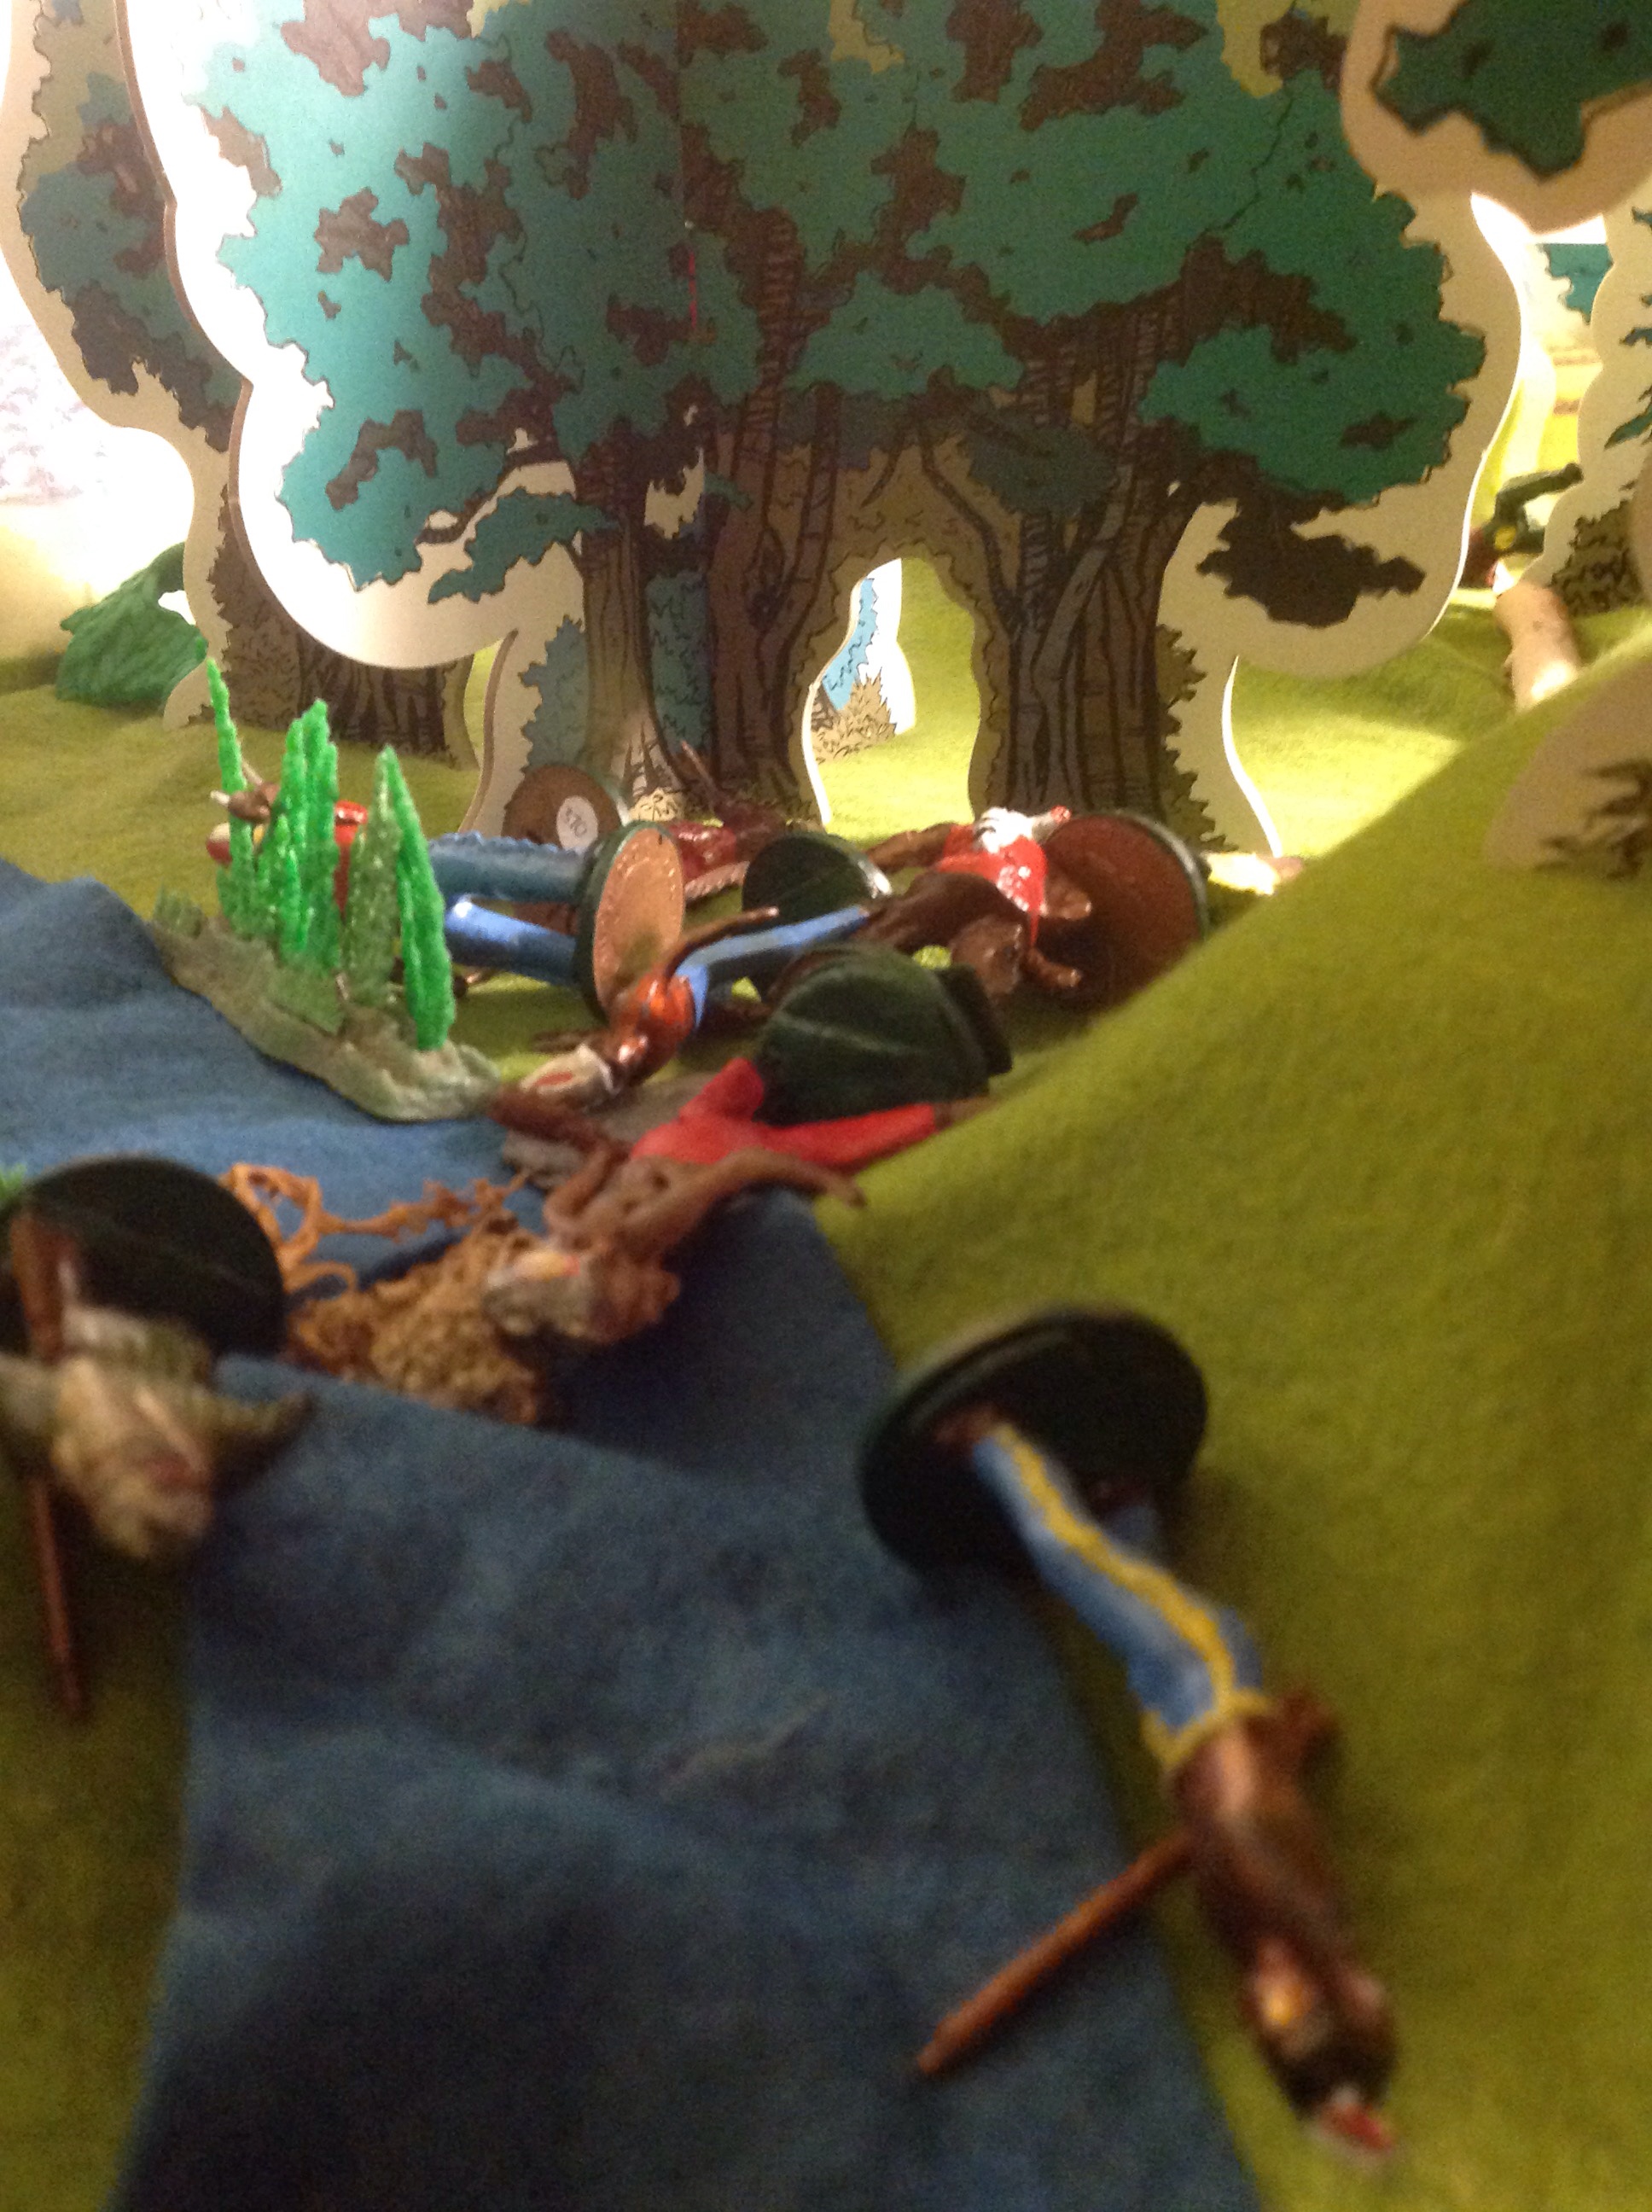
Valhalla – the lost warriors from both sides, two Redcoats and eleven Forest Indians from two Hunting Parties.
The shadowy stream valley of death …
Whilst the wagon is repaired, the Redcoat reinforcements keep watch on the trees, quickly bury the native dead and recover the native rifles.
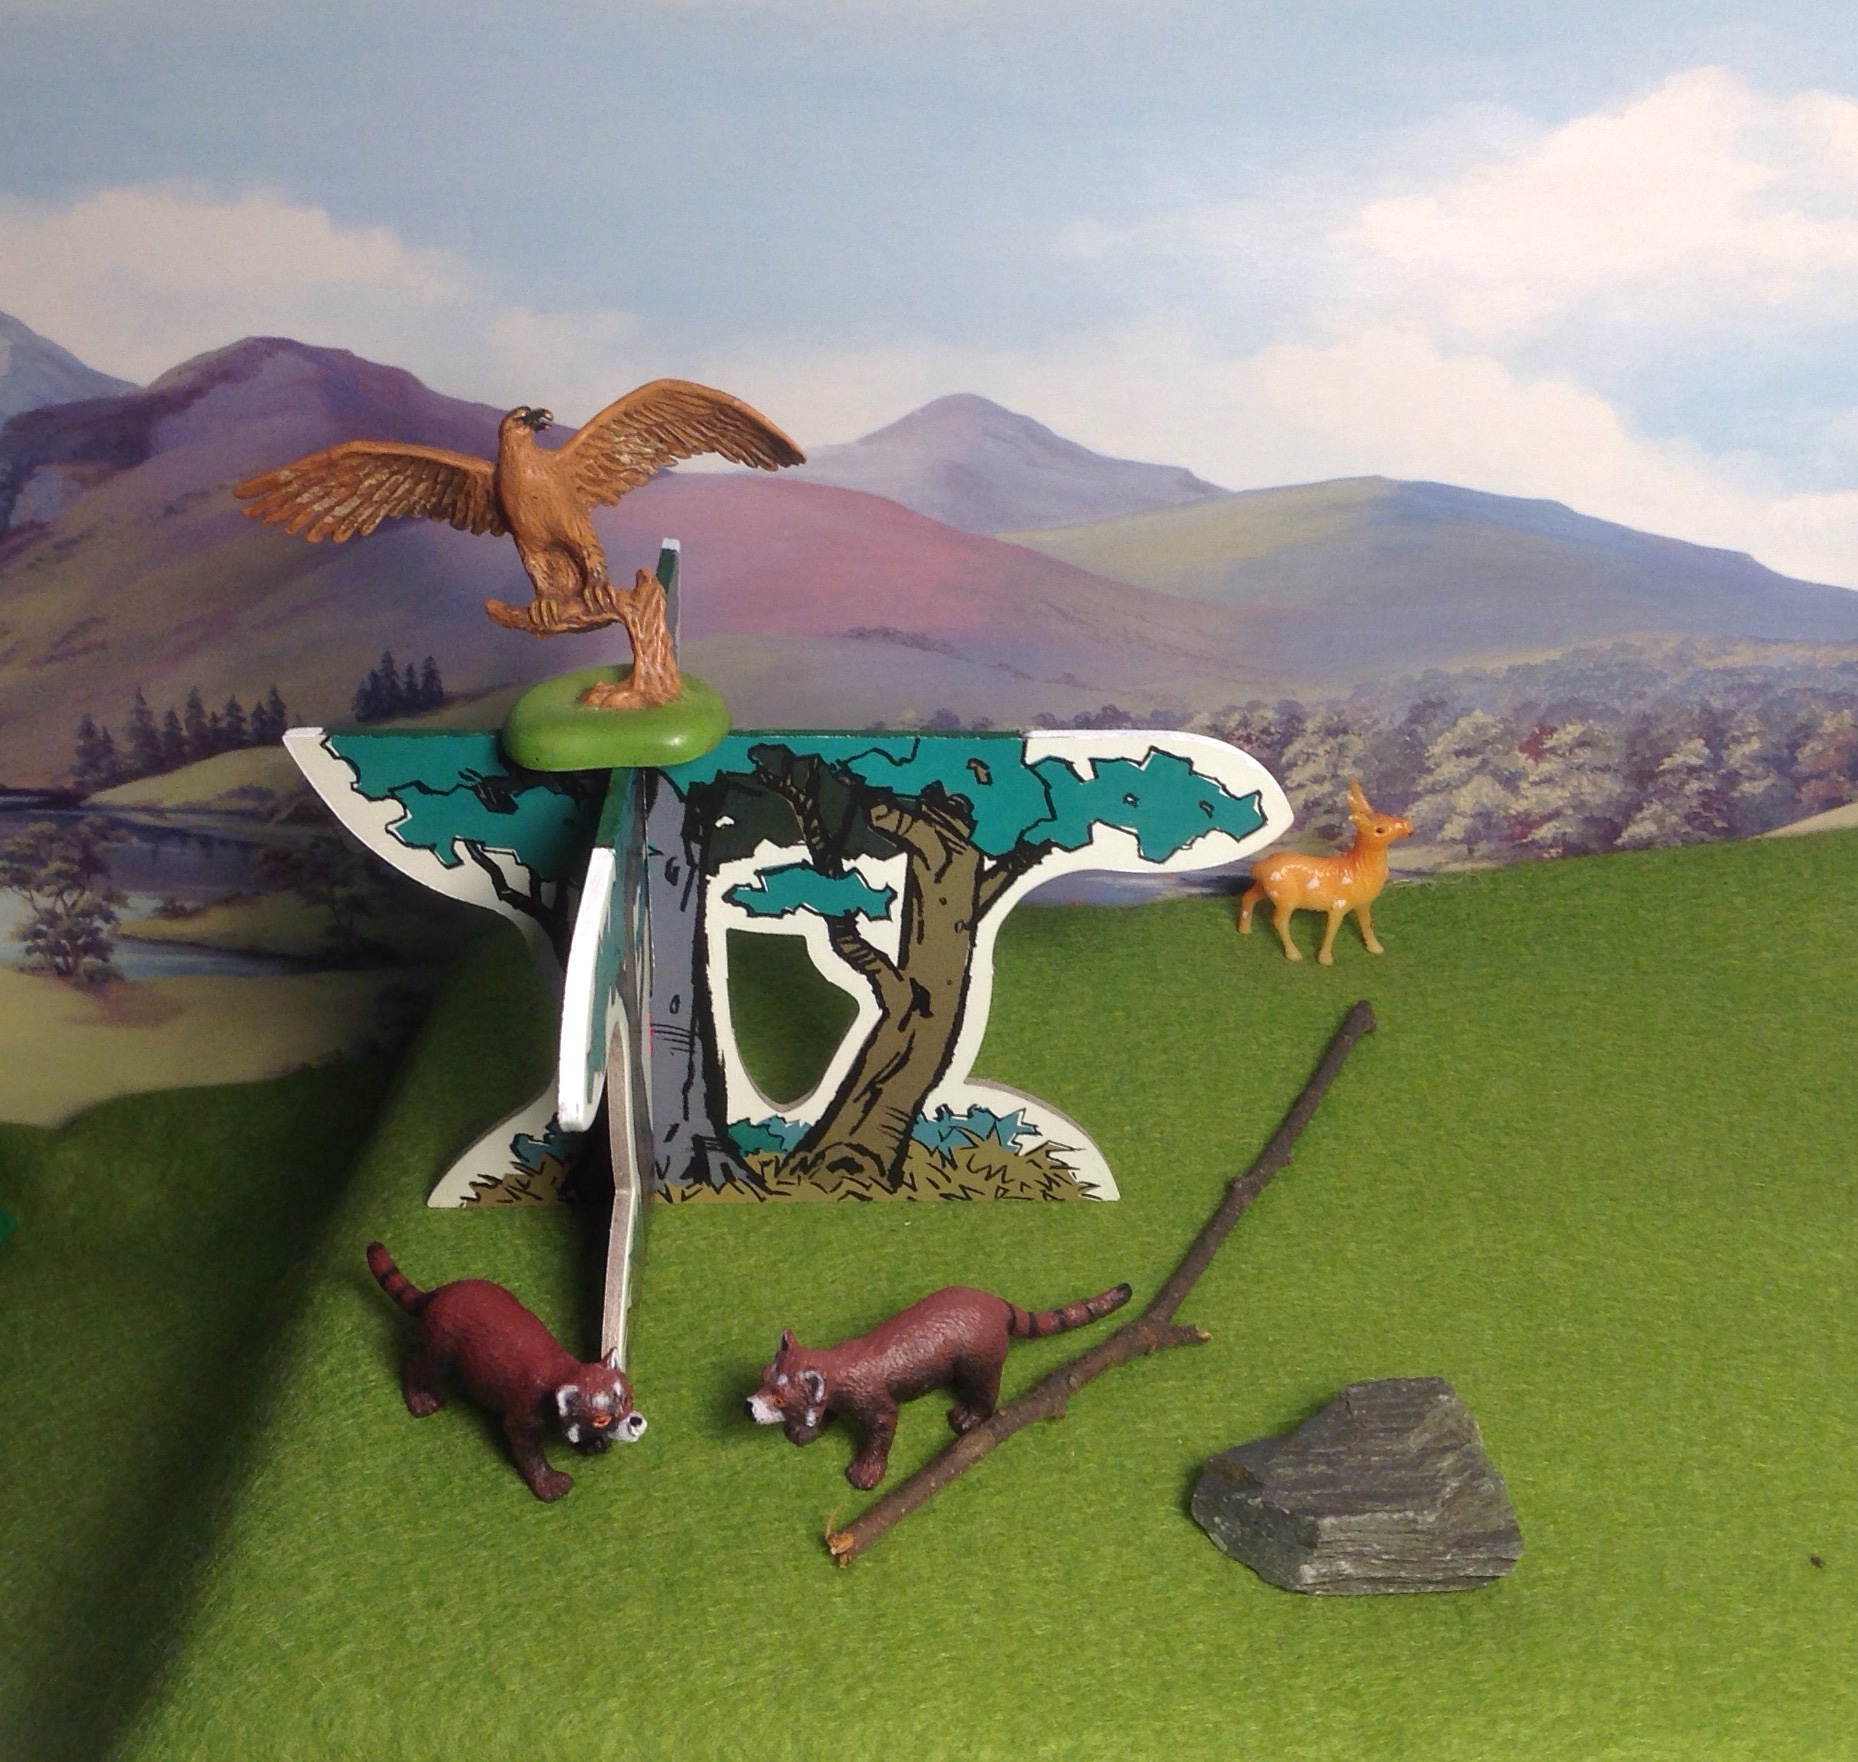
Eagle’s Eye View of the stream valley
Turn 10 – the skirmish is over.
Turn 11 onwards.
The Forest Indians regroup further in the woods. Snortt keeps his sentries posted watching for further attacks.
Will there be another attack from different directions?
Snortt keeps his troops quiet and watchful. It’s not over yet until they reach the Fort.
He thinks – There are no signal drums.
The forest sounds of trees and birdsong return amongst the sound of the wheel and axle being fixed.
They know we are still stranded. The Forest Indians will be watching and listening. The Forest is always full of eyes and ears.
Will they face further ambush and sniping on the road ahead?
By Turn 15 the wagon axle and wheel is fixed by the Fort Engineer. The horseman has returned. The wagon is restacked with its barrels, hitched up and sets off for the Fort, screened by its Relief Party.
The wagon finally leaves carrying supplies and the two fallen Redcoats for burial back at Fort MacGuffin.
A lone brave keeps watch on the Redcoats and repaired supply wagon as they leave.
The Chief recalls his remaining Warriors. They will return to retrieve their dead warriors after dark.
Later that evening
Back at Fort MacGuffin as he writes his report by oil lamp for Headquarters, Snortt reflects on the day and how things went.
From this – the stranded wagon and brave cool Miss MacGuffin …
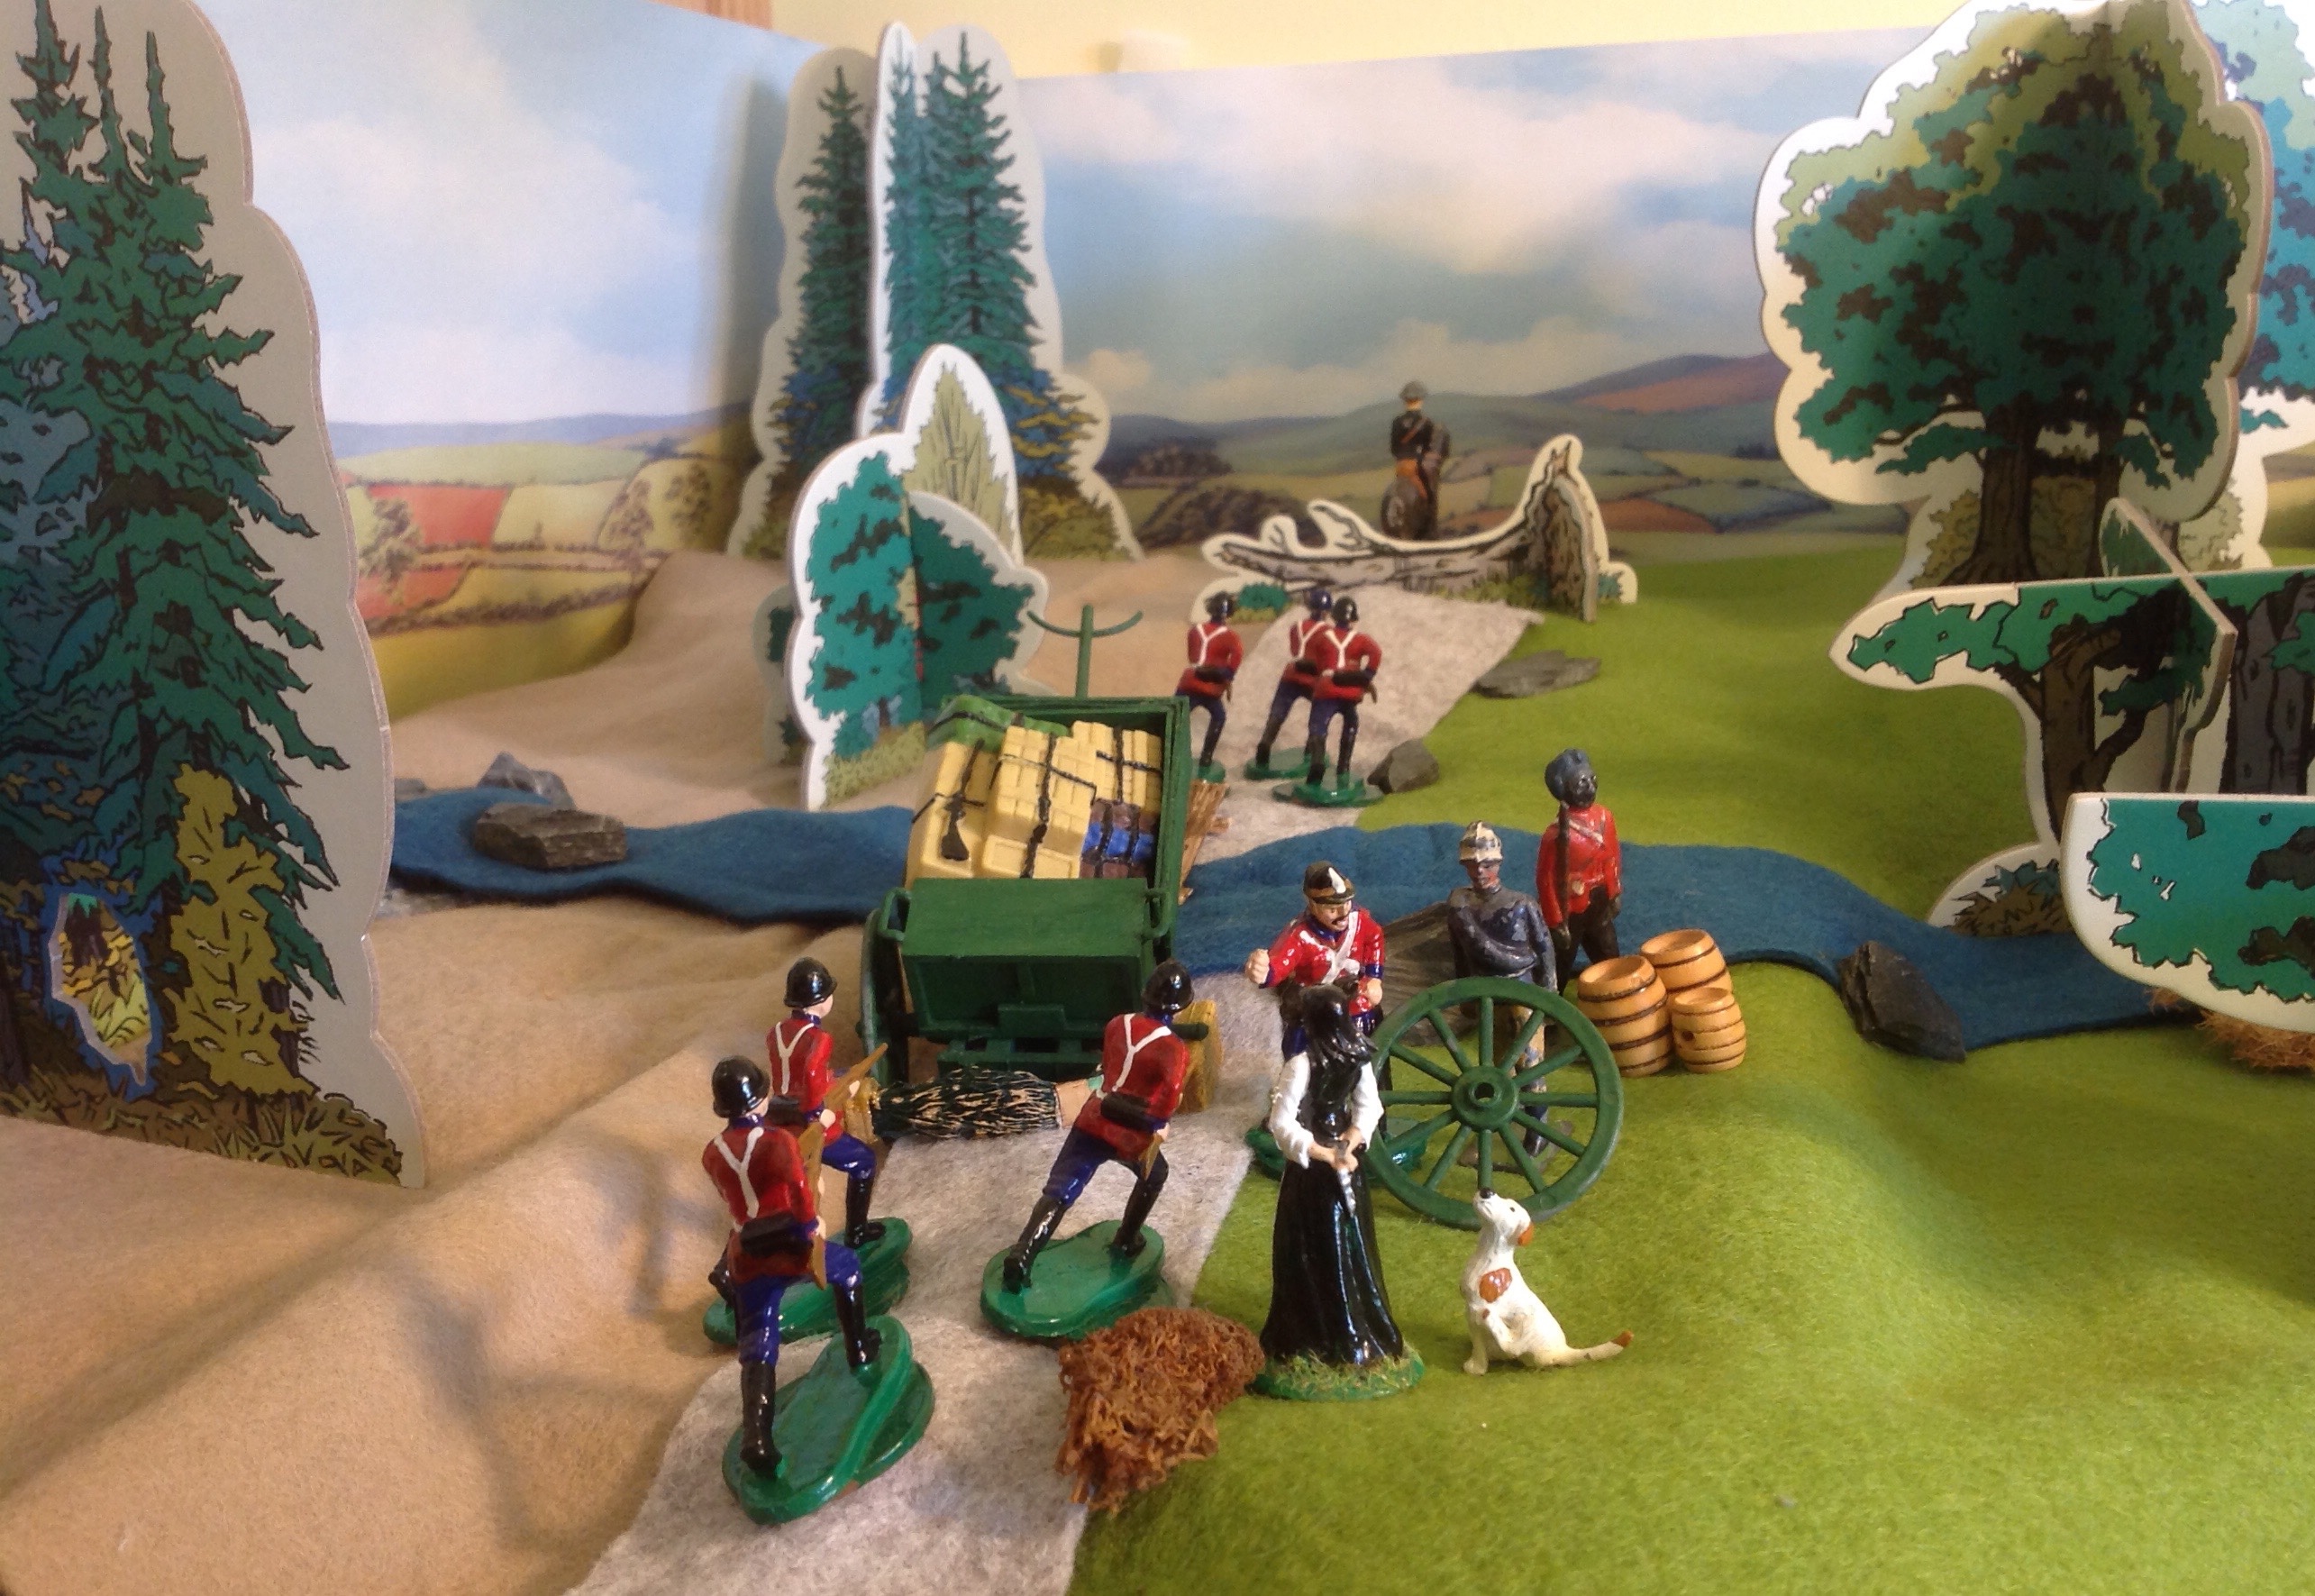
Captain Snortt and the Major’s daughter Miss MacGuffin as ASC Private Fuller helps the Fort Engineer mend the wheel
To this – Relief or Rescue – and the wagon fixed, his young passenger safe with only two privates dead. Things could have been very different.
Miss Macguffin’s secret weapon … whilst her Guard dog Patch hopes Snortt has biscuits or a ball.
A Captain may dream of promotion – and other things …
The End?
I have a feeling we have not heard the end of Captain Snortt of the Yestershires, Miss MacGuffin and the aggrieved Forest Indians of Gondal led by Chief Old Wooden Legs.
The Forest returns to quietness and wild animals – for now.
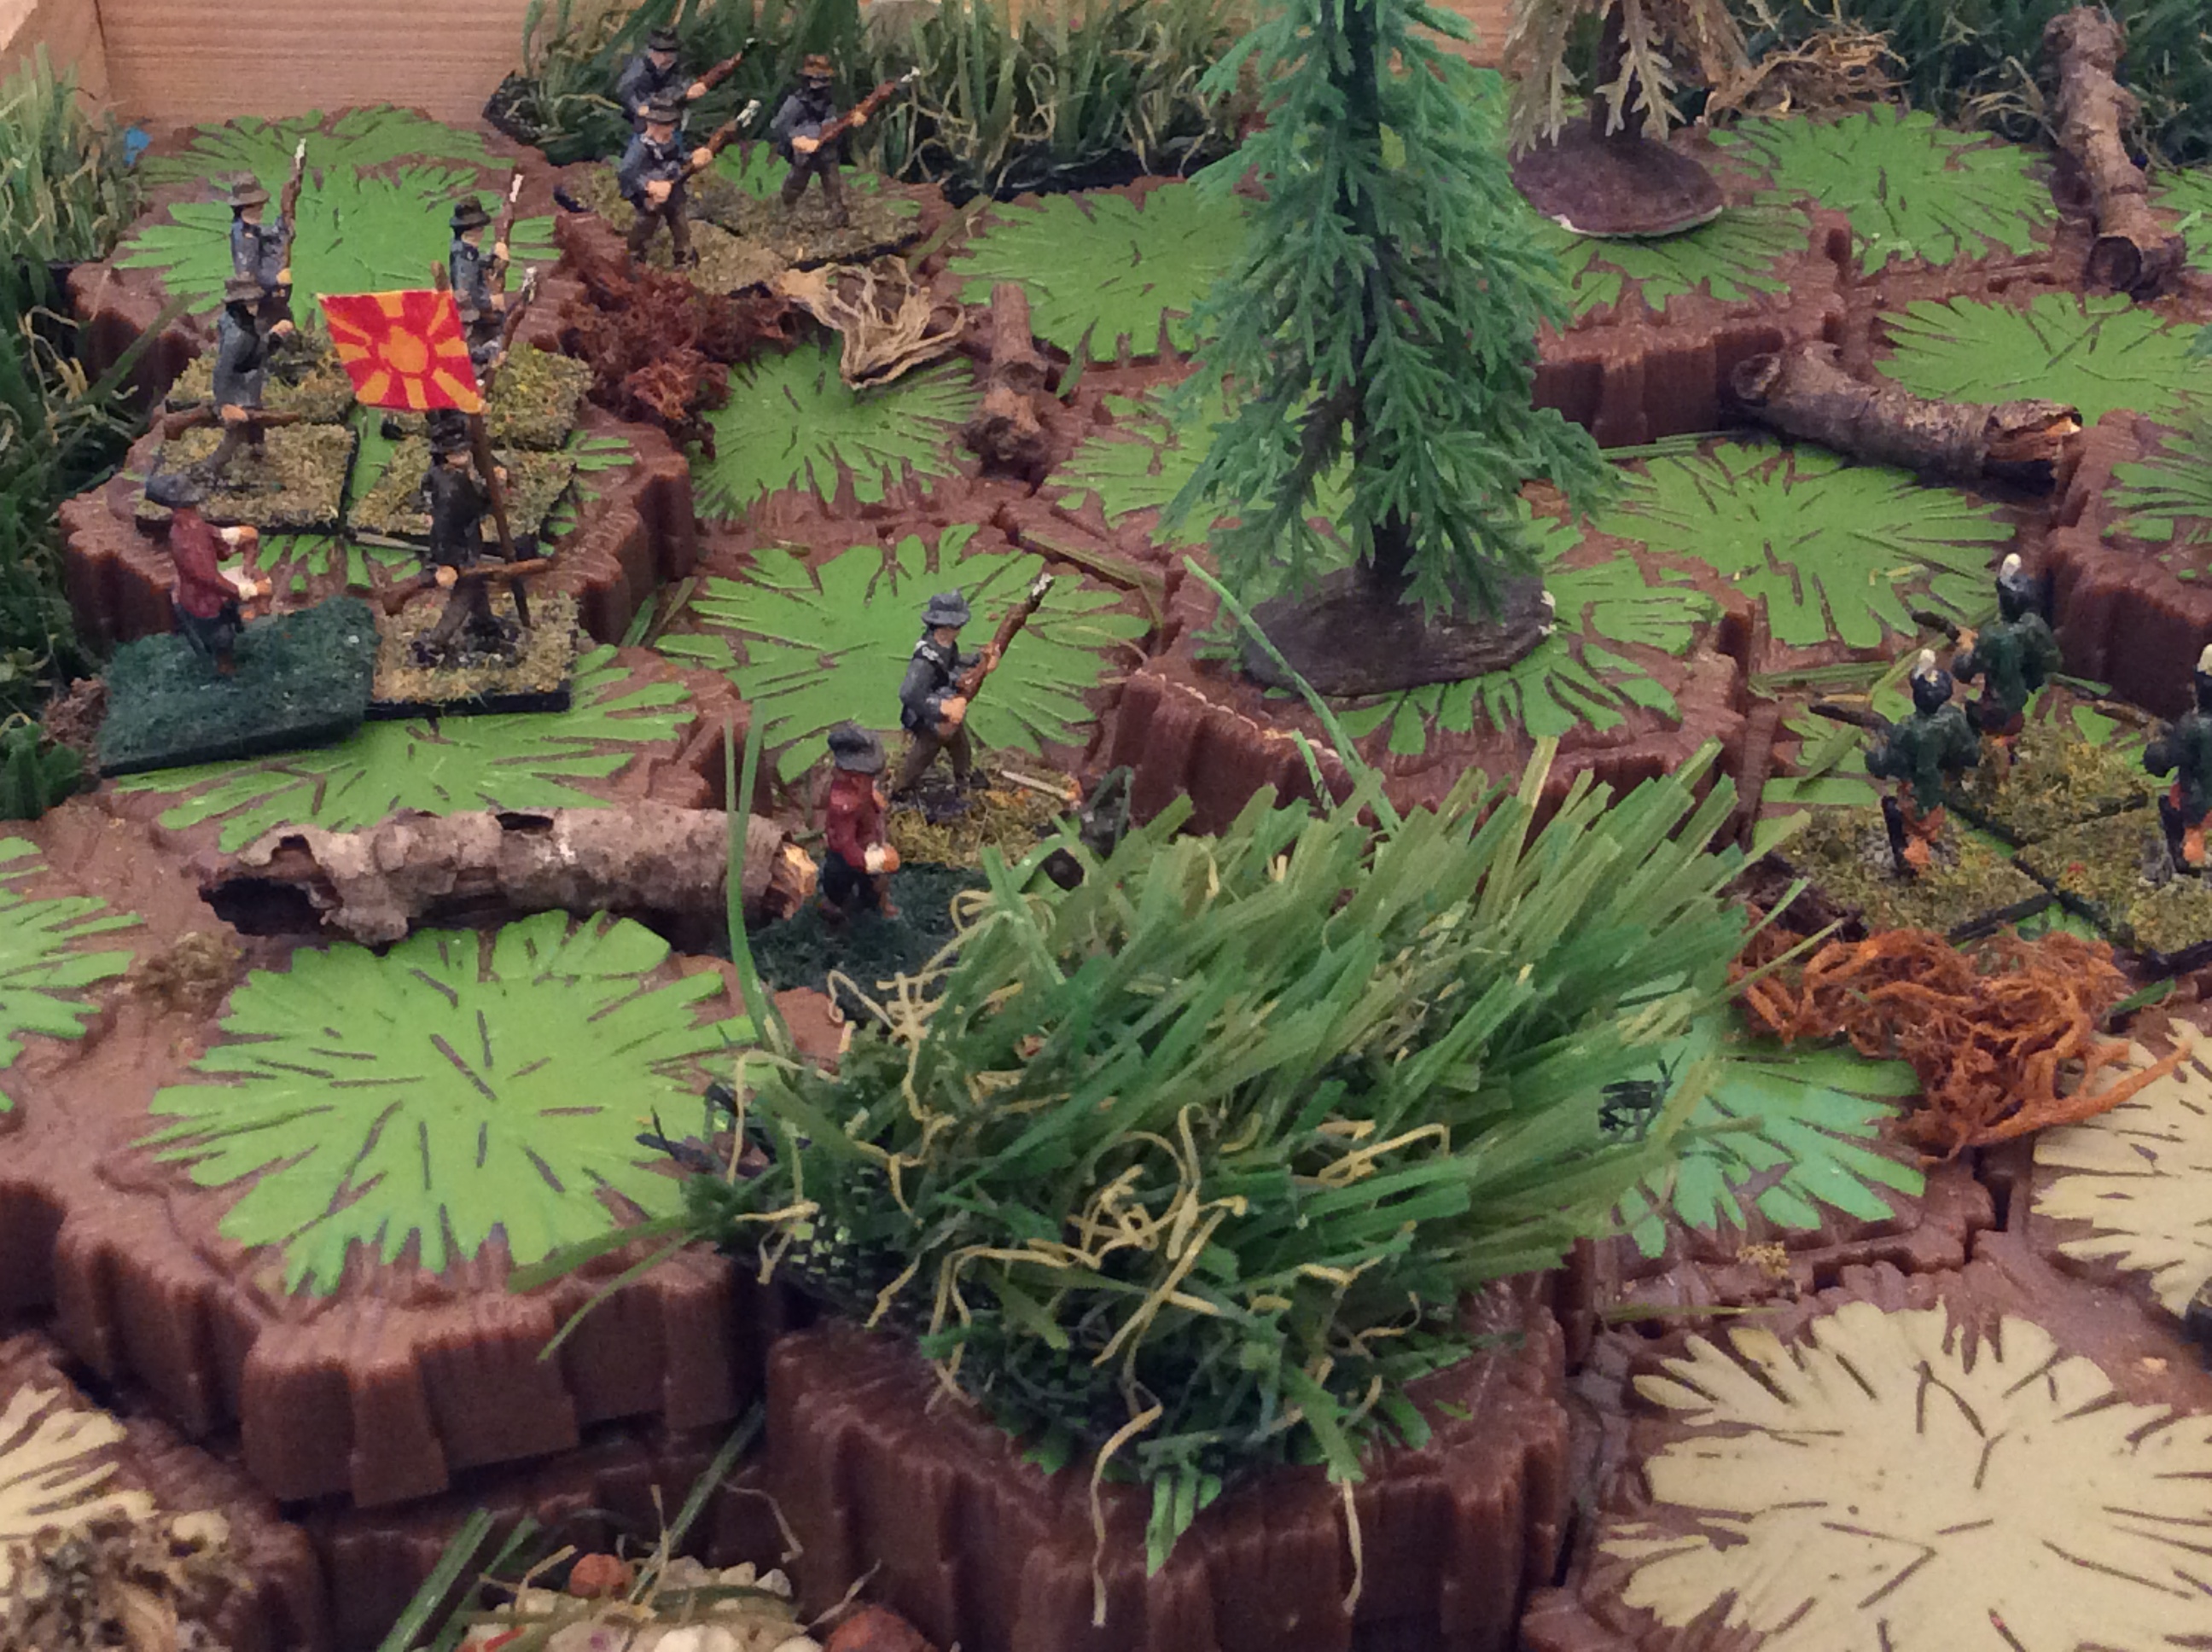
Eagle-eyed readers may have spotted that I have painted in the top of the shorter flat tree markers with green and white Acrylic paint, as they show when photographed from above.
Close Little Wars Scenario Post-mortem – initial thoughts
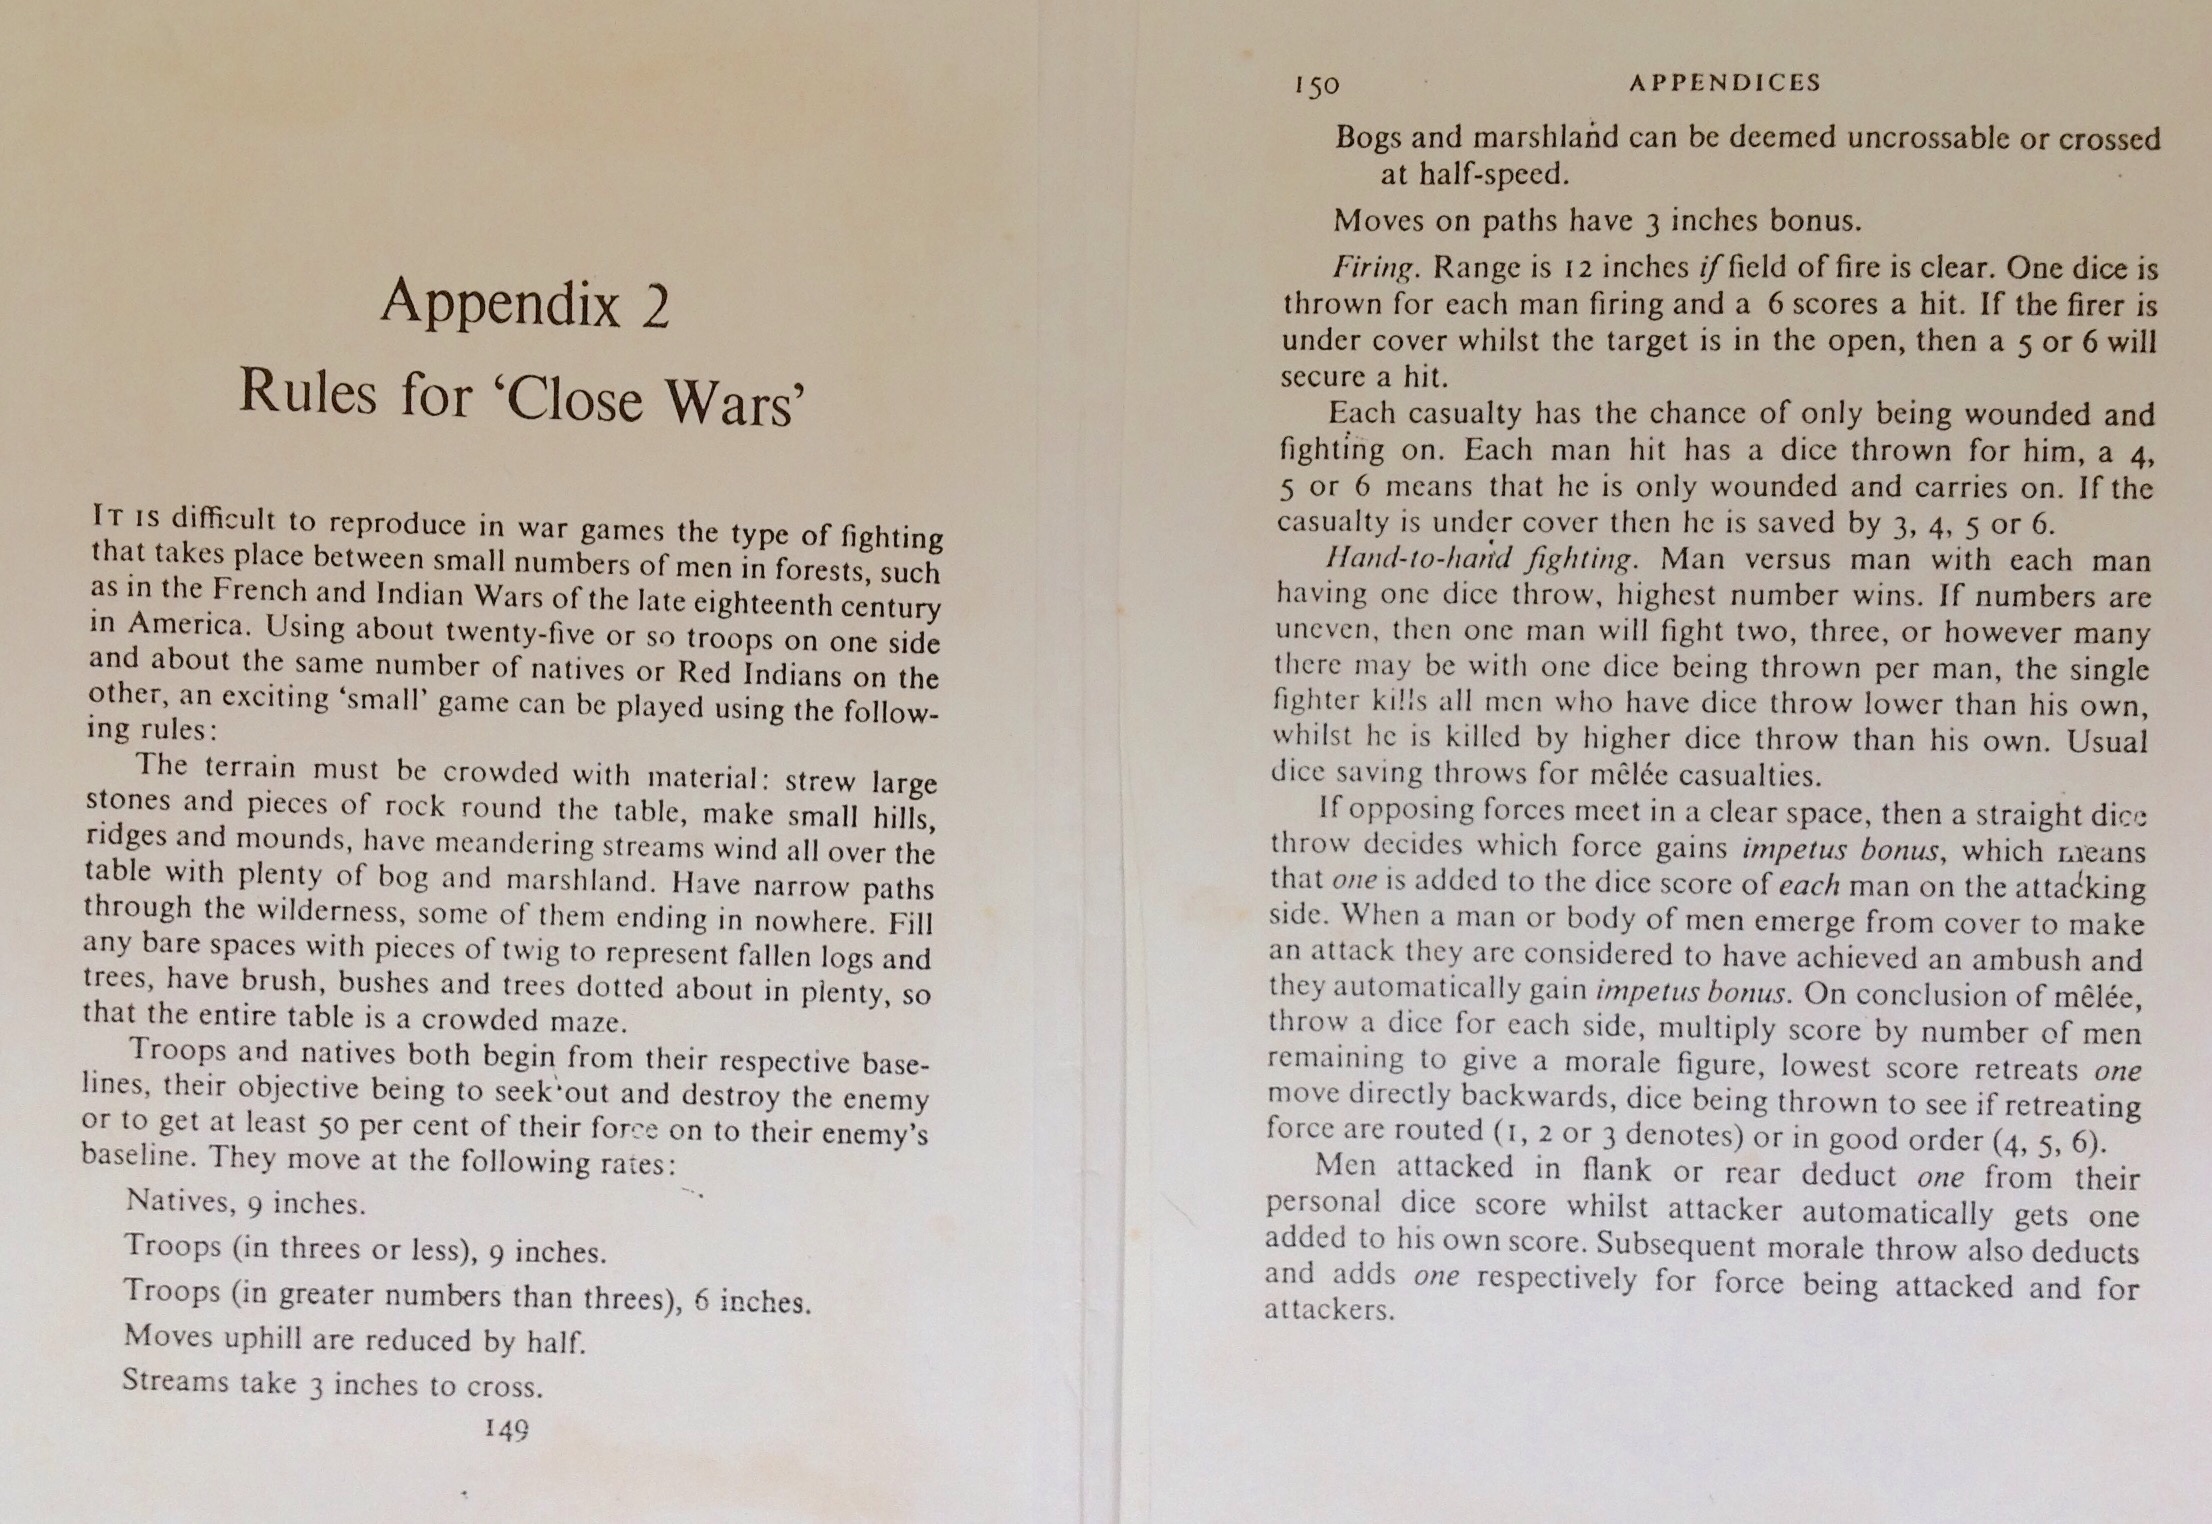
War Games 1962 – Donald Featherstone – Close Wars appendix
Playing solo, I had to work hard not to have favourites. I wanted both sides to succeed in their aims. If in doubt, a dice decided.
The opening turns for the Redcoats were those of stand and wait in cover until first contact and melee, but playing as solo player and umpire, I had to assume for the storyline that the Redcoats could be attacked from any angle and Snortt could not weaken any one side.
The presence of the delayed third Hunting Party who could loopin at the top North and attack from the NW or NE or engage the Relief column had to be borne in mind by Snortt.
Had the outcome of the dice throw for the arrival of the Relief Party been different, say for example Turn 6 plus 1d6, the game could have had a very different outcome.
Blending in Featherstone’s Ancient weapons and ACW weapons rules
Firing through cover and related savings throws had a big influence on the events. Strength of numbers and some lucky dice throws (or excellent shooting) made things easier for the Redcoats.
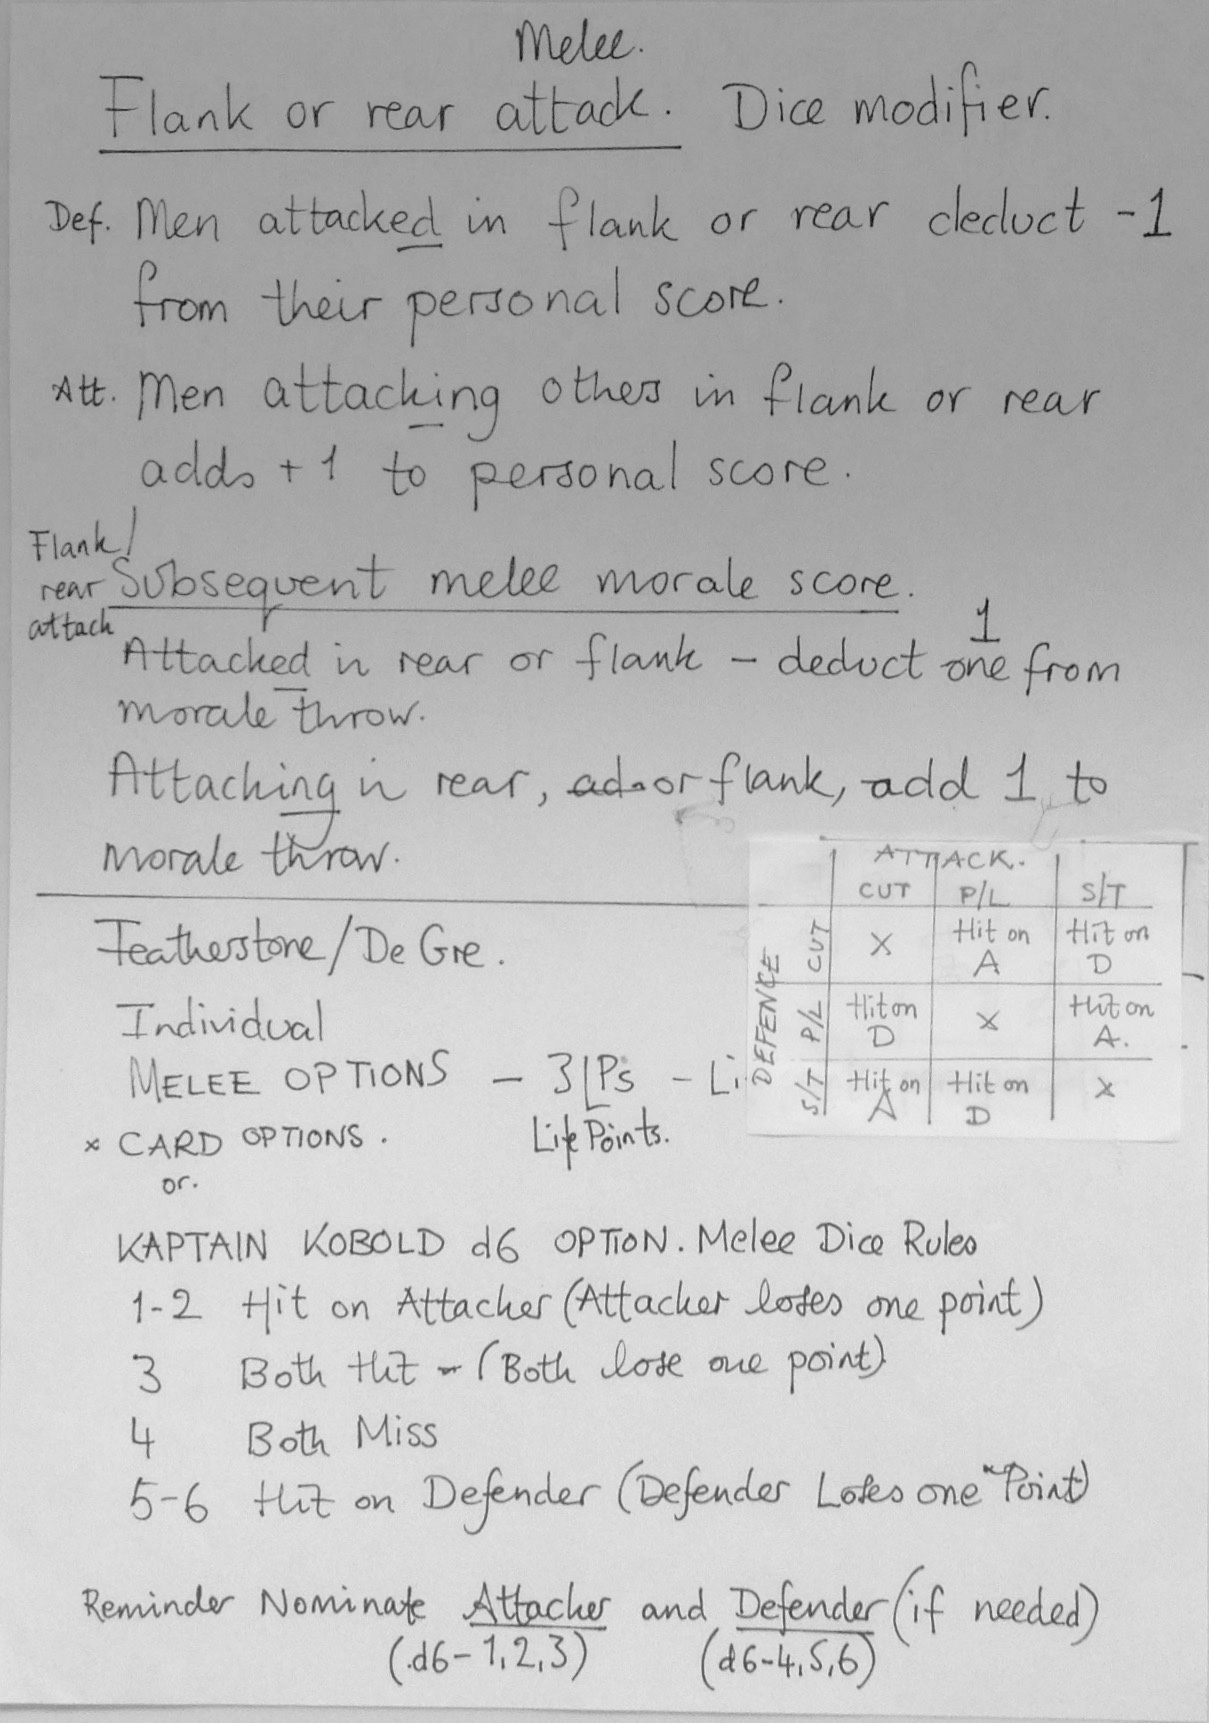
Melee reference page in my notes
Melee – Duelling by cards – made it feel in places like a skirmish game.
I wish I had taken time to name the initial Redcoats and Forest Indian Hunting Parties, instead of talking about the SE or NW Sentry.
The lumps and bumps of the cluttered terrain of Bold Frontiers trees, book hills and felt streams (with attendant movement modifiers) works well for me. It slows down movement as it would in real life and provides a longer lasting target for concealed riflemen.
Judging Line of Sight (LOS) from the character’s eyeline in cluttered forest was tricky. I used a small mirror from a Christmas cracker to help me see what they could see.
Using a 12 inch ruler in cluttered forest terrain was tricky at times. A ruler half that size would help.
50% loss of strength as part of the Victory Conditions governed the retreat by Forest Indians.
Two useful Featherstone quotes from War Games 1962 in my scrapbook
An enjoyable and fulfilling solo skirmish game ImagiNations scenario of which I feel we have not heard the end.
I hope you have enjoyed the game, the terrain and the build up. I look forward to hearing reader’s thoughts and reflections.
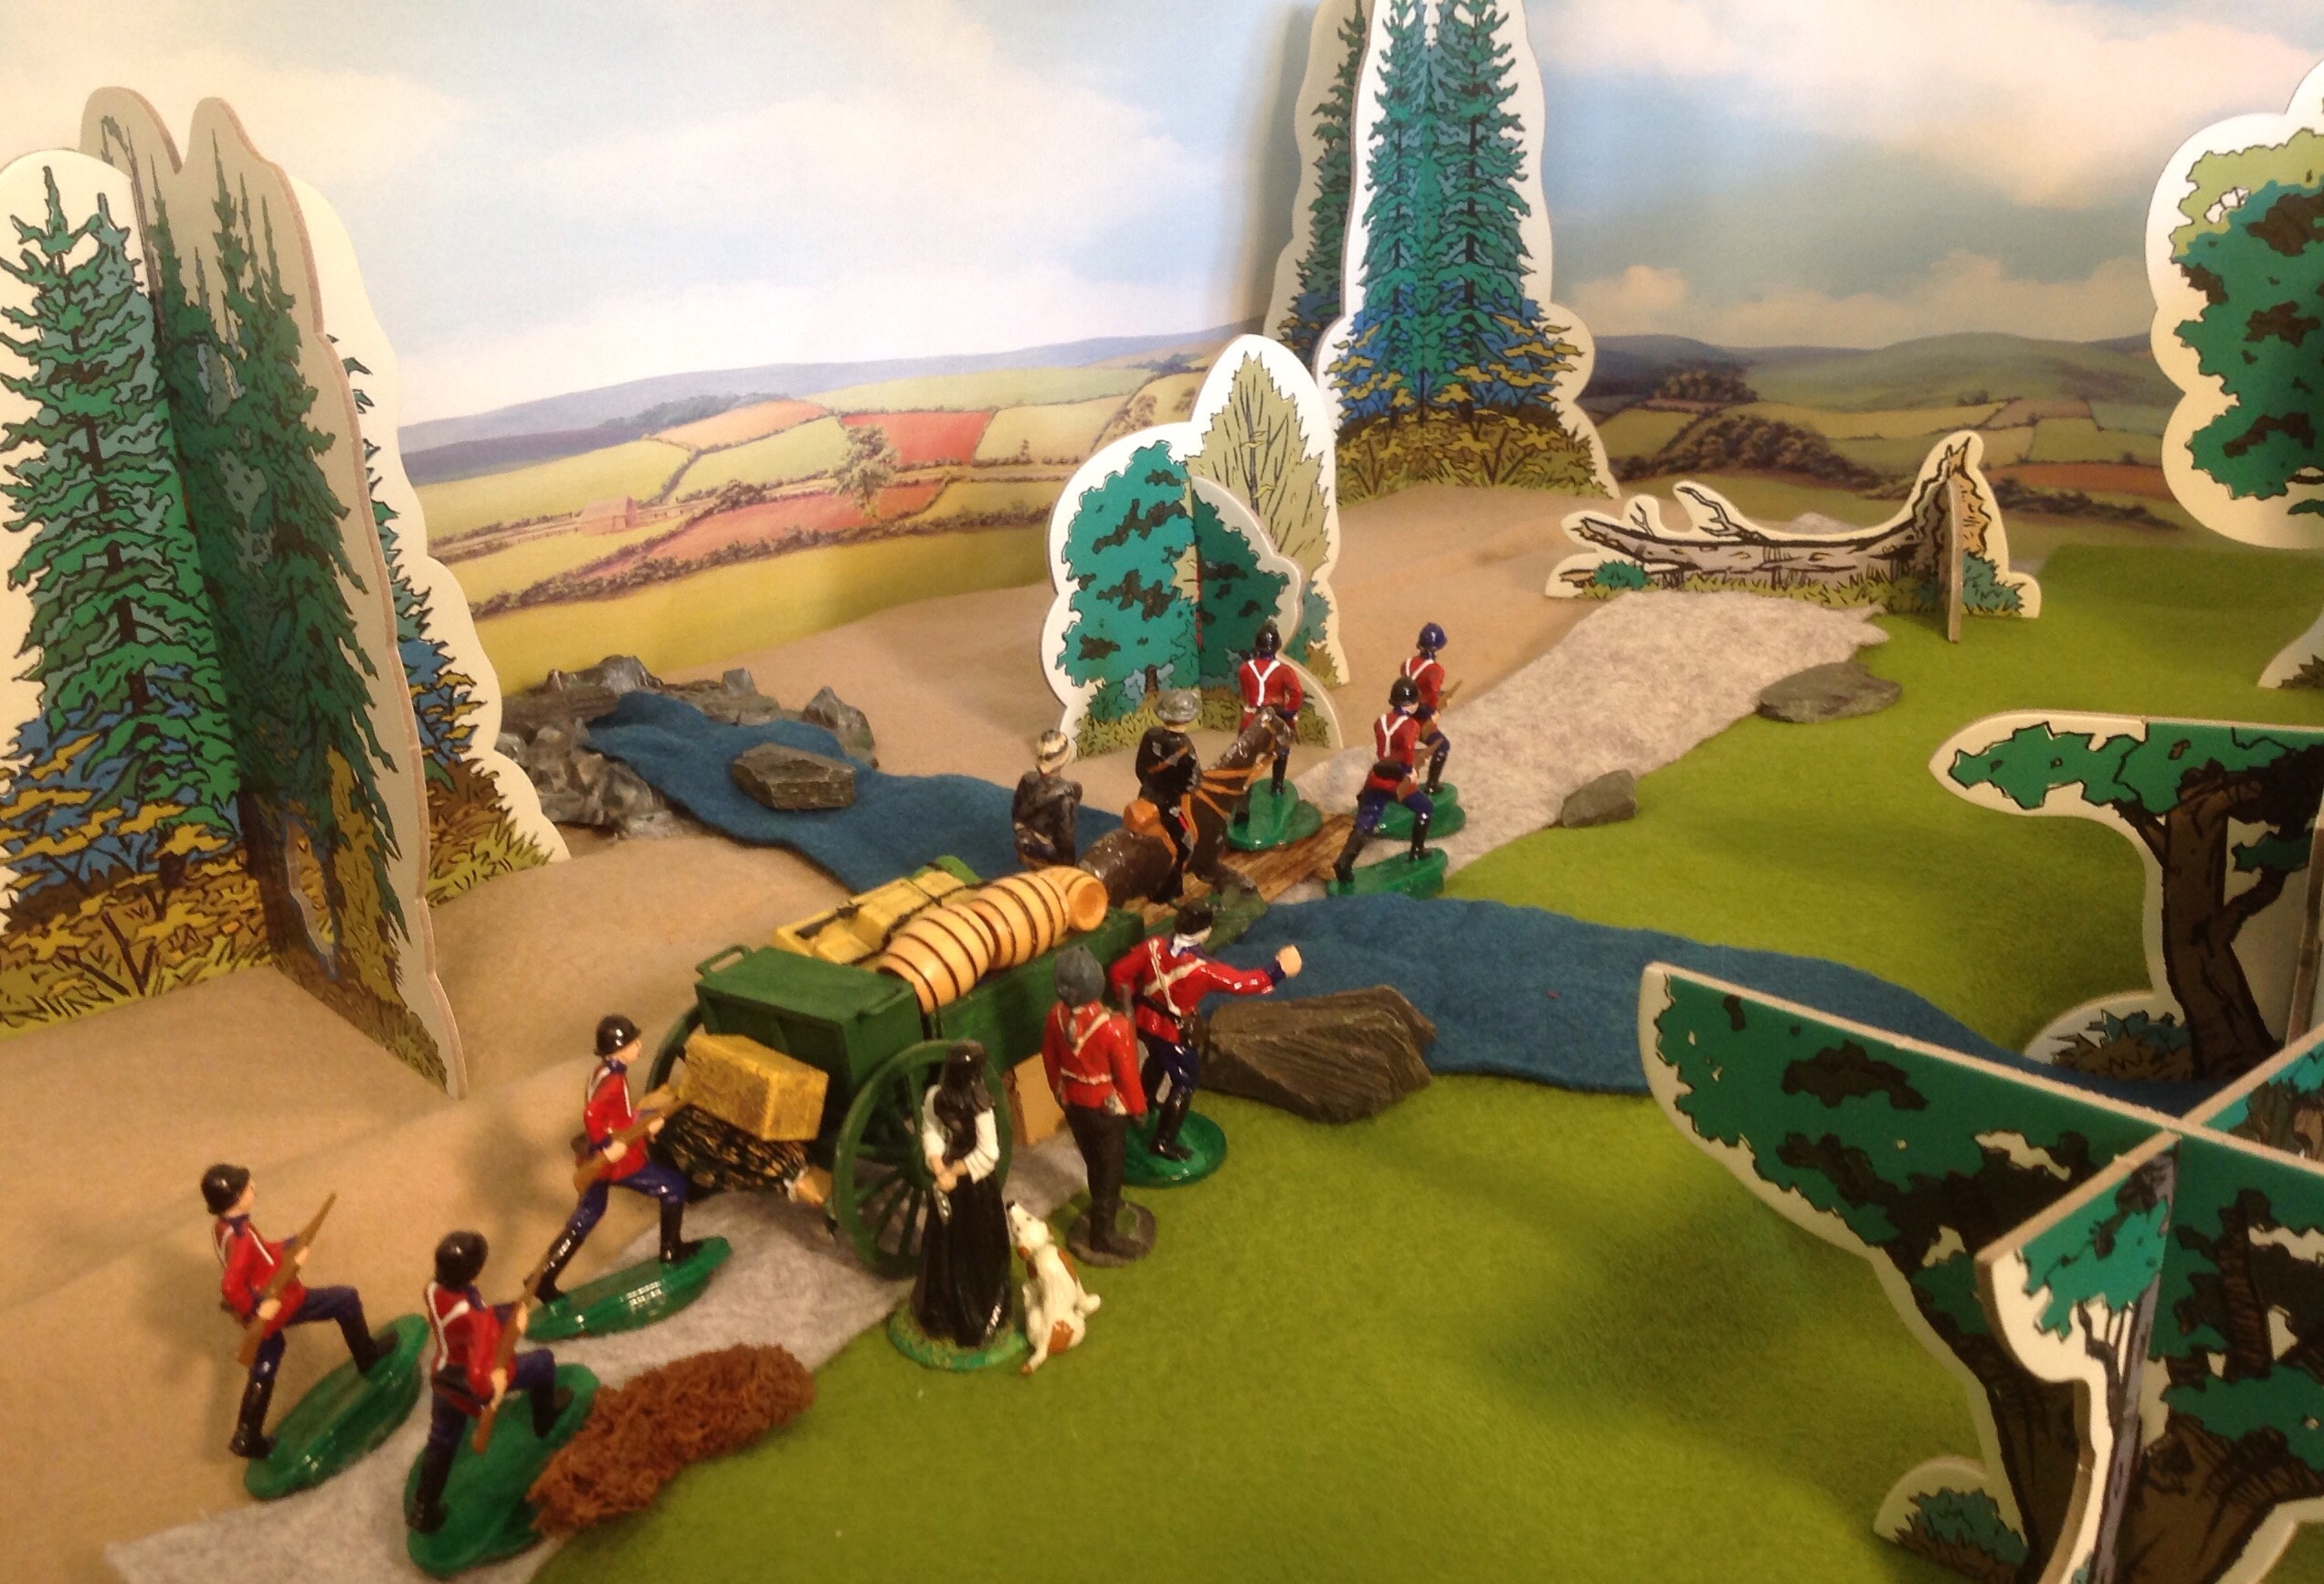
North Gondal forests, 1870s – a supply column, deep in the forest, approach a stream
Ahead of the supply column, few yards over the old bridge, a large dead tree had fallen over the road, neatly blocking it.
Suspicious? Old dead trees fall over, and they had had heavy rain storms recently. The old plank bridge wasn’t looking in too good shape either. Must have happened overnight. The Forest Fort foot patrols should have noticed this damage and made good a repair.
They would need to proceed cautiously. Steady there! The weekly supply waggon for the Forest Fort (Fort McGuffin) tipped precariously over and backwards as it crossed the old wooden bridge over the stream.
Crack!
The Redcoat troops of the Yestershire Regiment heard the sound as one of the wheels skewed off at an odd angle. Barrels and boxes tipped out onto the rough forest road and stream. Some of the bridge had washed away … or maybe the rope and timbers had been hacked away?
Assessing the damage to the wheel, Captain Snortt of the Yestershires, the officer in charge of the supply column, quickly sent the wagon horse and rider ahead to summon reinforcements and a repair team from the Forest Fort (Fort McGuffin).
As the horse and rider disappeared up the forest road, Snort sent his small column of seven redcoats to fan out and protect the cart whilst one of the Army Service Corps men Private Fuller tried to fix the axle and wheel.
The scattered barrels and boxes were stacked to make temporary cover positions.
They wedged the damaged axle on a haybale that they had been carrying for the horse.
Snortt knew that the Forests this far North had eyes everywhere. The local Native Indians were increasingly hostile, they did not enjoy their sacred hunting grounds being carved up by roads and forts, loggers and the land claims of settlers.
To add to his problems, the column included a rare civilian passenger, Kate the youngest daughter of Major McGuffin, the Fort Commander, who was travelling to visit her father. A fine hostage and bargaining chip she would make, if the Indians captured her.
Luckily for Snortt, young Kate was used to frontier life and quickly unpacked a pistol from the baggage, loaded it and watched the surrounding forest. There were spare rifles in the wagon if needed.
An Indian Scout spots the Redcoat supply column and sees the wagon founder on the bridge.
The Indian Scouts who were scattered around hunting through the forest return to their chiefs. They bring news. “The wagon is broken on the bridge.”
“The horse has gone to the fort.”
“Several redcoats have stayed to protect the wagon.”
“There are supplies and a passenger for the Fort.”
Meanwhile back at the bridge, the Redcoats of the Yestershires heard drums. The low sound of a native signal drum in the distance. Snortt was not sure how far away. Drums talking across the forest trees. Someone may have seen their difficulty and was even now summoning the local hunting parties.
Damn that bridge! Damn that wheel.
It looked to Snortt now that the fallen tree and the storm damaged bridge may not have been such natural events after all.
Meanwhile amongst the trees, the Indian Braves gathered with their spears and hunting rifles. Their tribal chief Old Wooden Legs spoke to the dancing Medicine Man who was blessing their hunt and ordered the drums be silenced. The Summoning was over.
“Let us harry the Redcoats and their wagons to remind them this is Our Land. There may be much of value in the Wagons – firesticks, metal bees* (bullets) and other important supplies for the Forest Fort, a Fort made from the timbers of our sacred trees.”
“Let us use the shadow and cover of these trees to approach the wagon and take something back in return for what these Redcoat devils have done to our forests. Civilians may prove good hostages. If the Redcoats attack or resist, we will use force to defend our forest.”
* The native Gondal Forest Indian name for bullets, “metal bees that sting death”.
Thus the die is set for a confrontation. In part 2 (or chapter 2?) of this small skirmish solo game I shall set out the terrain map, troop dispositions, aims and victory conditions.
Figures, Terrain and used.
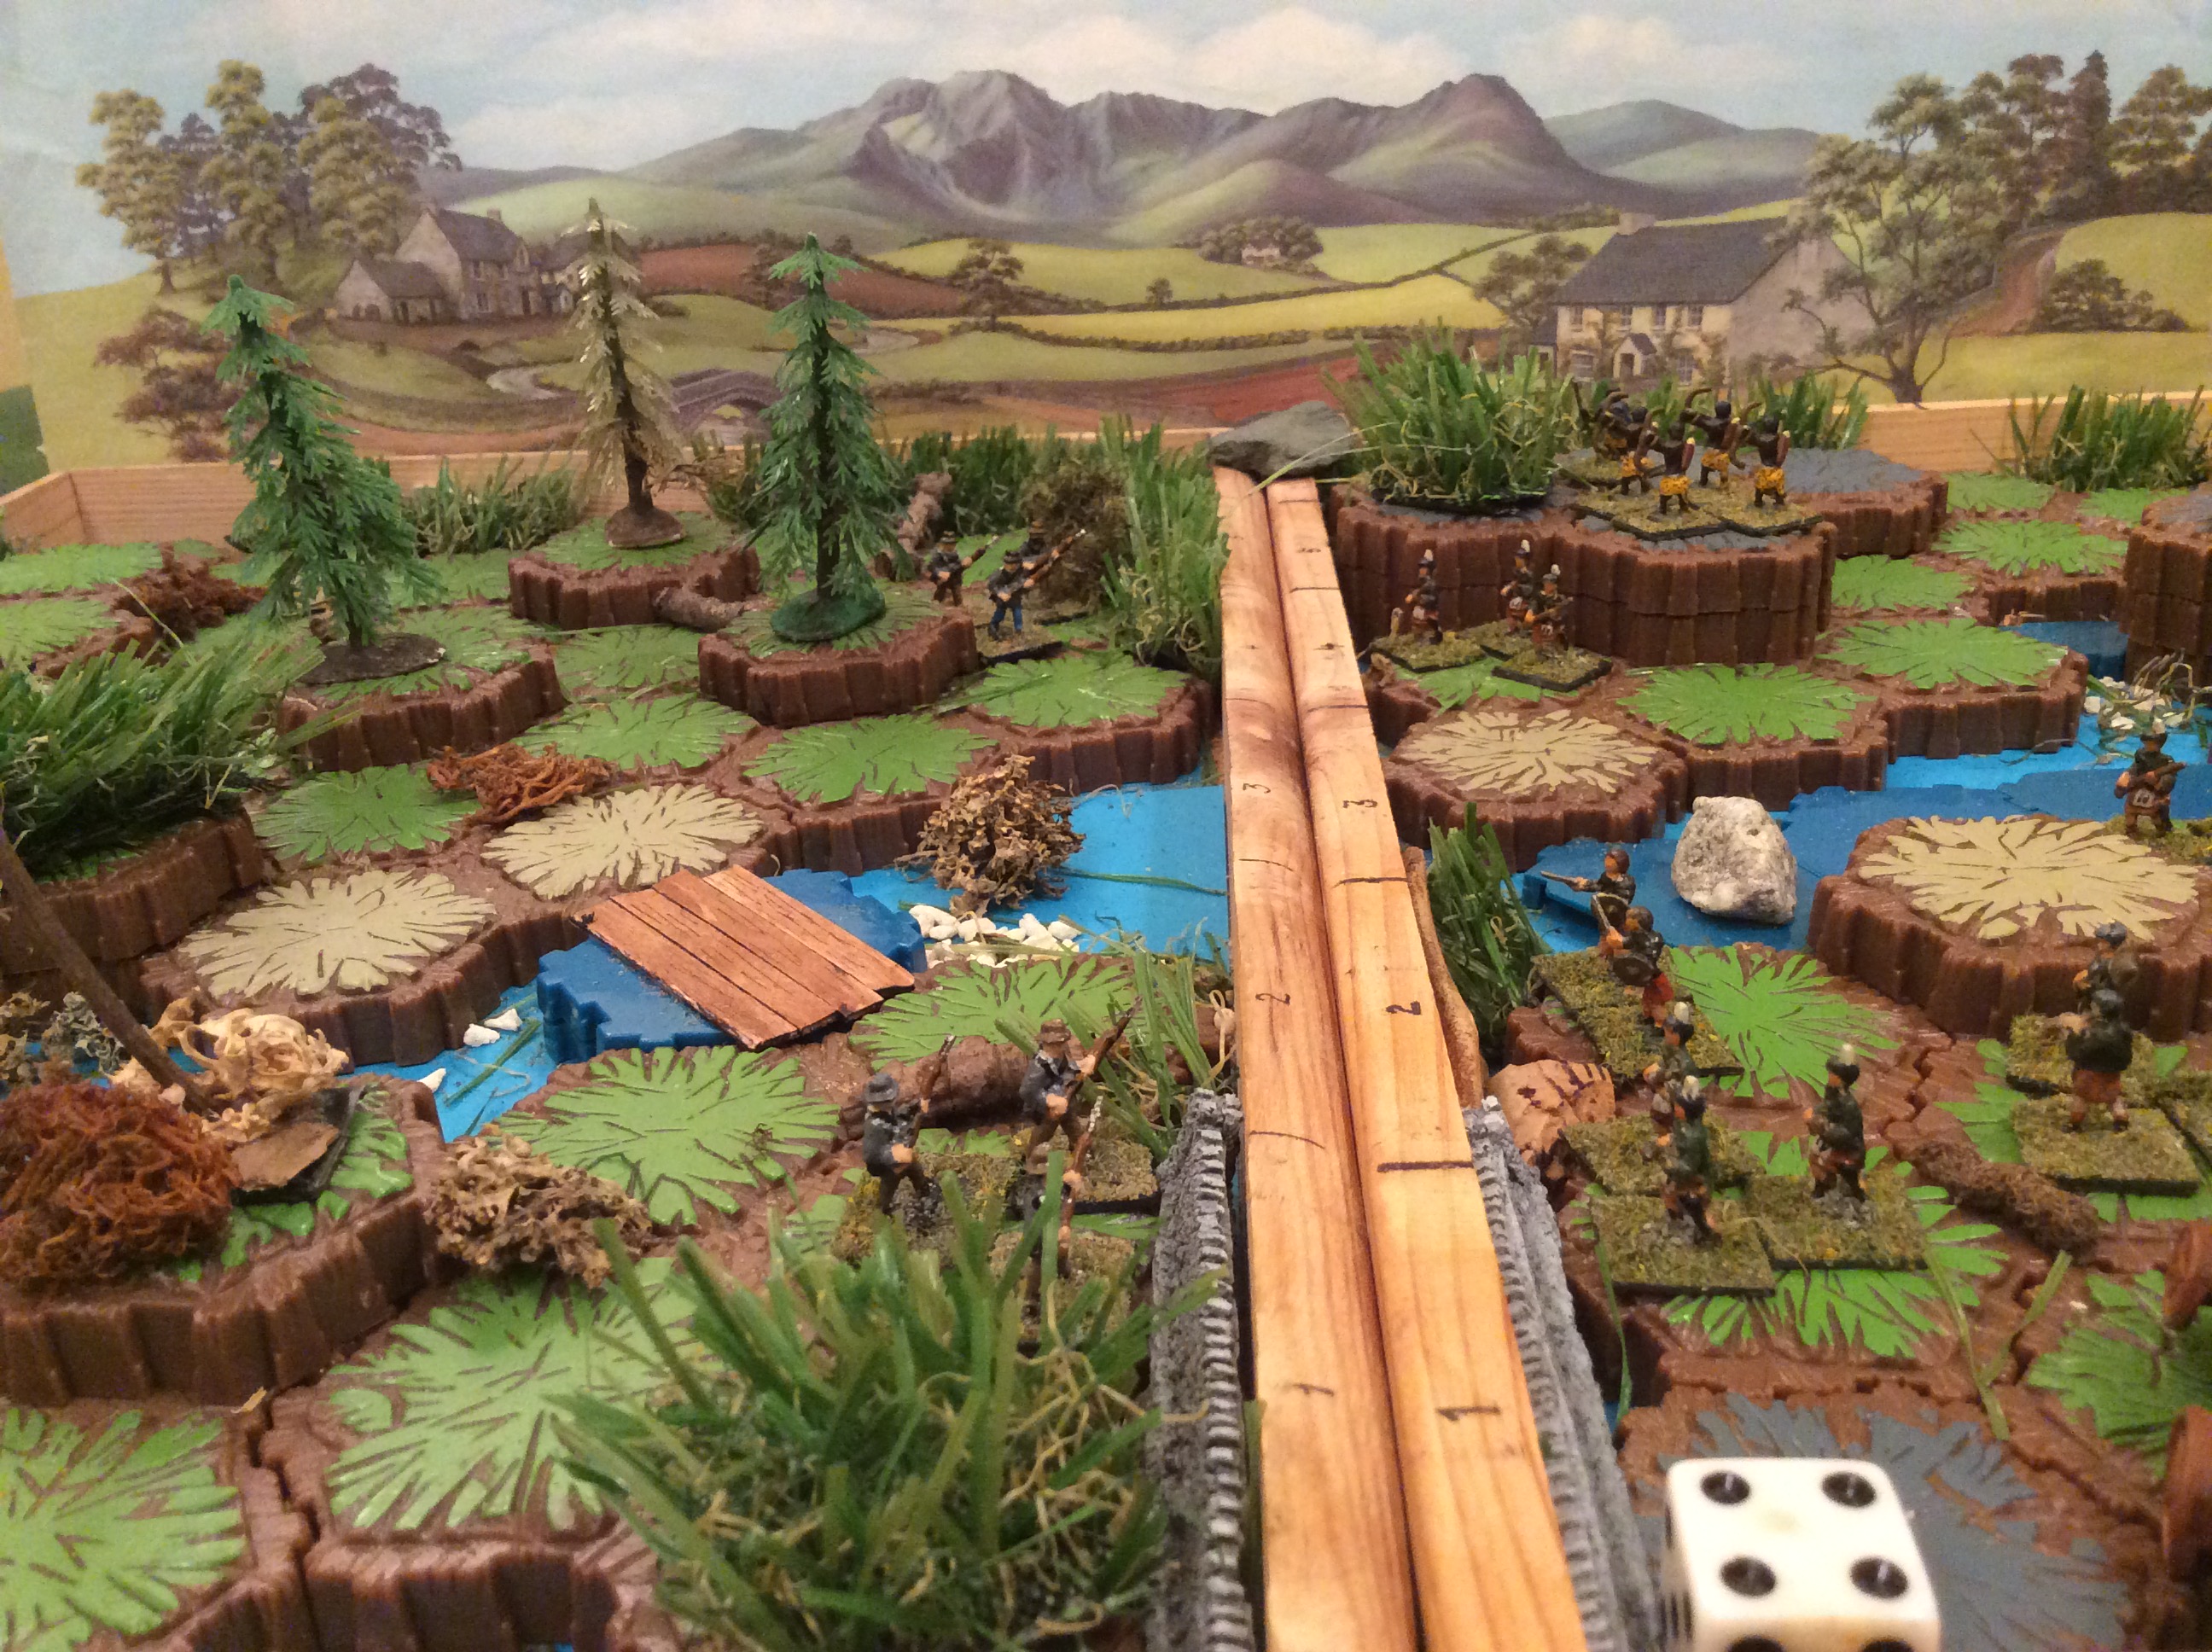
Close Wars rules requires a cluttered terrain. Rather than clutter up the kitchen table with a 54mm Close Wars game and have to move it for meals, I wanted to leave this set up to play over several days squeezed in next to my desk and painting table.
I put sheets of felt over my usual portable hex boards for a change, using some chunky bound old volumes for hills. I used strips of felt for added streams and paths, exploiting the dips added some slate chips and chunks from the garden, some twigs and railway modelling bushes.
The damaged bridge was quickly made from a raft of coffee stirrers, superglued and ‘painted’ with felt tips. The bridge provides a “pinch point” between hills and stream for the wagon.
Hopefully it all keeps some of that improvised terrain spirit of our childhood games, of H. G. Wells’ Little Wars and early Donald Featherstone War Games 1962 (the book from which the two page ‘Close Wars’ rules appendix came).
The only large sheet of felt in the house when I was a child, a beautiful thick dark green, was the heat protector under the table cloth for our family dining table, so borrowing this or the dining table itself (above or below) meant toy soldier games had to fit in and finish around family mealtimes.
For a few moments I considered this as a garden game, but with creaky knees and changeable weather, I decided against this. The trees I use for pop-up 54mm games would not like being left outside.
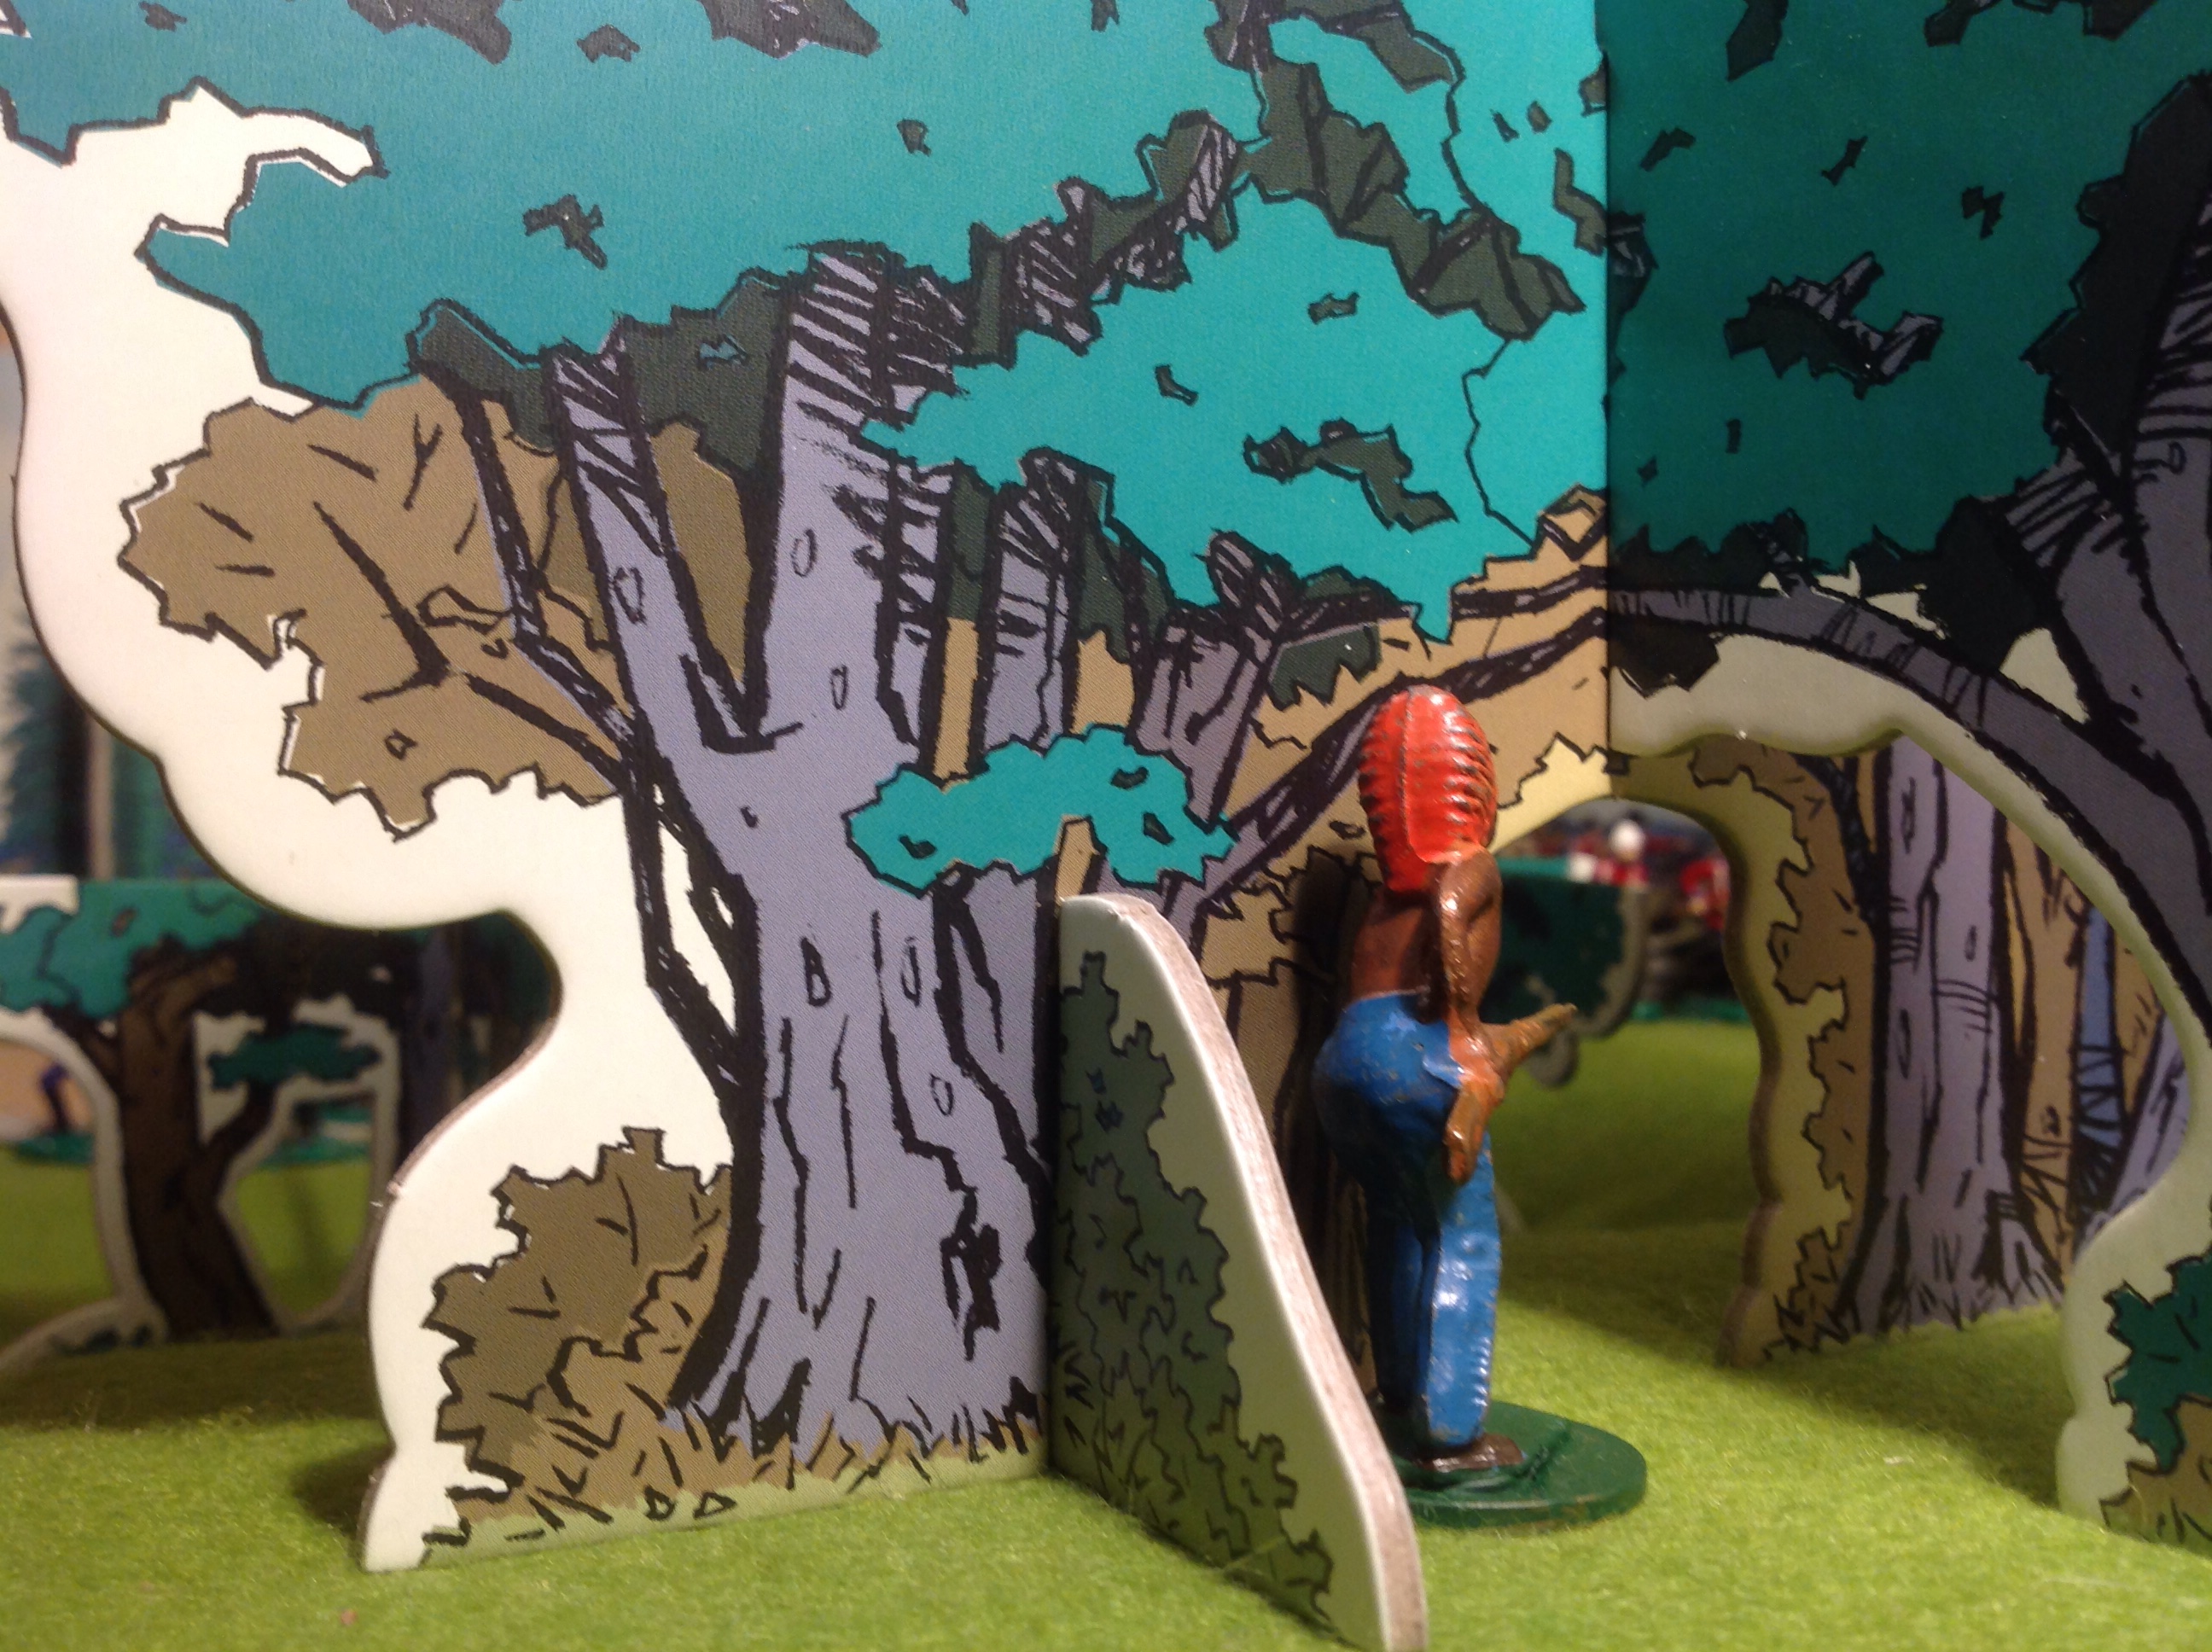
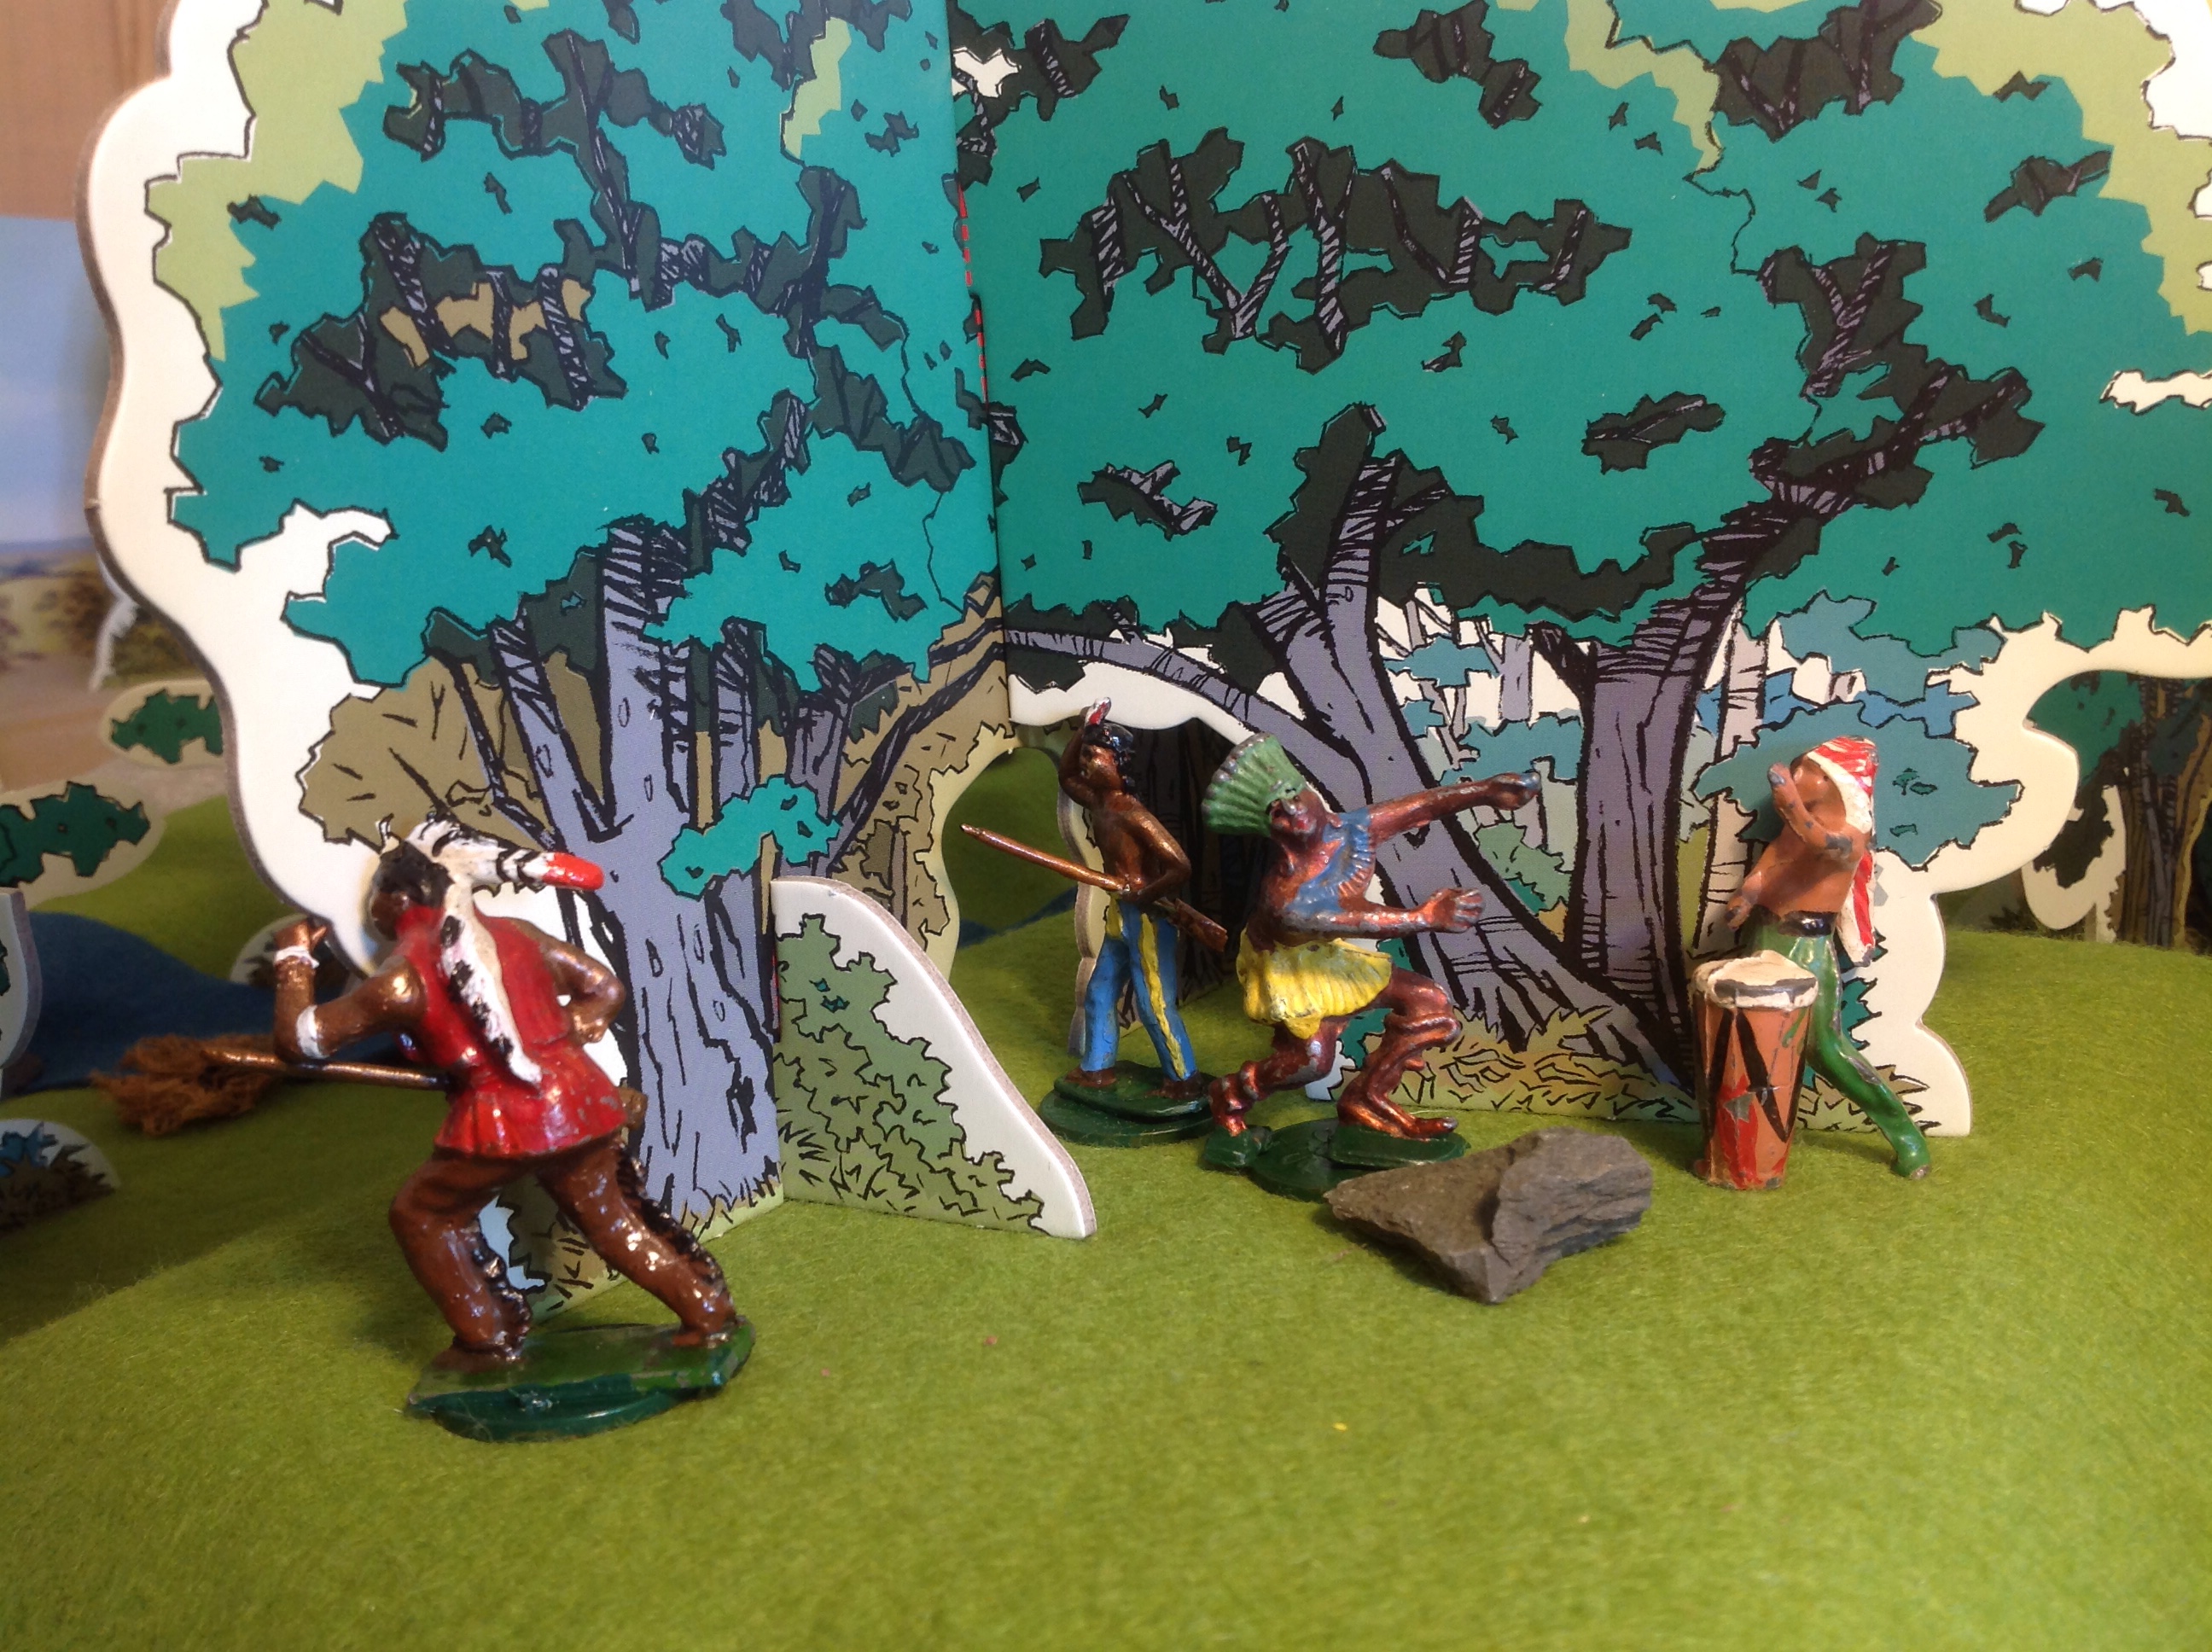
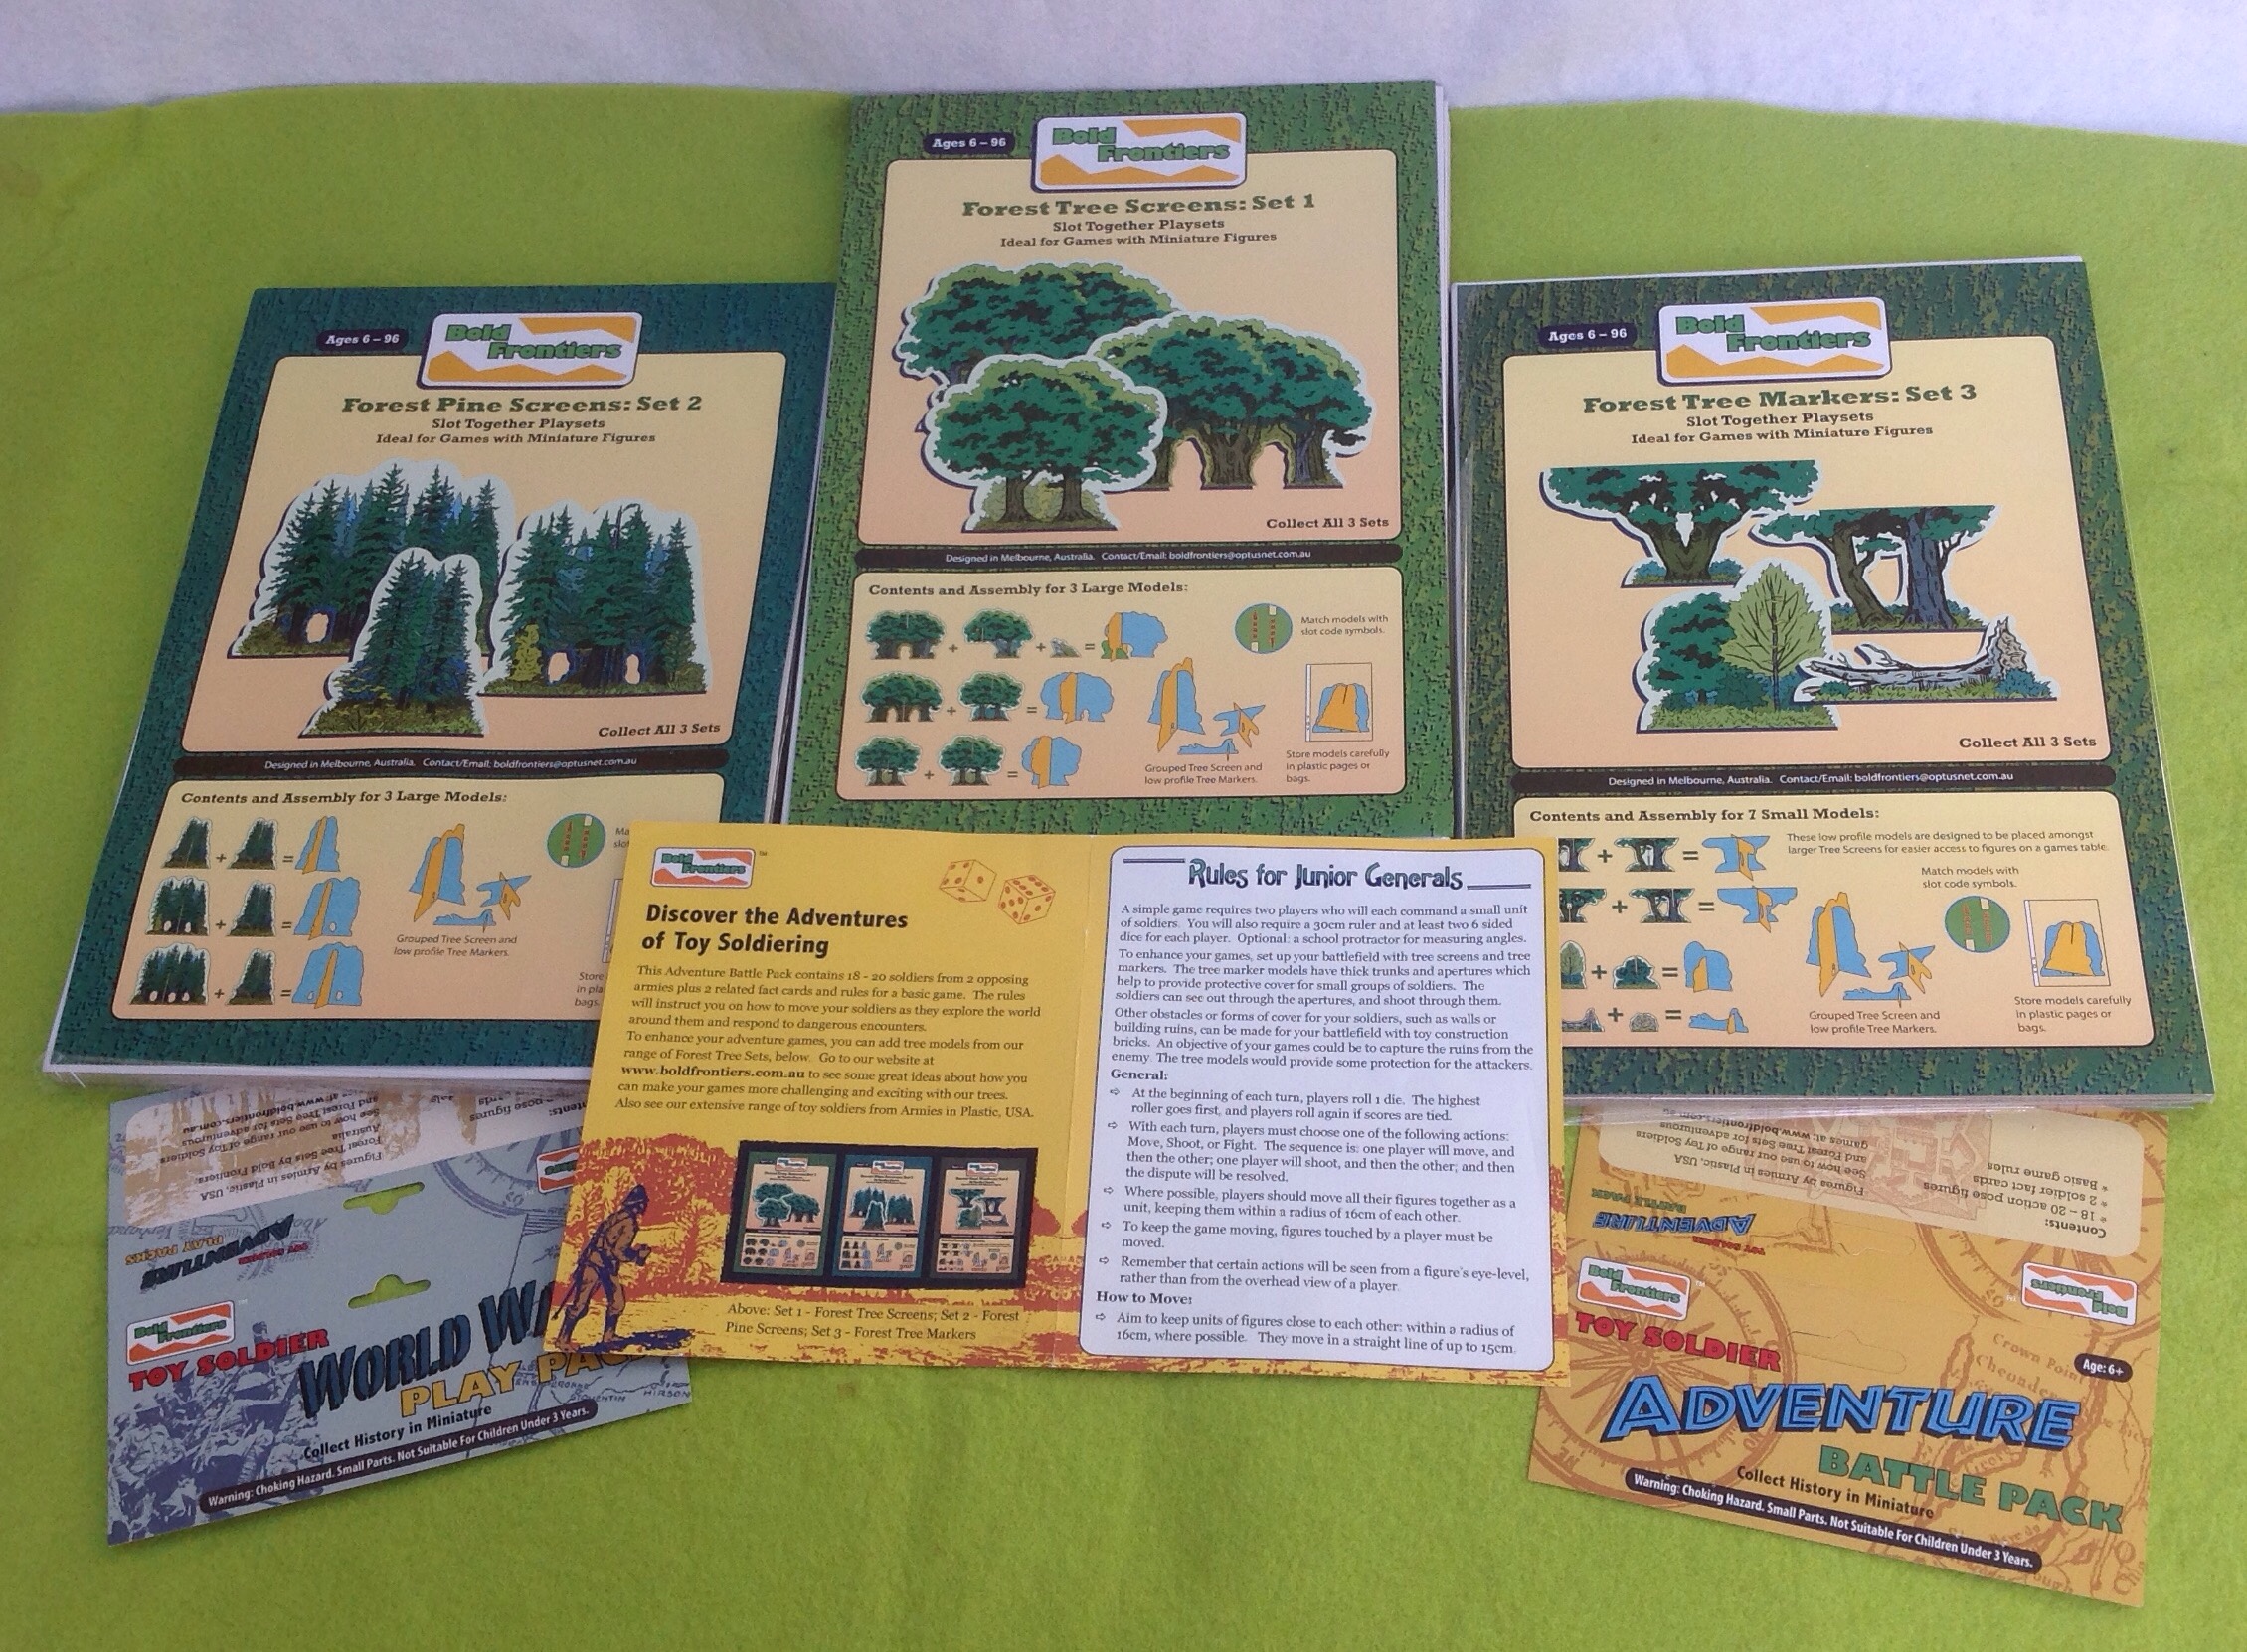
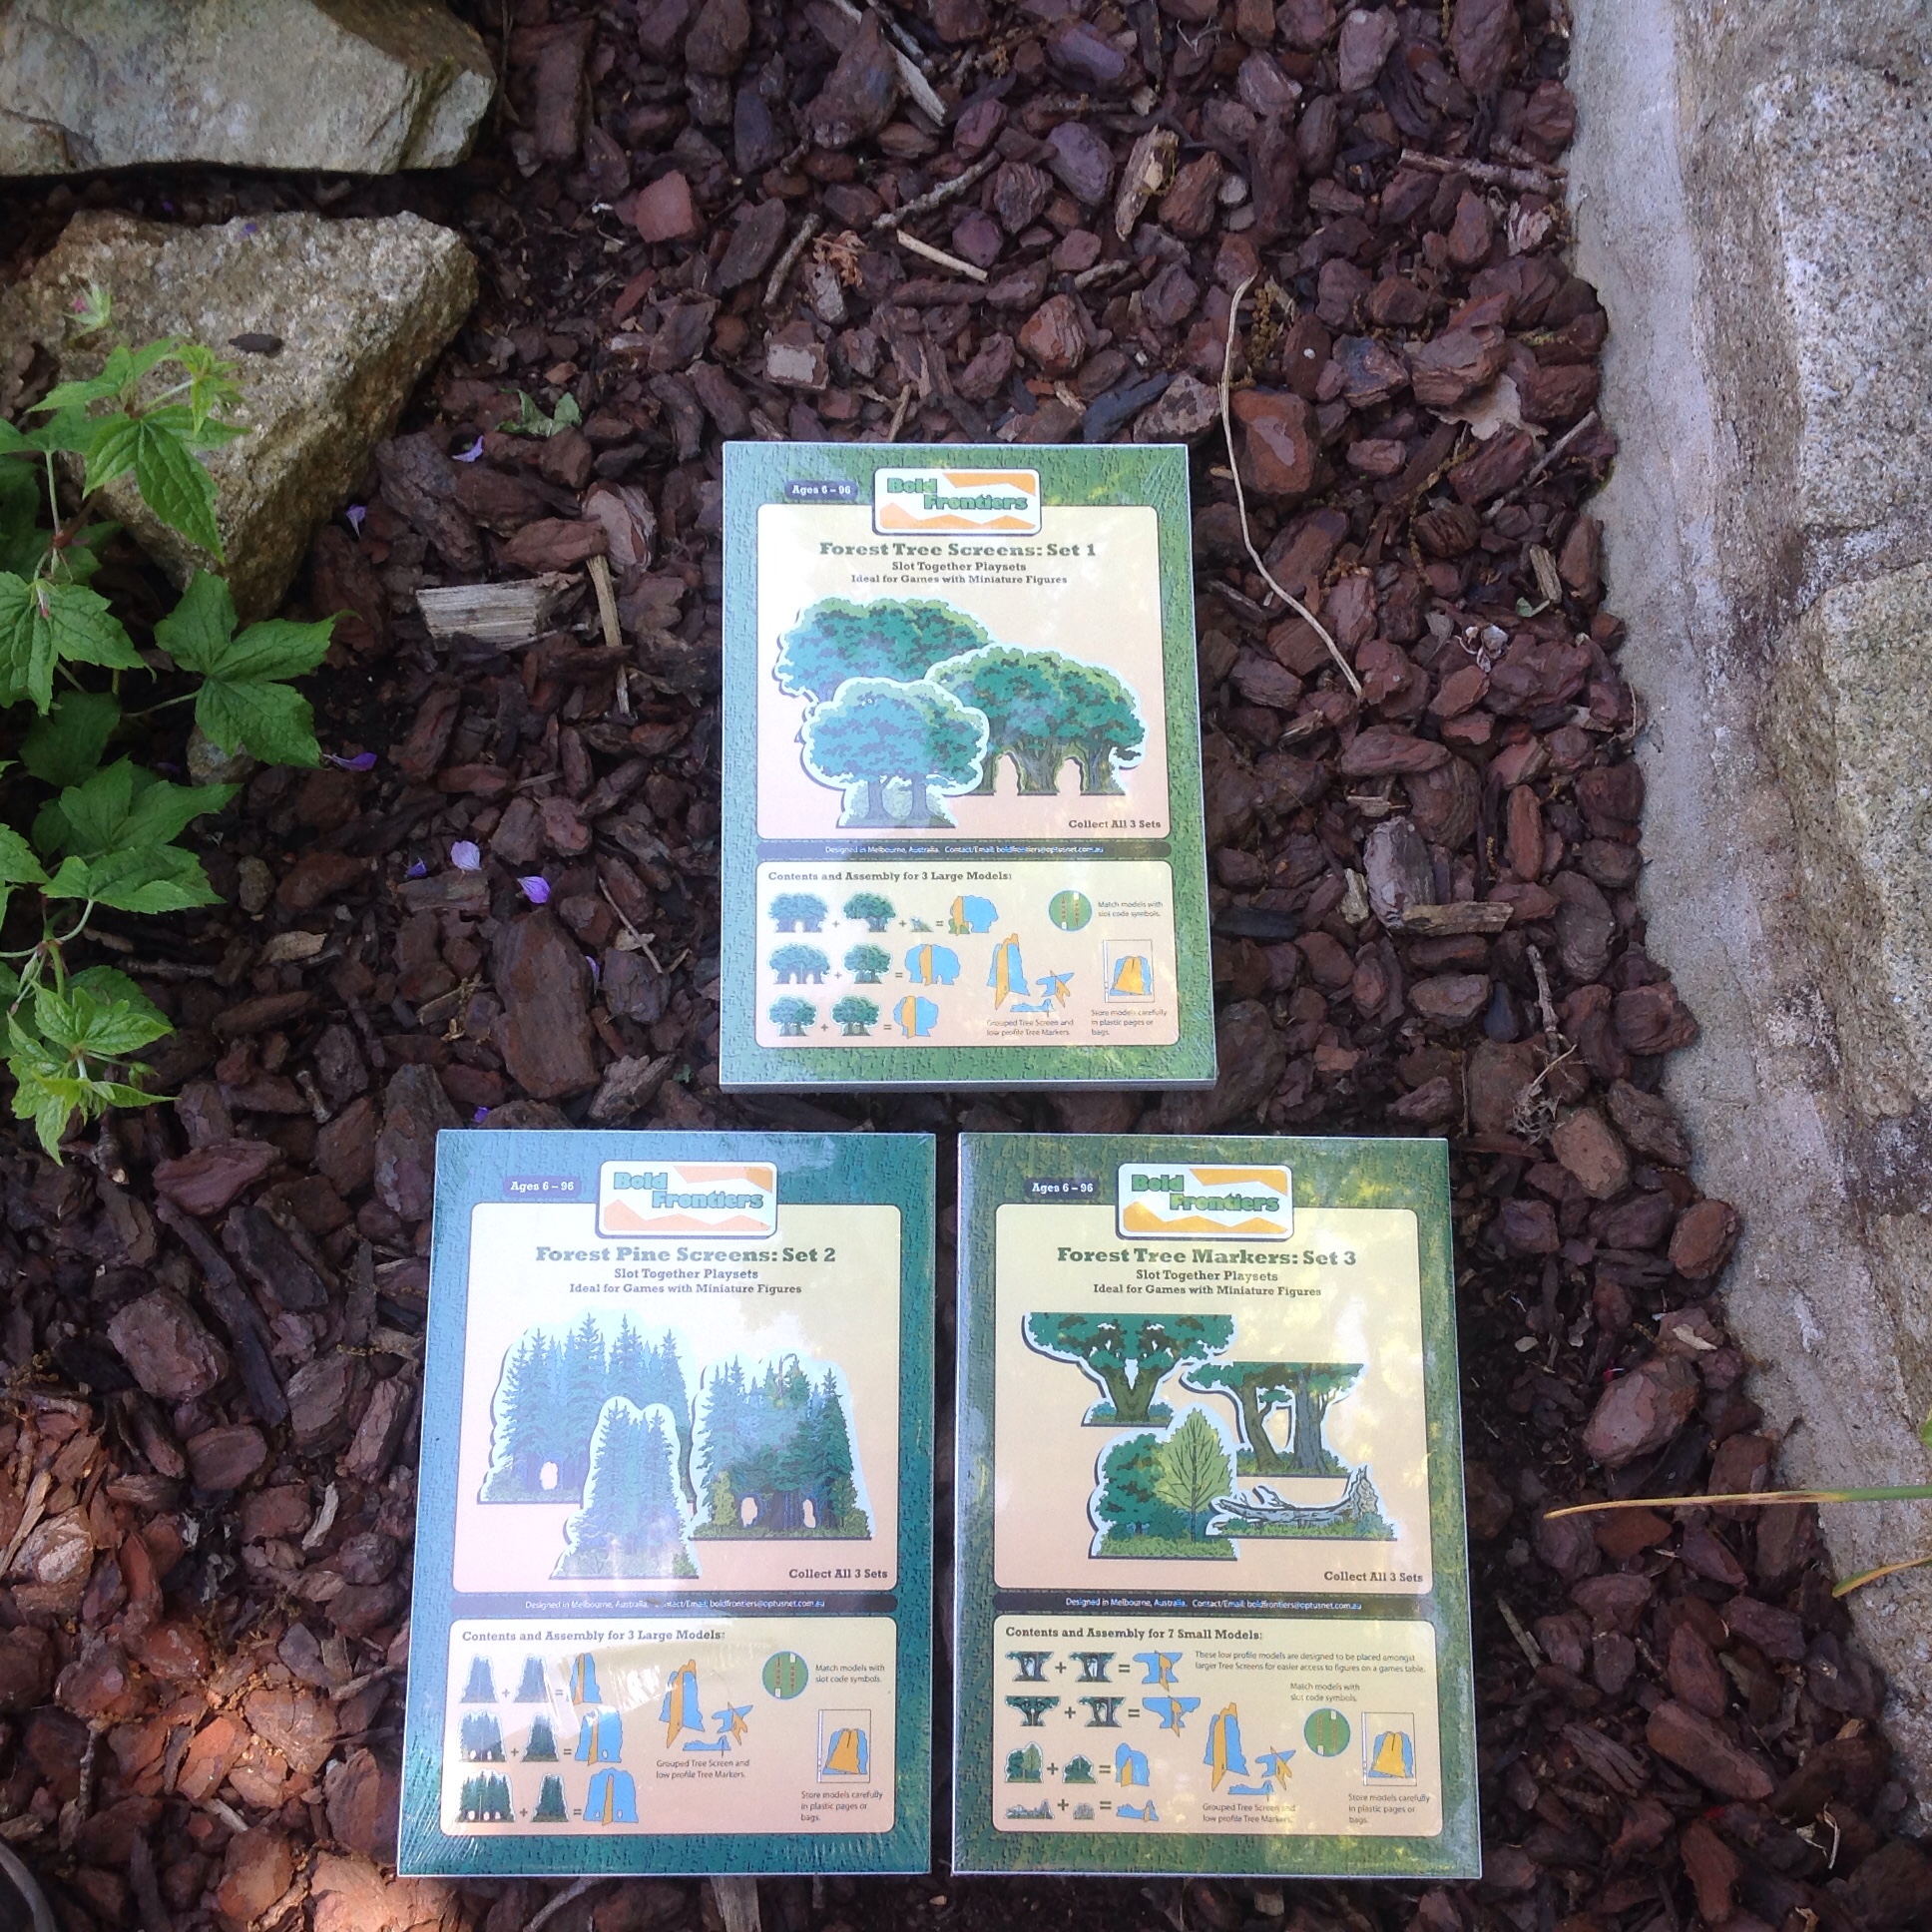
The forest trees are beautiful preformed preprinted thick card ones from Bold Frontiers Australia, a recent gift to aid my Close Little Wars forest games. The three tree sets bring a real pop-up 3D picture book feel to this forest landscape.
The scenario of ‘Wheel Meet Again’, the broken wagon to defend in hostile territory is loosely based on one by the late Stuart Asquith that I used as a memorial game last November. Add a dash of Last of The Mohicans.
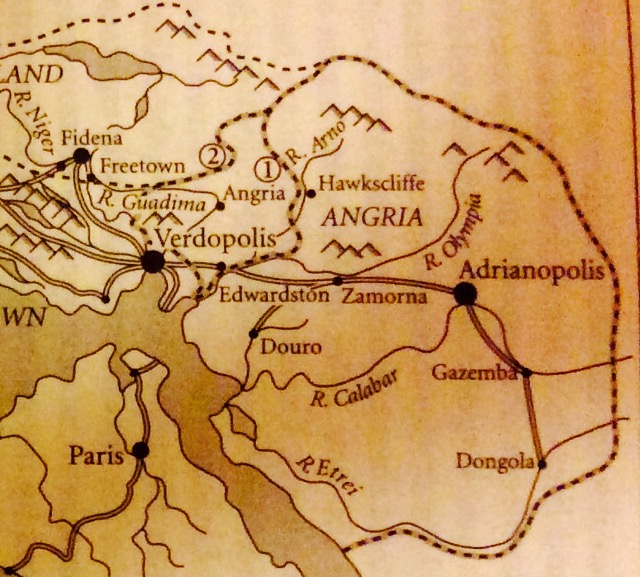
Gondal is a borrowed ImagiNation, one of the four kingdoms on a North Pacific ‘Tropical Yorkshire’ island created in the 1830s and 1840s by the Bronte family as youngsters. Other Bronte versions of ‘Tropical Yorkshire’ include Glass Town and Angria (roughly West Africa), whilst Gaaldine is Tropical Yorkshire on two South Pacific islands. Gondal is similar to my ImagiNations continents of North, Central and South Generica, roughly equivalent to the historical Americas.
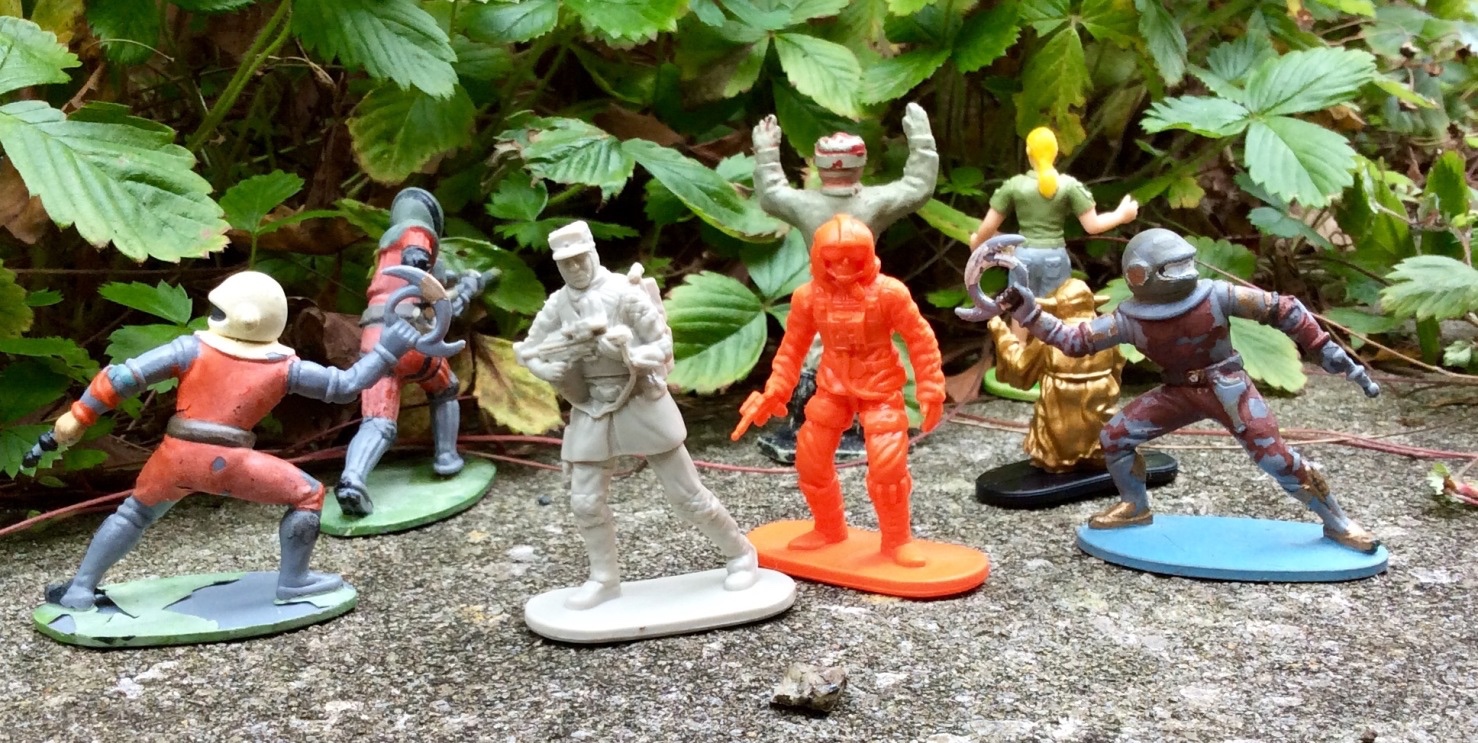
I don’t have any French Indian War / Revolutionary War bicorne figures or redcoats in 54mm at the moment. The BMC 54mm ones are in a box patiently awaiting painting, a year on from Christmas 2019. Instead my 42mm Pound Store Redcoats have stepped in and borrowed the scout trek cart. This overloaded wagon is pulled by a flat cavalryman who disappears to take news to the Forest Fort, Fort McGuffin.
A few smaller Britains hollow-cast figures were added in. The Fort Commander’s daughter is a plastic seaside pirate girl with concealed pistol behind her back, her faithful hound from the old Tradition of London Victorian street figures.
Barrels are buttons from the local craft shop, hay from Britain’s farm series, the baggage from the old Herald cowboy raft.
The Natives
I do have a host of repaired, tuppenny based hollow-cast 50 to 54mm Indians that I have repainted over the last two years. I have generally chosen the non Britain’s Indian figures as they tend to be a little smaller in the mid 40s to 50mm size.
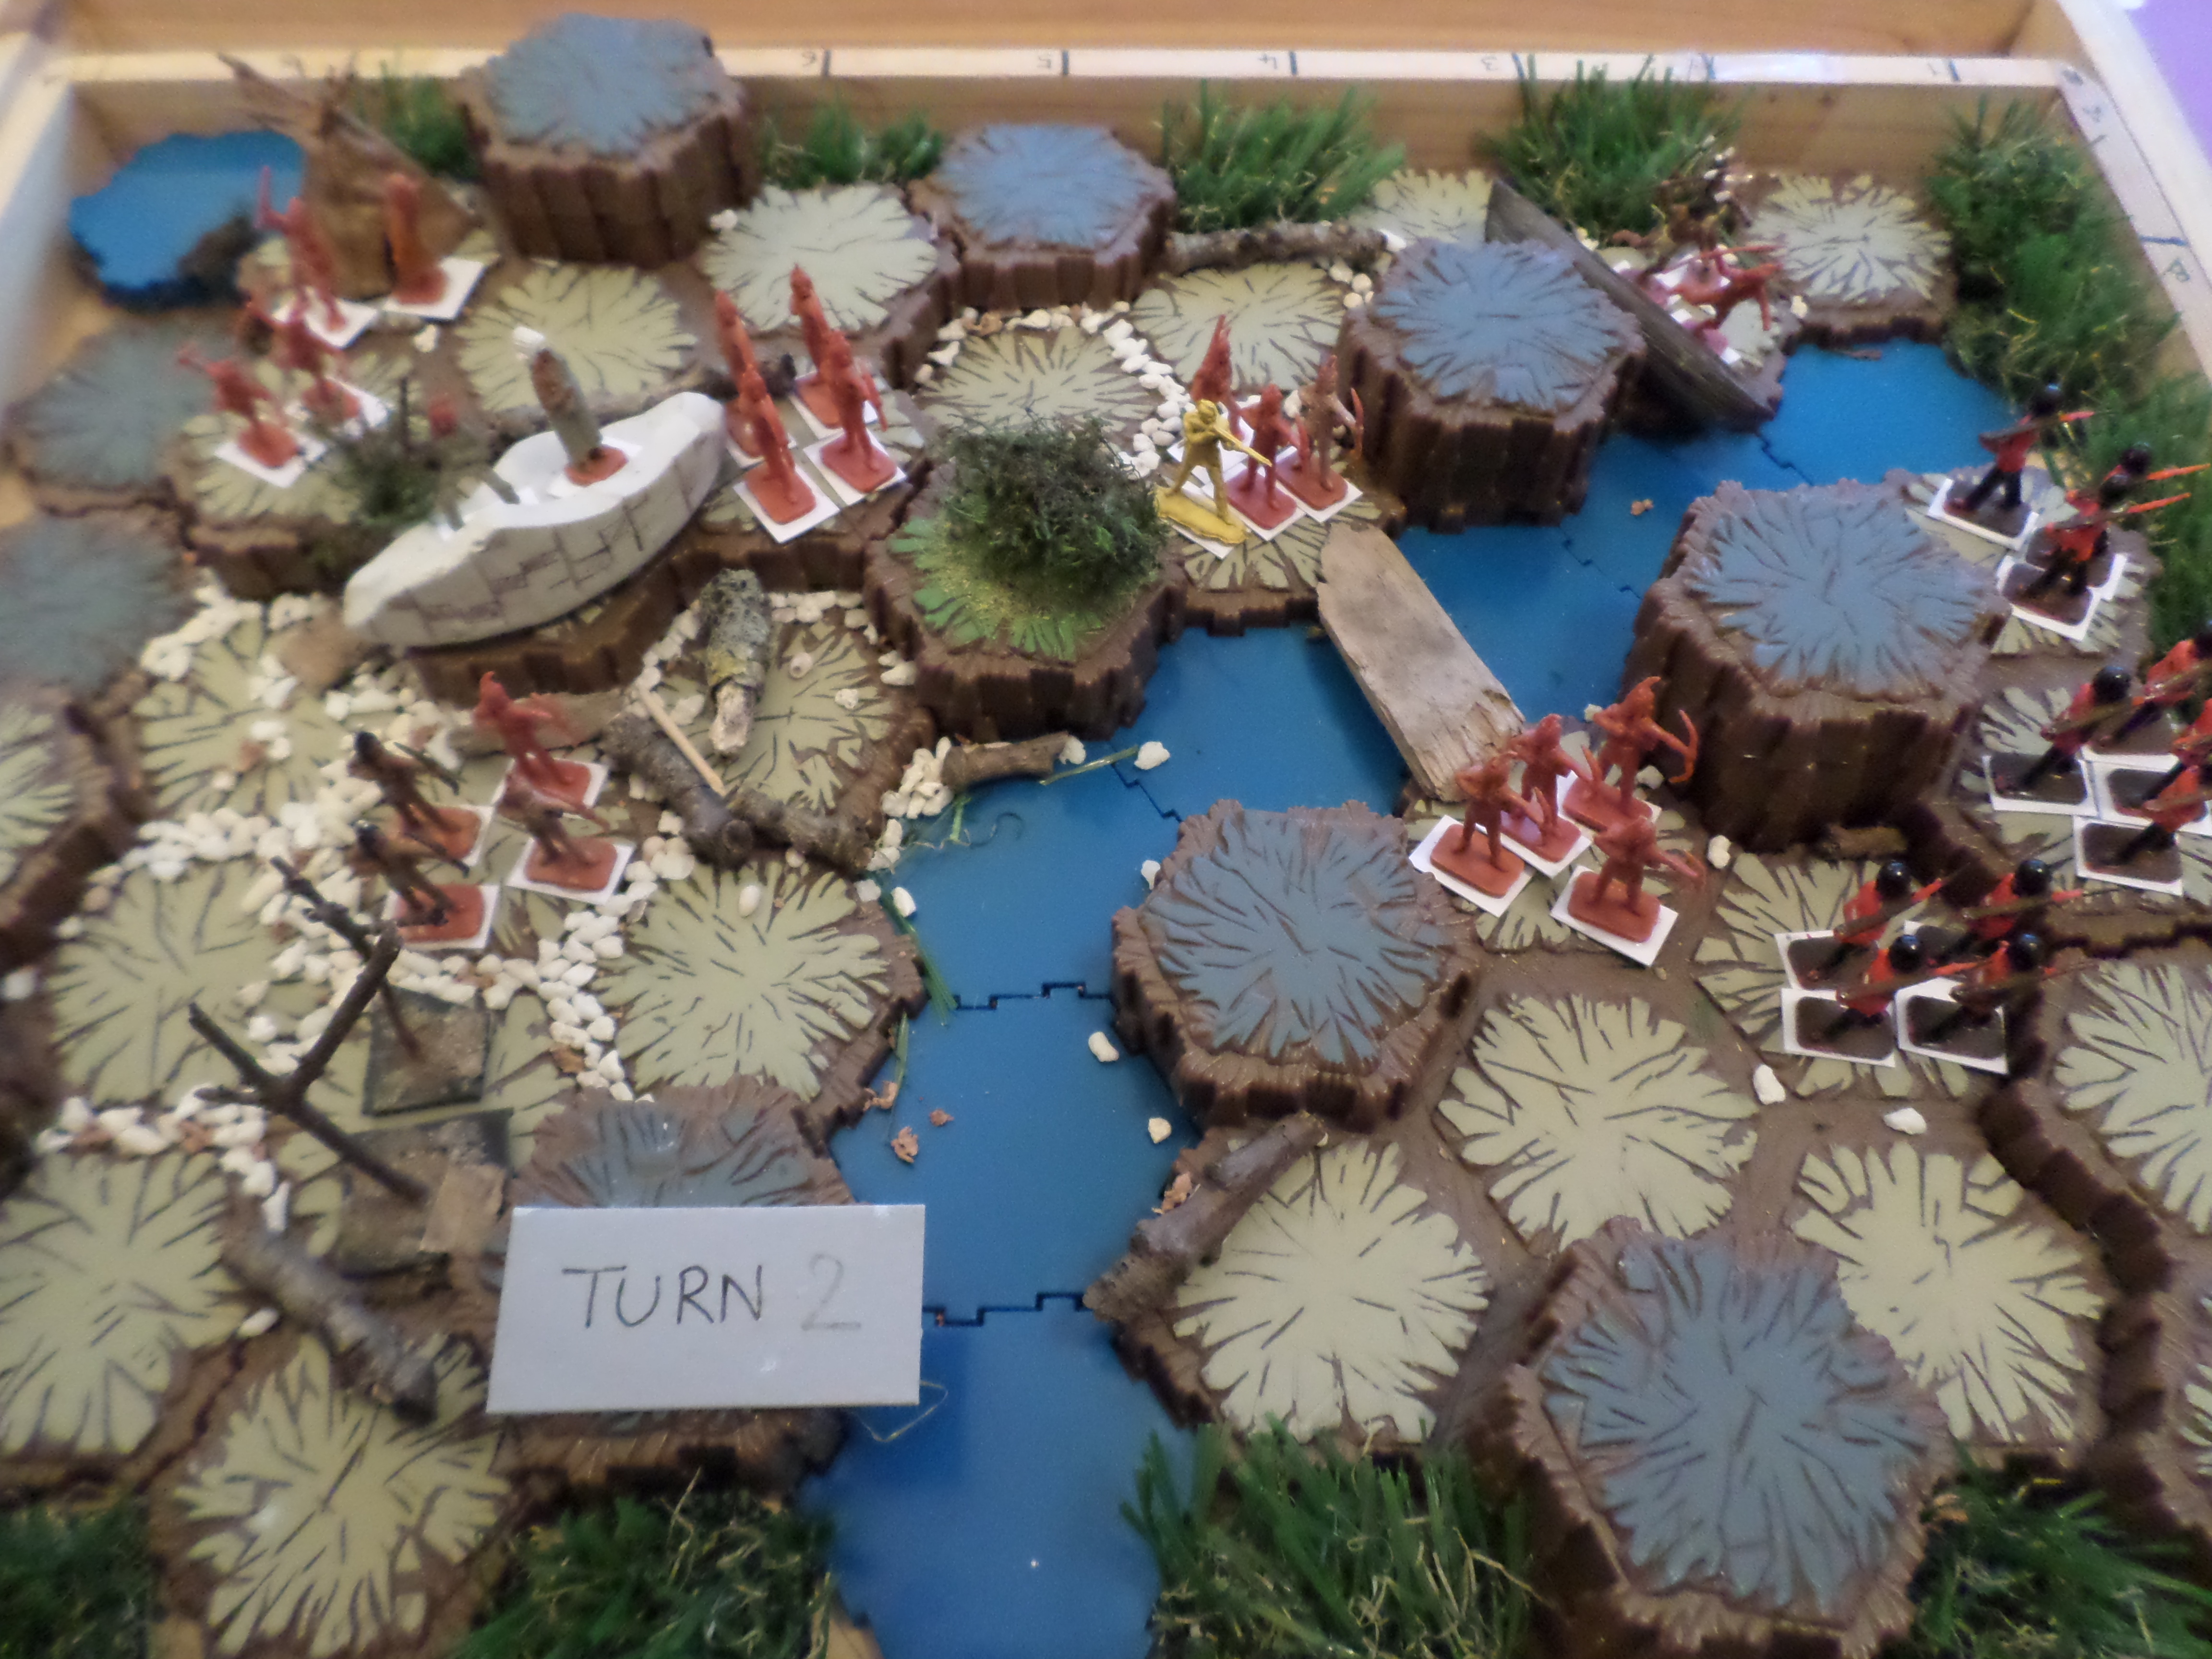
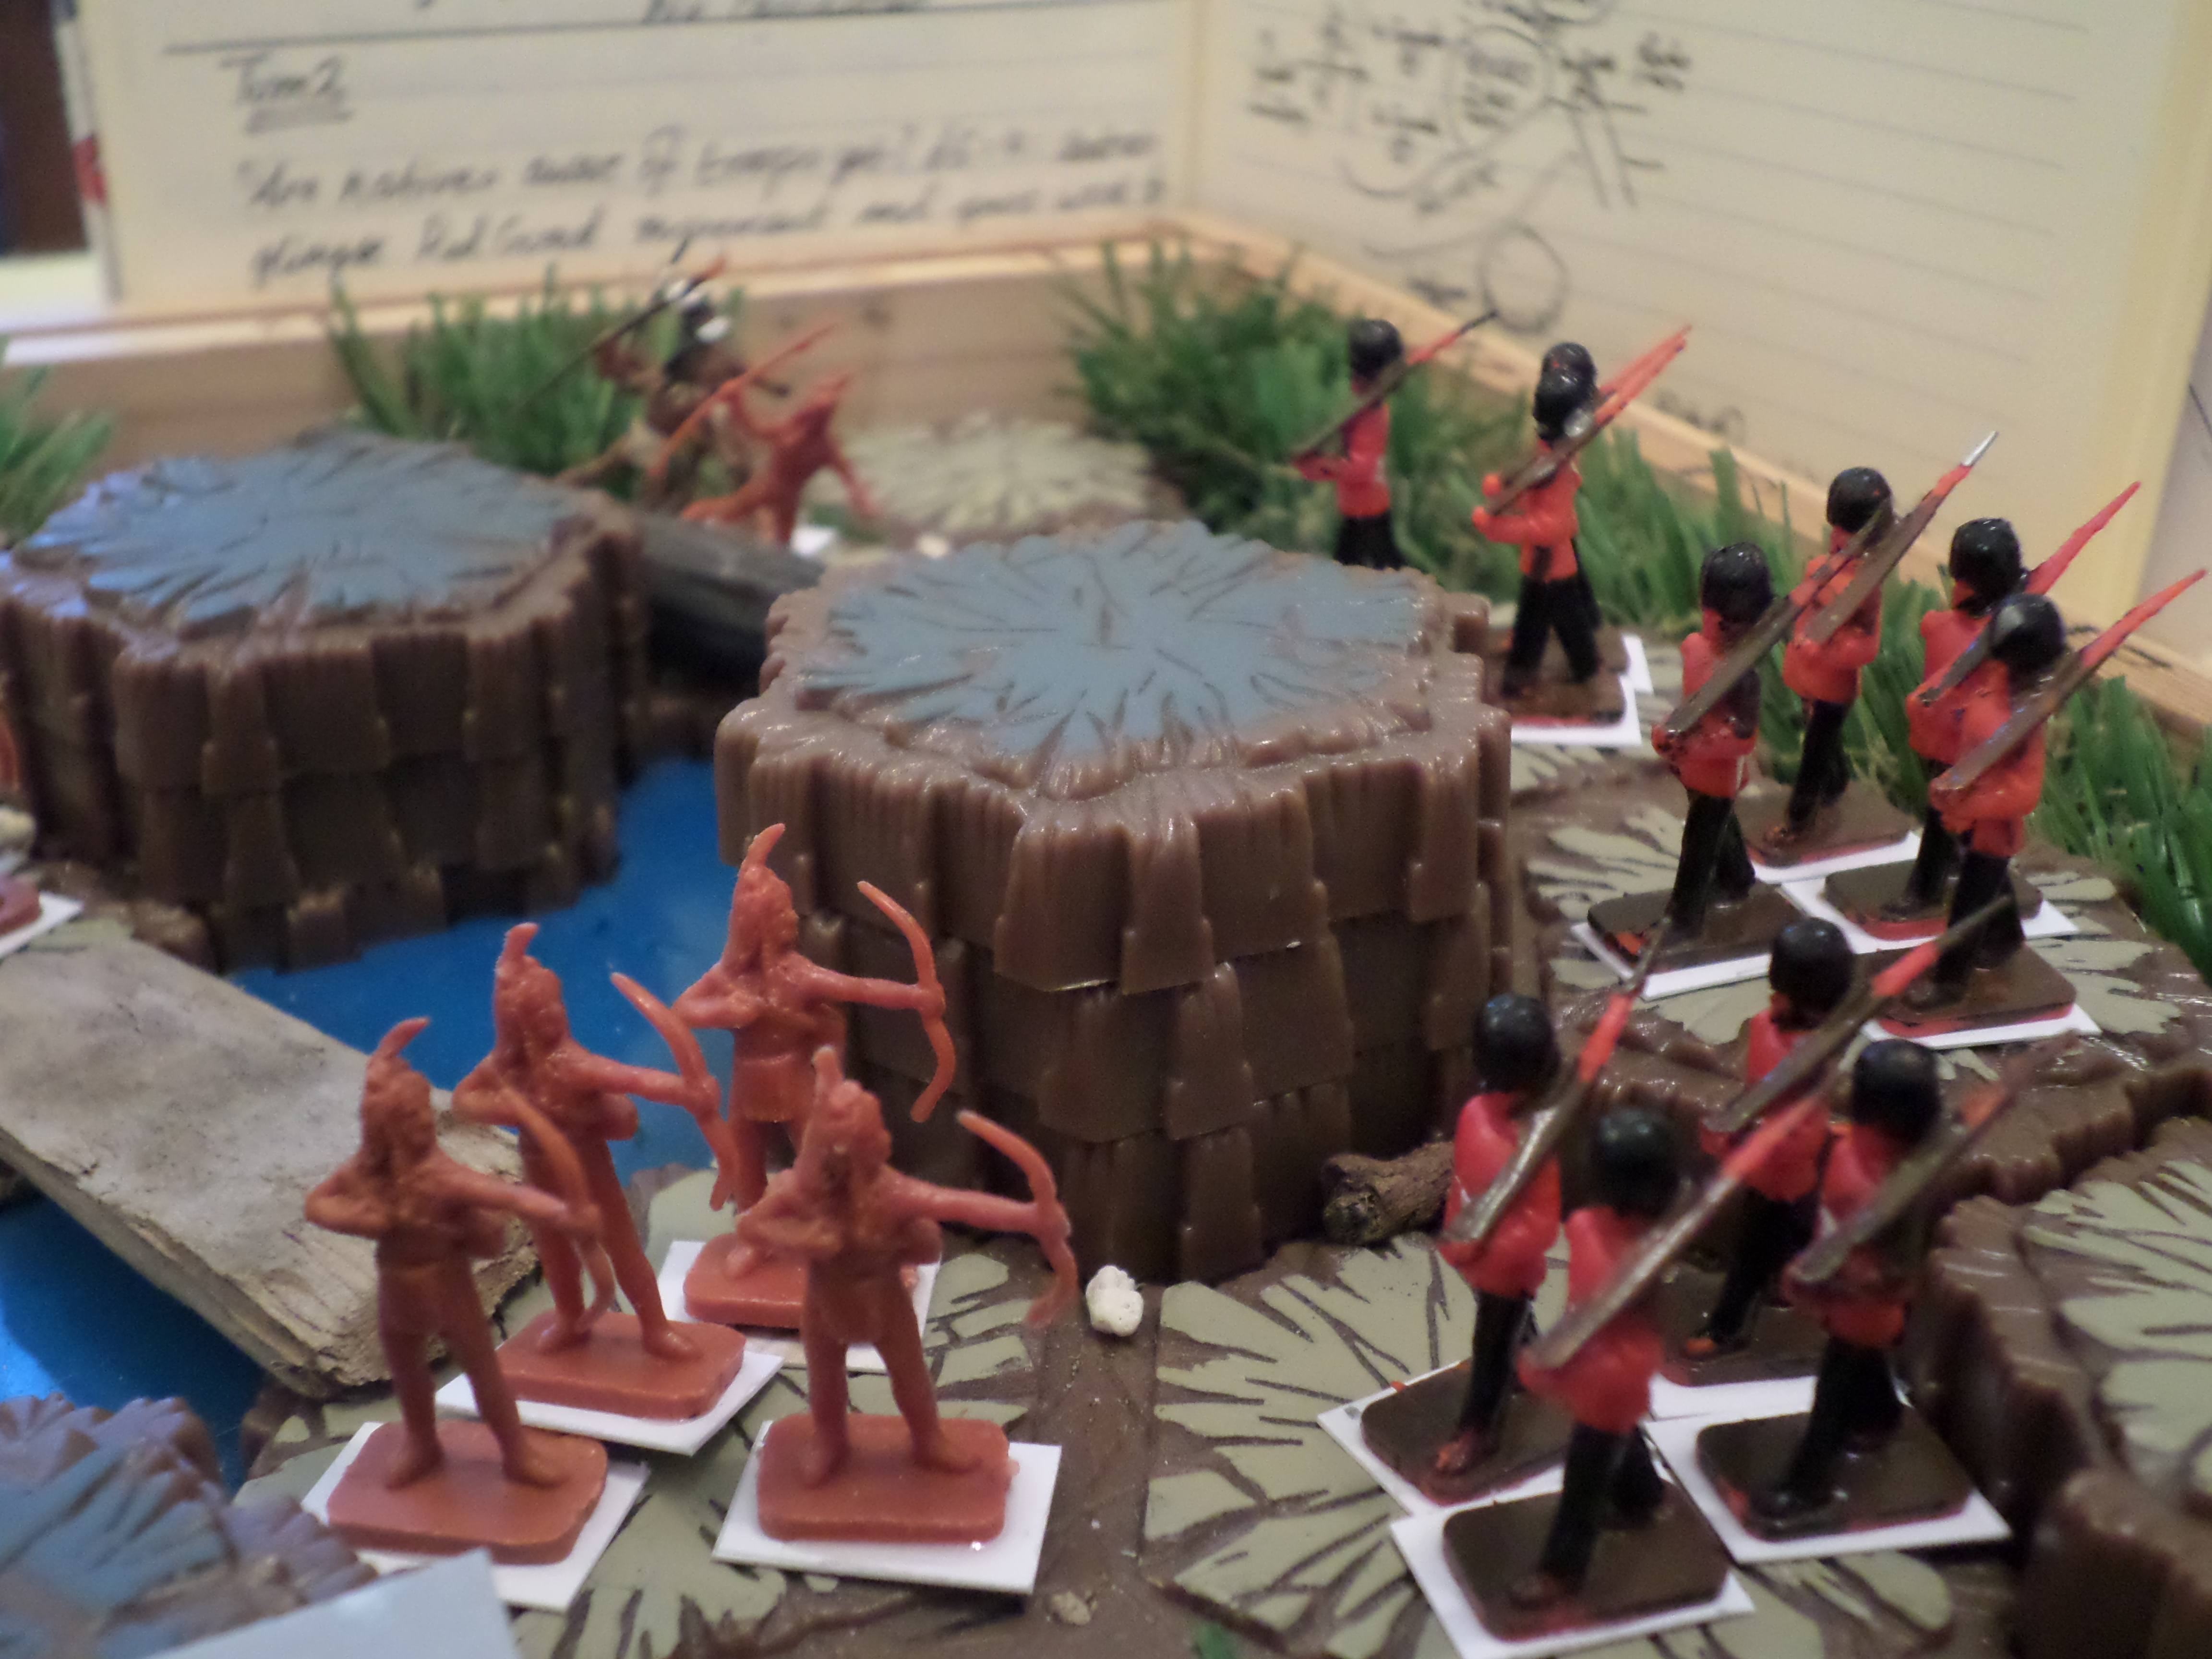
Turn 2 of Counterpayne / Close Little Wars game No. 8
The Duke of Wellington dismissively observed to William Siborne, “You can as well write the history of a ball as of a battle.” Here is an old overlooked battle or skirmish report.
This scratch game is an oldie from 2016, stuck in the drafts folder, that didn’t as far as I remember get published on this blog at the time. It uses my first version of a portable wooden hex game board using Heroscape tiles.
Close Little Wars game 8 involves Natives v Redcoats.
Figures – The Natives are vintage Airfix Indians versus Redcoats who are vintage Airfix Guards Colour Party.
Weapons – The Natives (Airfix Indians) are equipped with distance weapons mainly bows, spears and a few rifles. 18 Redcoat Infantry, NCO and the Bugler have Rifles, the Officer and Standard Bearer have pistols and swords / cutlasses.
Range reminders – Rifles and native bows fire 4 hexes, pistol and spears 2 hexes.
Movement reminders – Natives move 3 hex squares, Redcoat troops in groups of 3 or less move 3 hex squares, Redcoat troops in groups of 4 or more move 2 hexes. There are no roads on this terrain. Uphill movements take half a move (1 hex height equals half a move). Heights above two hexes stacked are unclimbable unless a different route of 1 hex steps are available.
Size of Force – Usually we have about 25 figures on each side but throw a d6 for each side to remove that number of figures from each side, giving slight disadvantage of only 21 Redcoat Guardsmen (Redcoats rolled 4 on their d6) to 24 natives.
Only 4 figures can occupy a hex square. 1 figure = 1 man.
Scenario Aims – The Aim of the Redcoats is firstly to recover the old crossing fort, capture the crossing and possibly the native campsite. Capturing the Native Chief and his Squaw is also a secondary aim.
The Aim of the Natives is firstly to defend the crossing and defeat the Redcoats. Secondary aim is for their Chief and Squaw to escape intact, inflicting as many Redcoat casualties as needed.
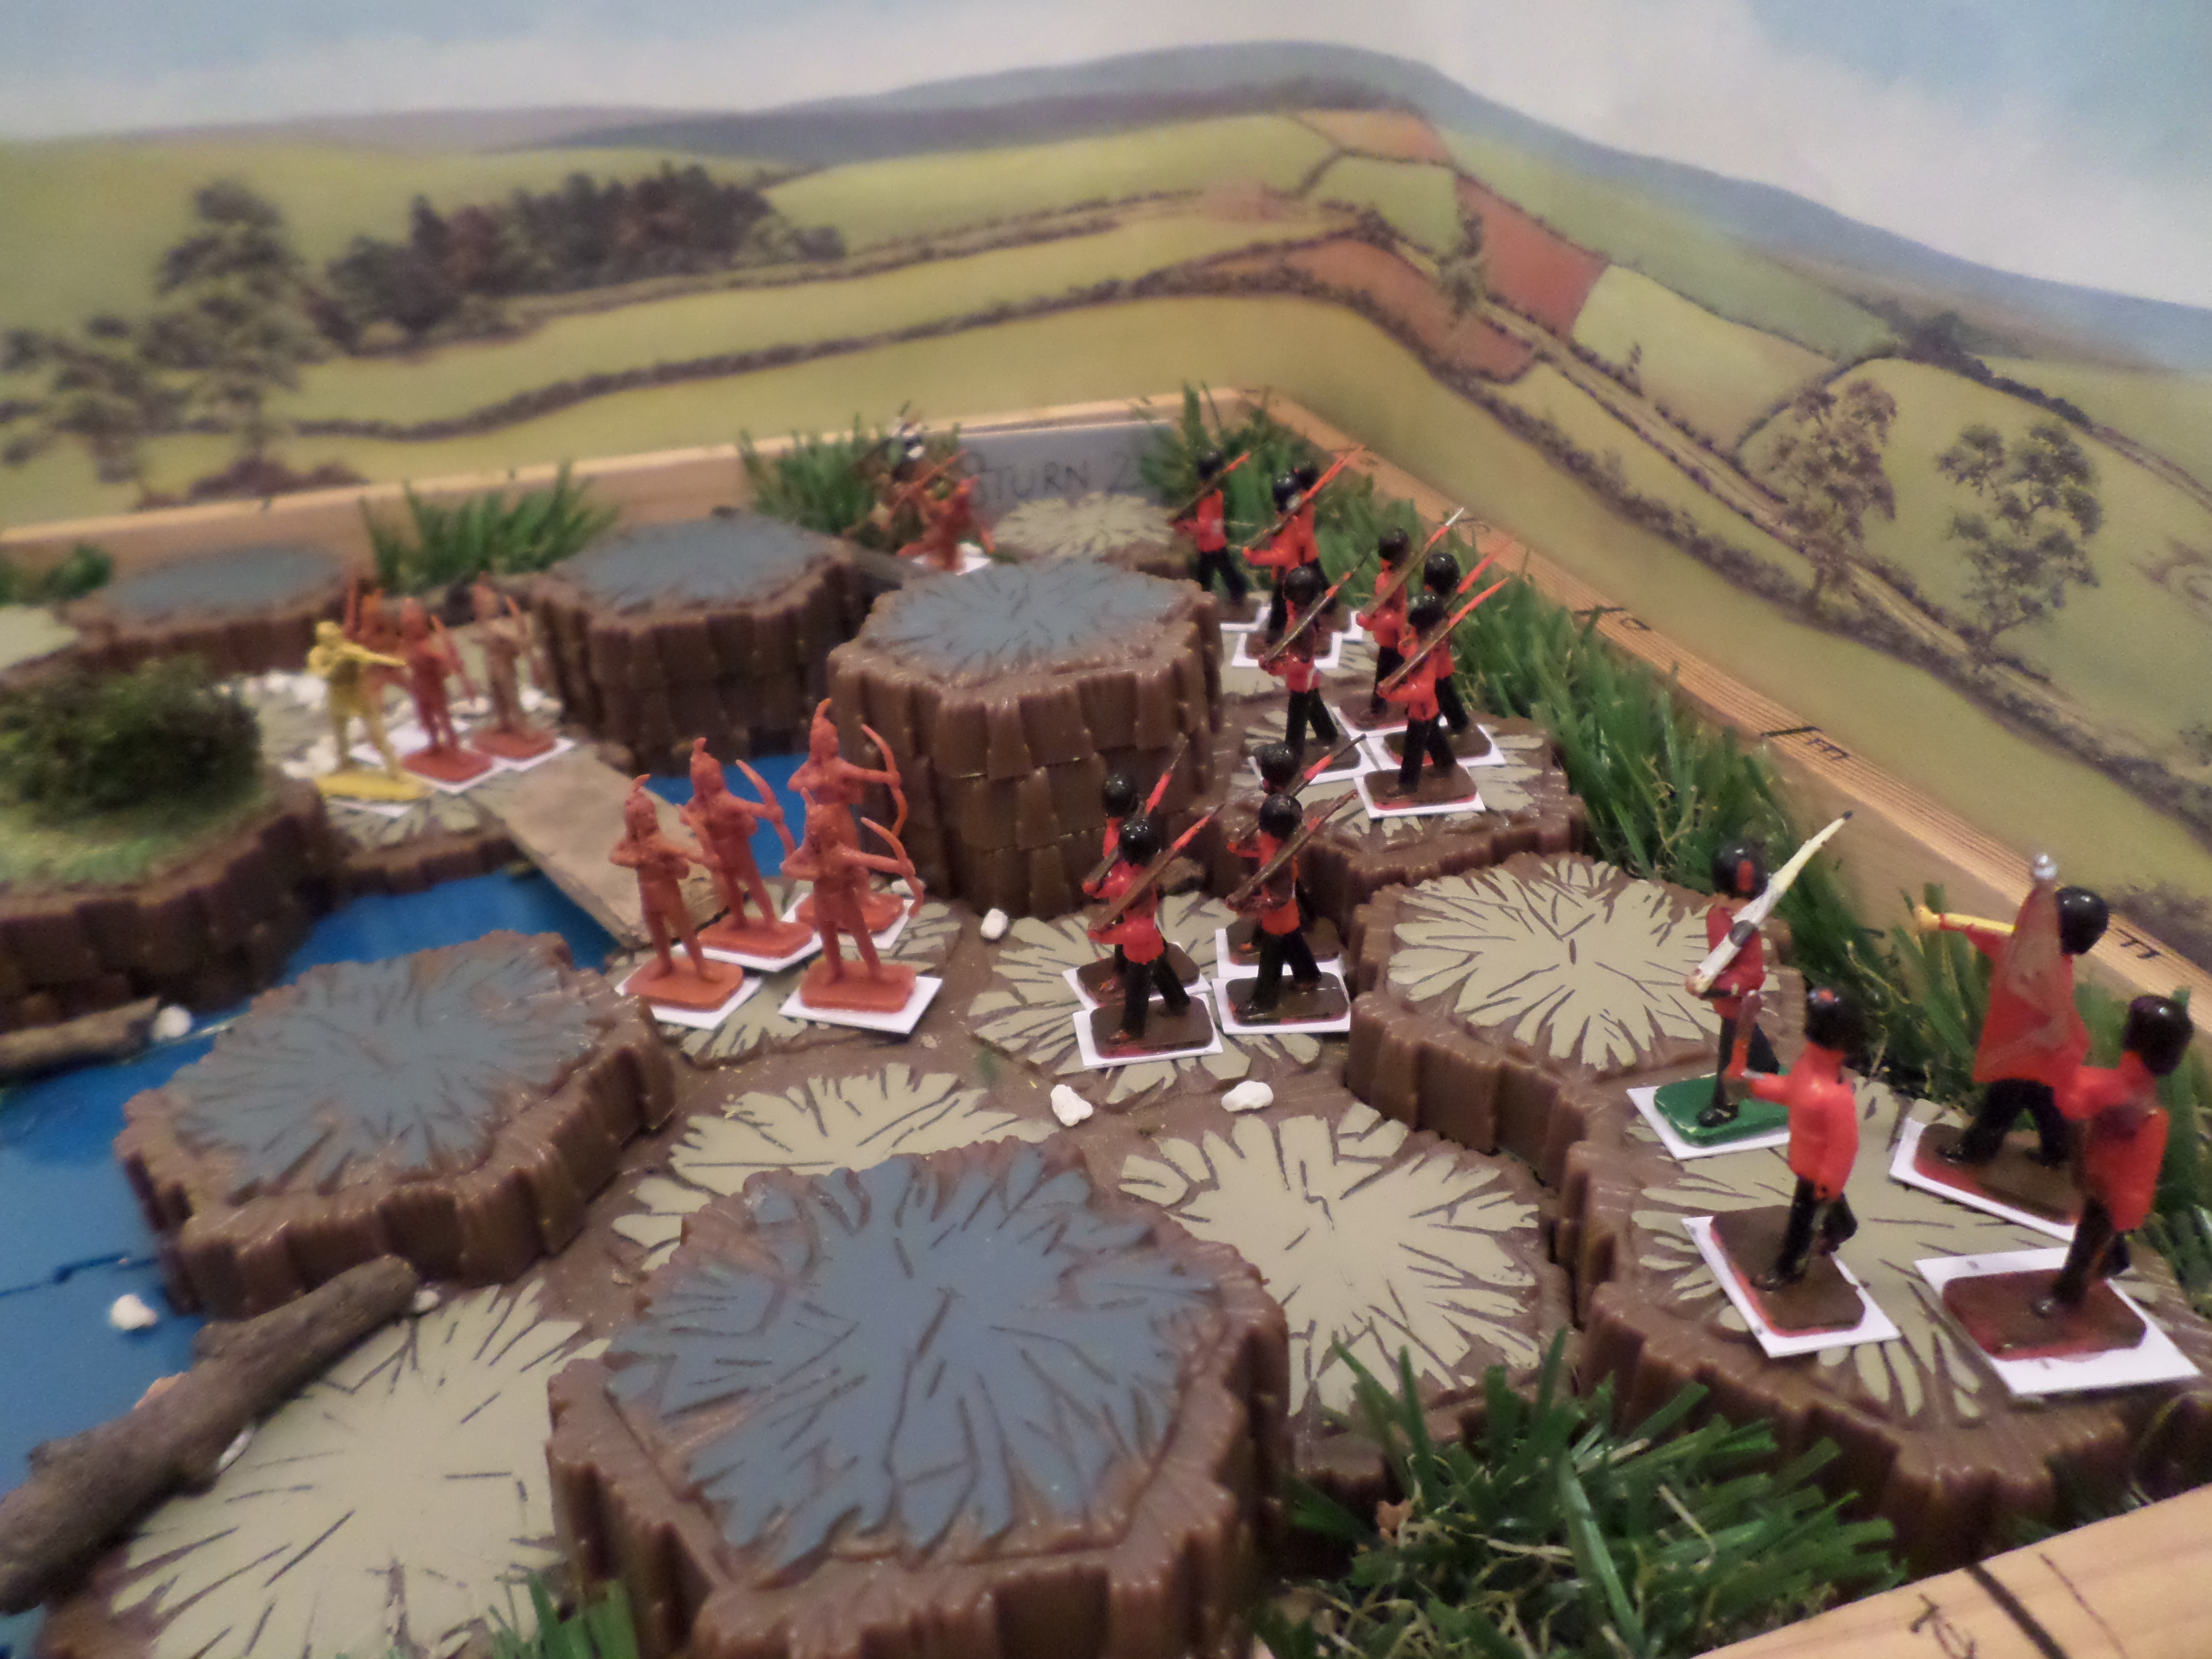
Arranging the Terrain – The Hex Scape board was arranged before the game with suitable high ground and restricted height areas. The Natives are encamped around their tent near the Old Crossing Fort.
Staggered start – By setting out d6 alternatives, it is possible to delay for a move how many figures are in place on the first move. Roll 2d6 to see how many of the group are involved on the board on the first move and 2d6 how many move onto the board on the second move.
Alternatively roll a d6. Roll 1-3 – all on board first move, roll 4-6 half the group (natives or redcoats) on board first move.
By allocating numbers to the grid squares A to F and 1 to 8, it was possible to slightly randomise where different groups first moved onto the board.
Future note: Blank hex map page to help with quick mapping / recording.
A second point to speed up precious game play time is to prewrite and set up scenarios, entry points well ahead of the game.
As it worked out all Redcoats / guards enter from one point on the river edge, whilst all the Natives are encamped around their tent hex with their Chief and Squaw (who is a non-combatant). The Chief has a suitable weapon for Melee as required.
At turn start – Red Dice used for the Redcoats, White dice for the Natives.
Escape / End Scenario – a log canoe is hidden in the undergrowth at A/B2 on the riverbank which will allow the Native Chief and Squaw to escape. A minimum of two figures are needed to operate canoe to escape to the SW, as there is no access past the low plank bridge crossing or to the North because of rapids, rocks, weir etc.
Unbeknown to the natives, Redcoats will not knowingly fire on women or children but may capture them, hold them in the fort etc. They also wish to rebuild the old crossing fort.
Bridge Crossing Rule applies – bridge crossing dice throw (roll 1 – fall in and drown). River is deemed impassable or unfordable. Redcoats have no engineers, pontoons or river crossing equipment.
First Turn of Game 8
Turn 1 begins with Natives moving first, having won highest dice throw..
Are the Natives aware of the Redcoats? Do the Natives have scouts or lookouts posted? Roll d6 to find out.
Roll 1-3, yes natives aware of enemy forces, scouts or returning hunting parties have bought word.
Roll 4-6, scouts need to be posted. Natives unaware of Redcoats.
Result of d6 dice throw is that No, the Natives are not aware of Redcoat activity.
Redcoat move – Redcoat group splits up and heads fast for the bridge.
Turn 1 Summary – End of Turn 1, no firing as no one in range. No casualties so far.
Turn 2 of Game 8
Natives win highest throw so they move first.
Are Natives aware of Redcoat troops yet? Roll d6 as above, Yes! Native sentries or scouts glimpse Redcoat movement and pass word to hunting party.
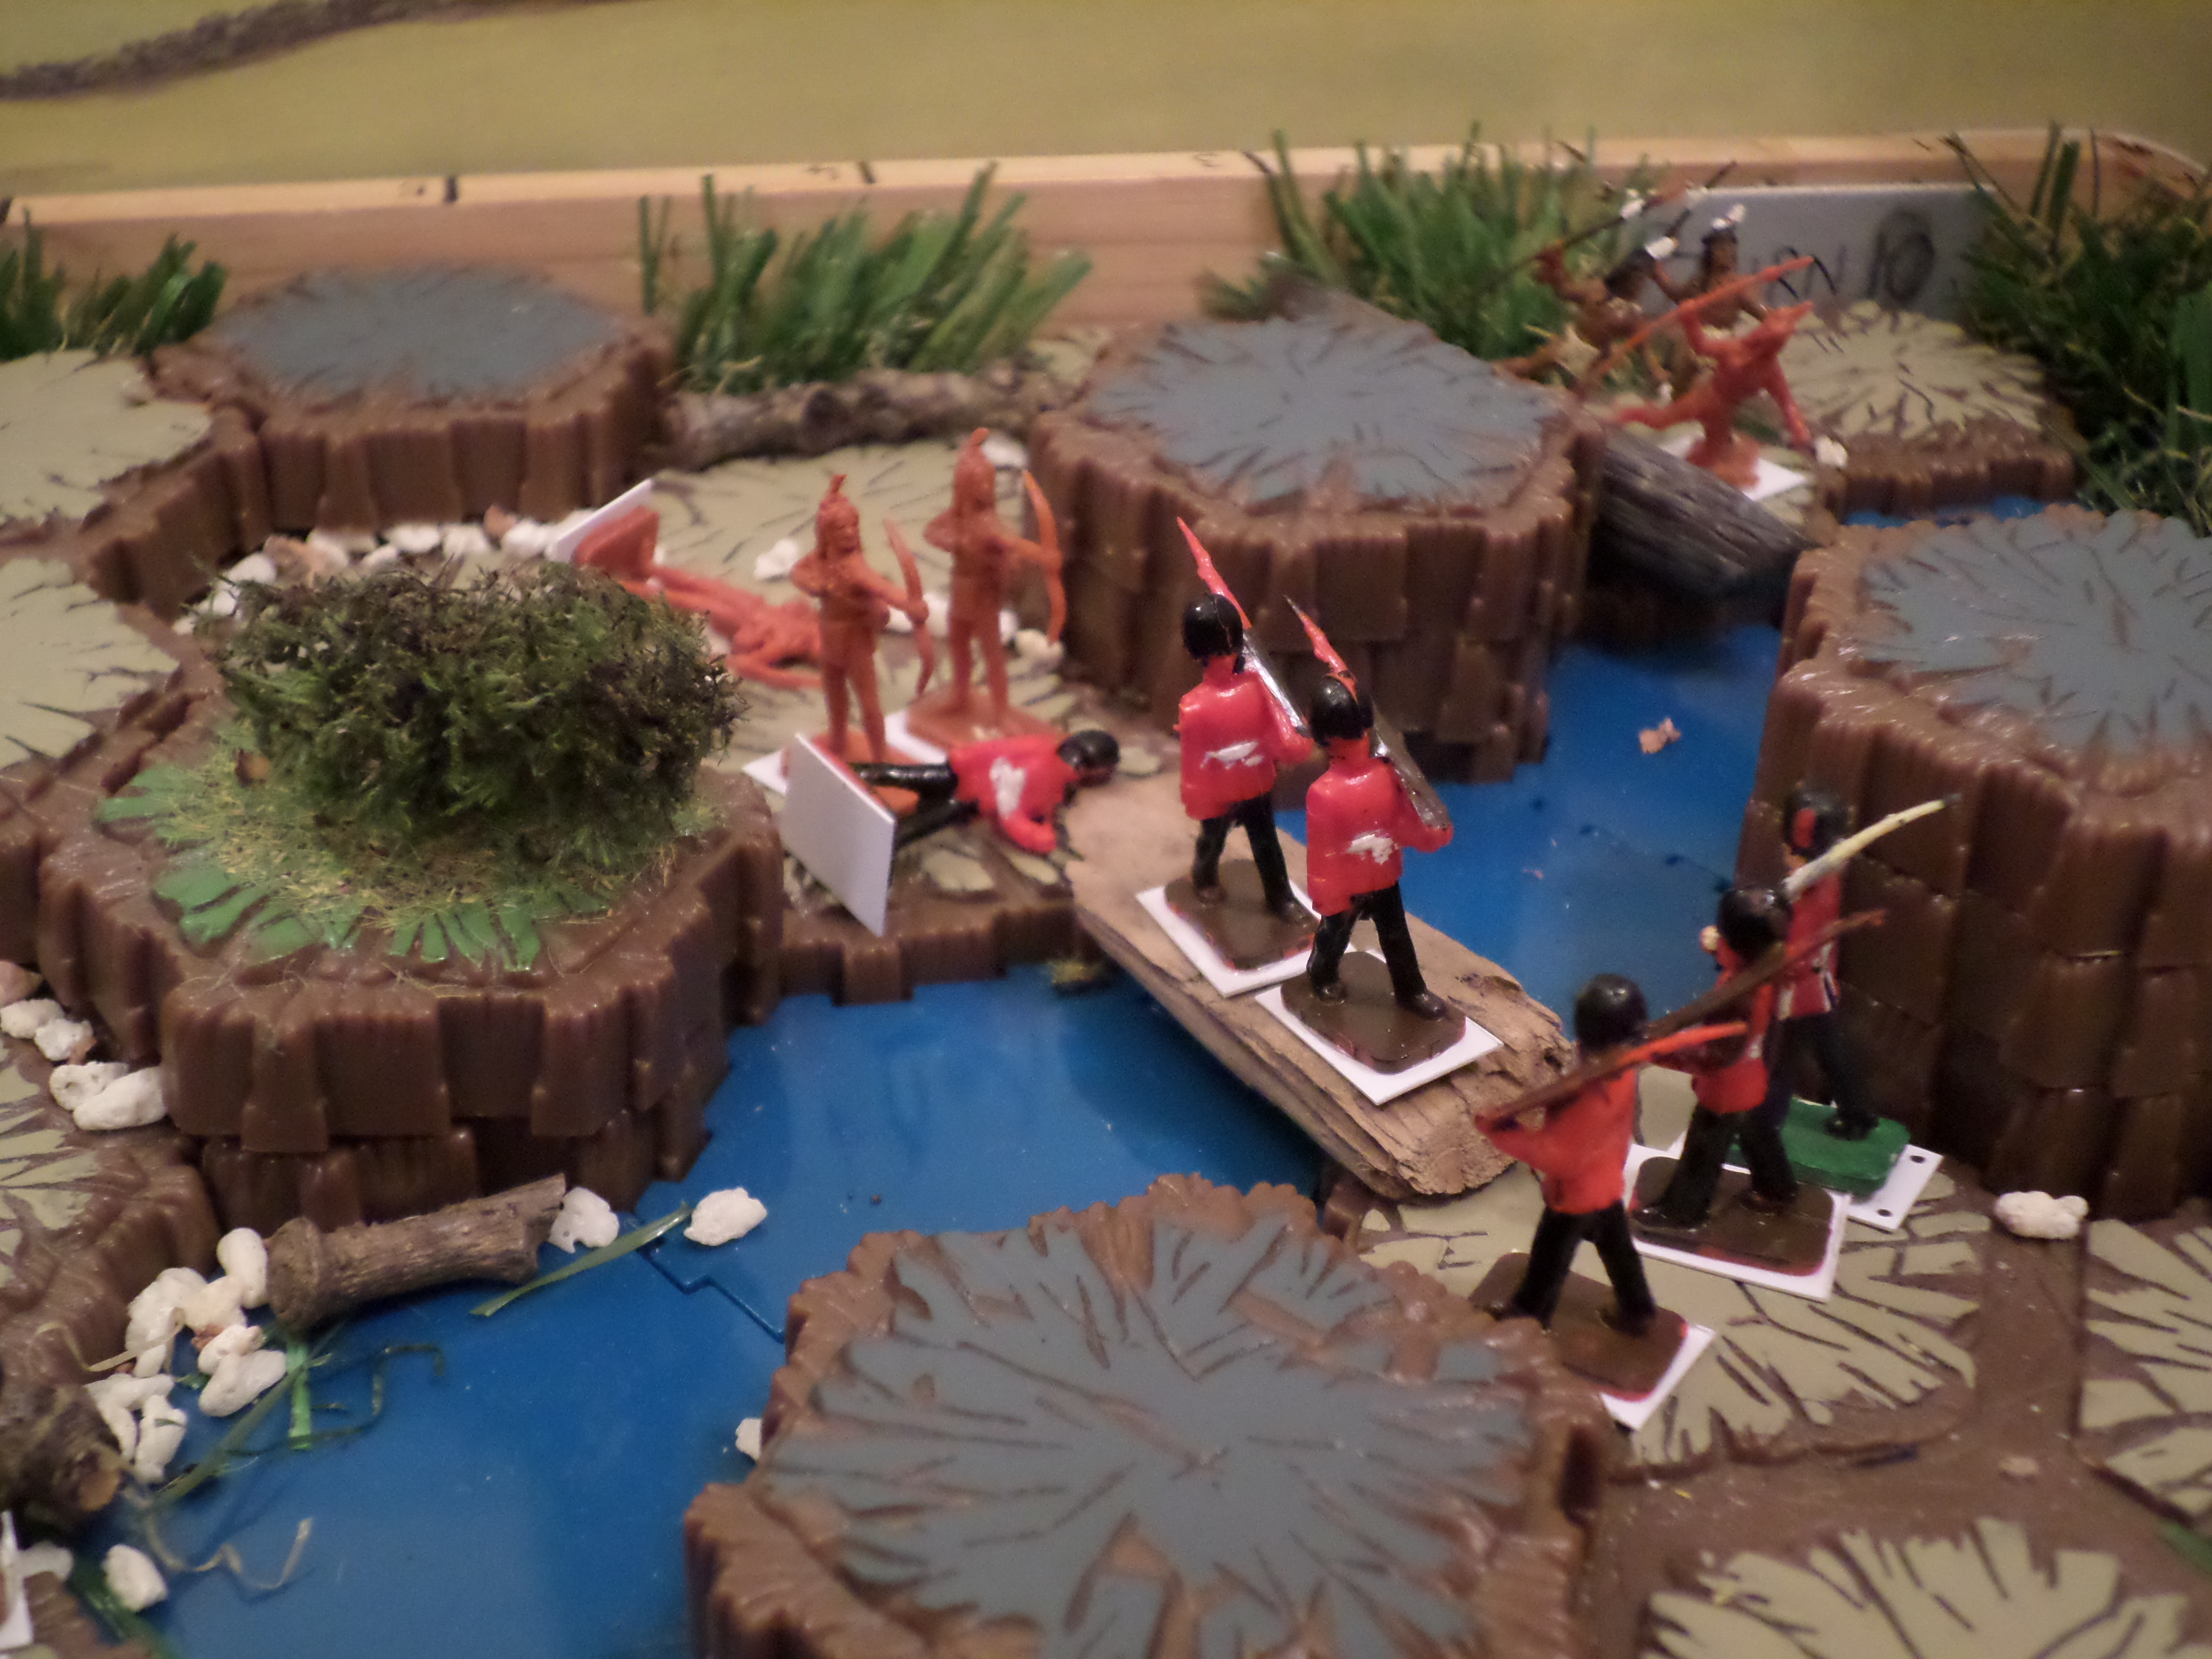
Natives move – they spread out and disperse to river edge, covering the crossing and edge of the camp. Four native bowmen cross the bridge to the Redcoat side (losing no men over the bridge on their river crossing dice throw), whilst a mixed Native group of riflemen and bowmen remain on the Native end of the bridge. The Chief moves up into a good viewing position in the old Crossing Fort. Squaw packs up and prepares to break camp.
Redcoats move second – they have seen the advance party of four native bowmen come into sight over the bridge and along the river edge. Movement is quite restricted and bottle necked at this stage with only a maximum of four figures per hex square.
Advanced party of Native Bowmen cross the bridge and engage the Redcoats. Turn 2 of Counterpayne / Close Little Wars Game 8.
Wider view of Turn 2 of Counterpayne / Close Little Wars Game 8
Natives fire first in Turn 2 – Their advanced party over the bridge fire arrows at the nearest Redcoat troops but fail to score any fatal hits (2 dice score hits on Redcoats but they are saved by successful casualty savings throw). The Native spearmen on furthest bank are more successful, killing 1 Redcoat infantry man. First Redcoat casualty of Game 8!
Redcoats fire second – The Redcoat group who have taken the first casualty return fire and score a successful fatal hit on one of the Native spearmen over the river. First Native Casualty of Game 8!
The Redcoats closest to the Bridge fire at the advanced party of Native Bowmen with no success.
Turn 2 Summary – End of Turn 2, Game 8 – one Redcoat Infantryman, one Native spearman.
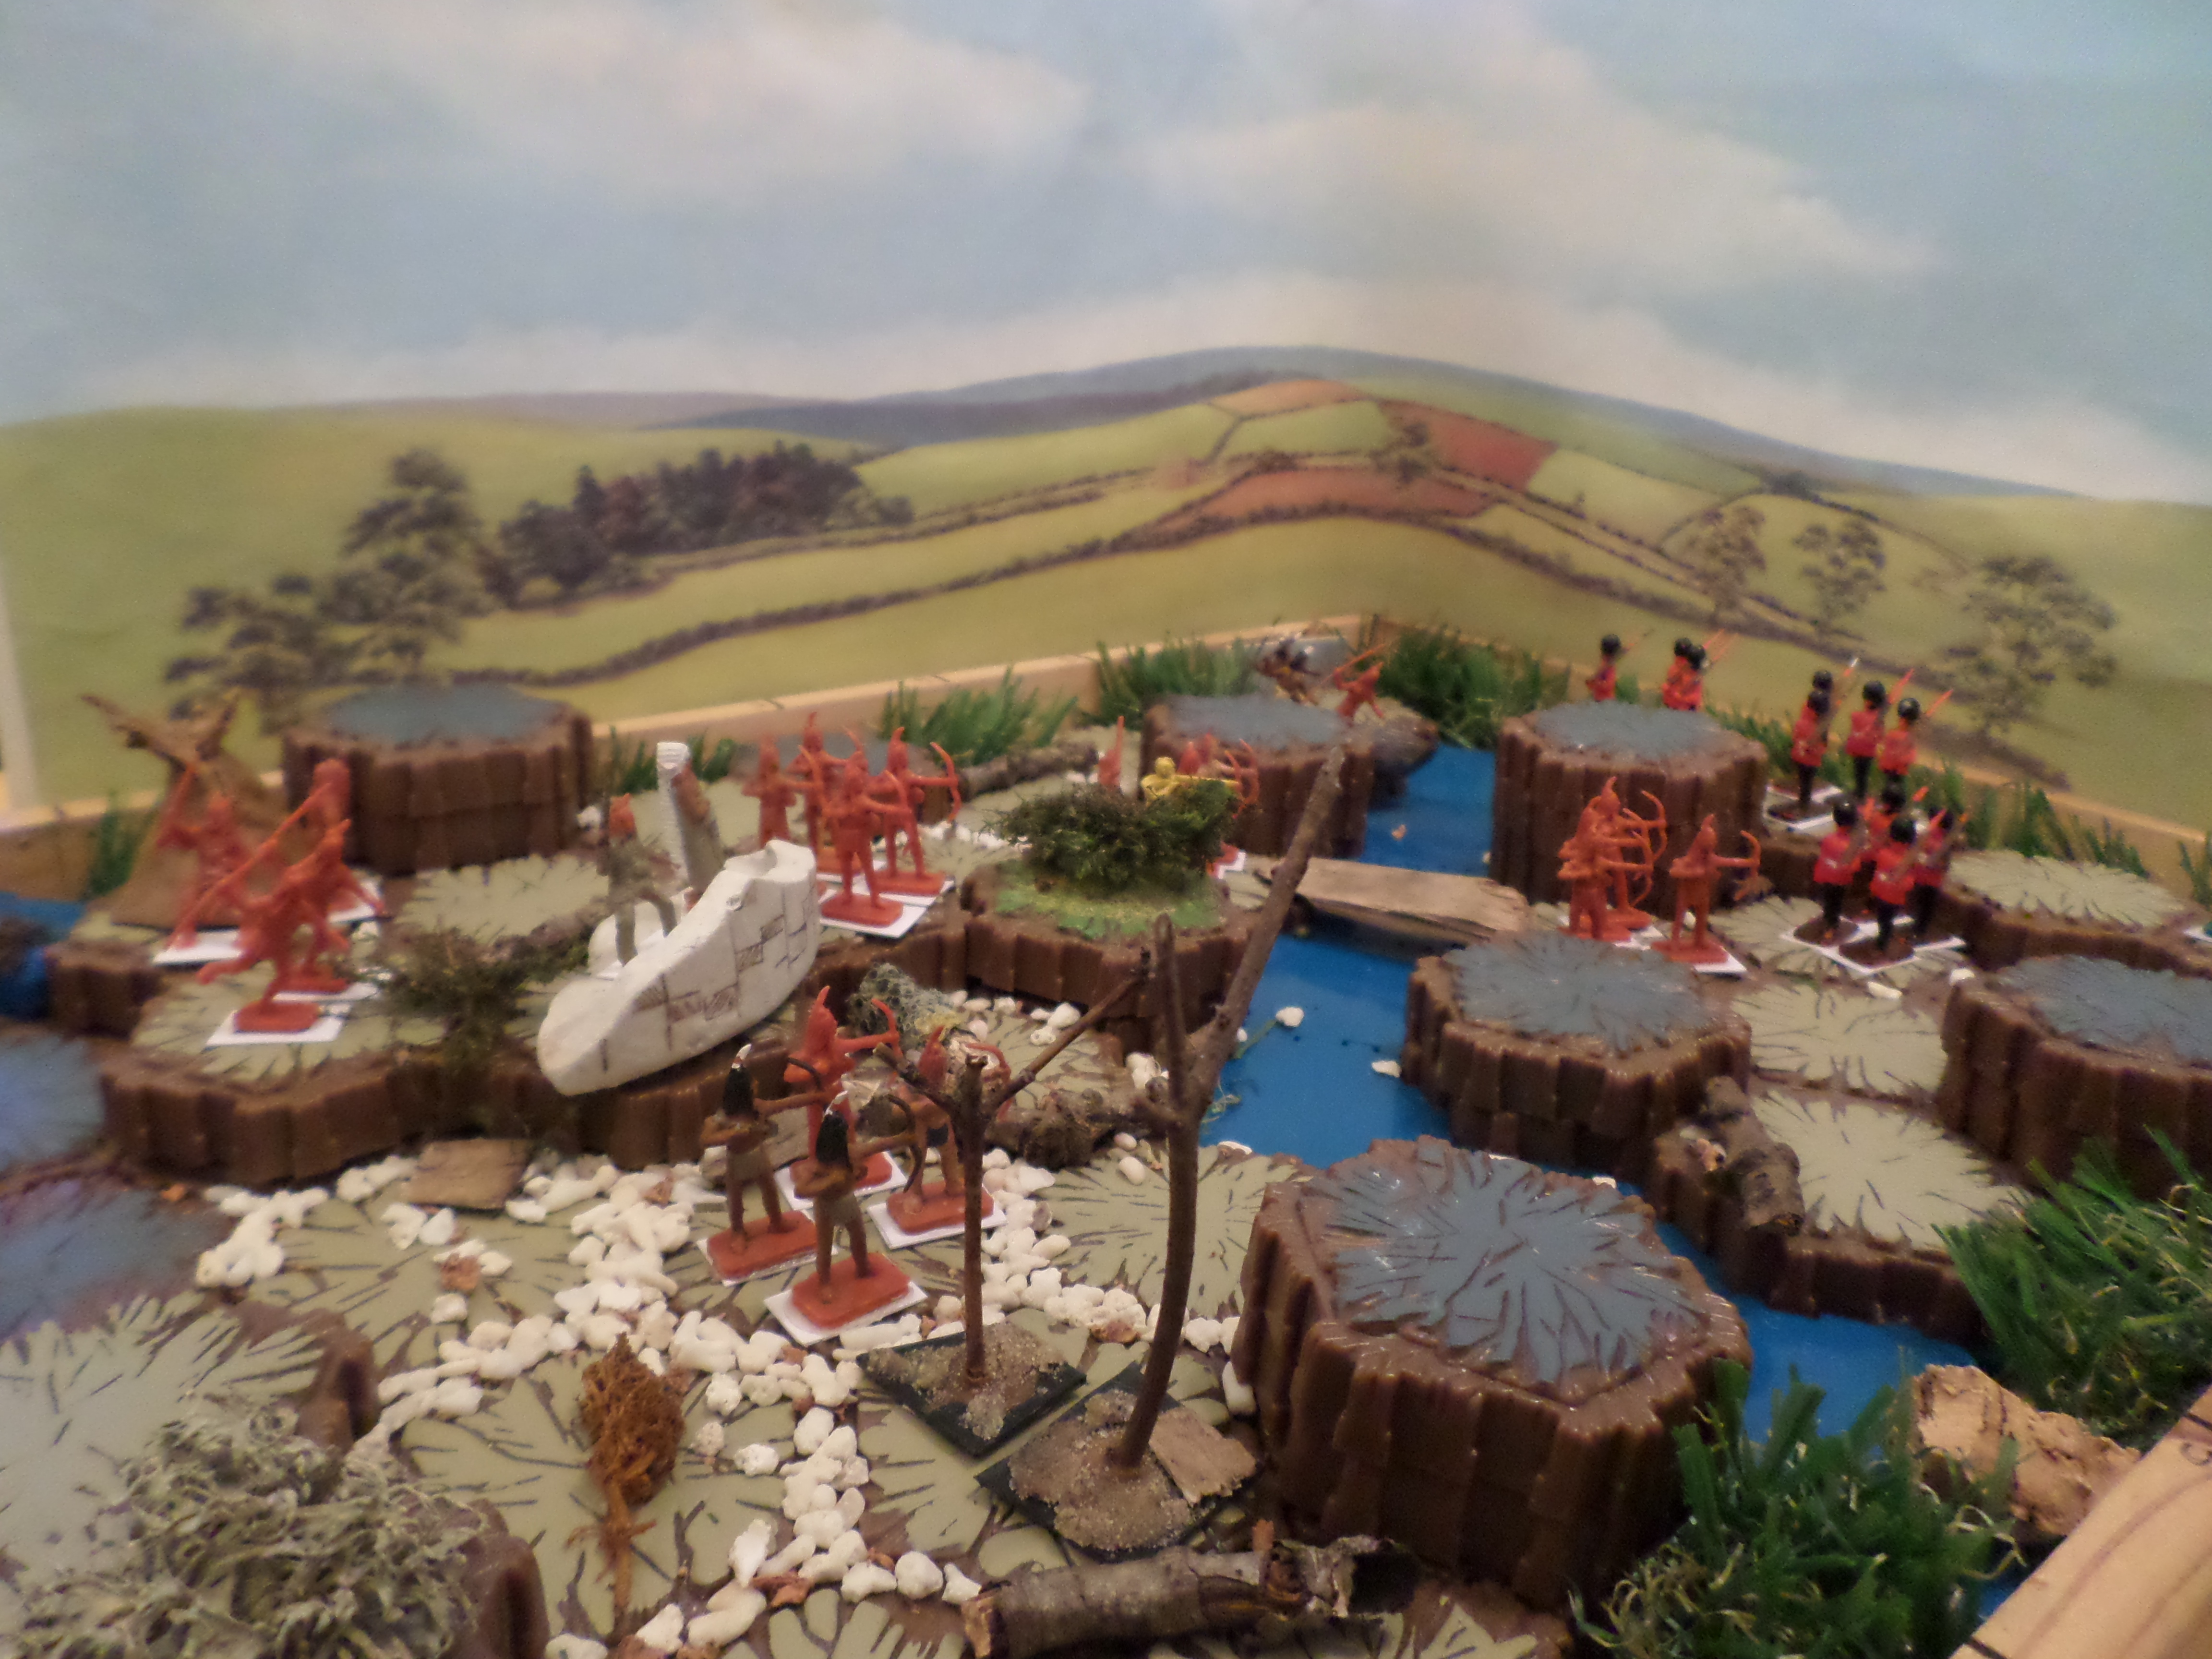
Even wider view of the Native’s side of the river terrain, Turn 2
Turn 3, Game 8 –
Natives win throw to move first. The advanced party of Native bowmen over the bridge engage the nearest Redcoats in melee. Two of the native bowmen are killed in the melee (after failing casualty savings throws) and the Natives lose the melee morale dice throw and retreat one hex backwards in good order, rather than rout.
Whoops! I realised afterwards that I had not given the Natives a +1 impetus throw.
Elsewhere the Natives move into a clearer firing line along the river edge within range of the Redcoats.
Redcoats move second , the final Redcoat figures moving onto the board / off the start line but still a bottleneck in places where rocks are too high to climb or pass over. Moving back into Melee, one Redcoat is killed by natives and the remaining 3 Redcoats in this group retreat one hex backwards in good order.
Natives fire first but achieve no successful hits. Redcoats fire second and kill one of the Native Bowmen near the Bridge. A further native is killed by Redcoat fire on the riverbank.
Turn 3 Summary During Turn 3, four Natives and a Redcoat infantryman are killed.
Turn 4, Game 8
Turn 4 sees the Redcoats move first, 3 Redcoats by the bridge move into further melee with the last surviving native of the advanced guard of Native Bowmen over the bridge on their side – who fights them all off and kills one Redcoat casualty! Melee morale throw a draw, so no retreat on either side.
When Natives move second, I wanted to see if this Lone Indian would retreat over the bridge. A 6 dice throw of 1 to 3 means retreat to the safety of the Native side of the river, 4-6 means the Lone Indian will remain on the Redcoat side of the River. A six is thrown and the Lone Indian remains on the Redcoat side, unfortunately blocking the fire path of the other Indians.
In the Firing phase, Redcoats fire first with no hits. Natives elsewhere along the riverbank fire second and kill three Redcoat infantry.
Turn 4 Summary – During Turn 4, things have gone badly for the Redcoats with 4 casualties. Overall 6 Redcoats have been lost in the first four moves at a cost of 5 natives.
Both groups have now lost a fifth to a quarter of their starting numbers. There is no retreat position, it will be a fight to the finish and / or an escape for the Native Chief and Squaw.
Turn 5 of Game 8
Redcoats roll highest dice, so move first. Four Redcoats move into Melee against the brave Lone Indian by the Bridge who kills one Redcoat but is finally killed fighting off the other 3. His base is inscribed for bravery in perpetuity!
When the natives move second, groups of warriors reinforce the riverbank and their side of the bridge. Some remain behind with the Chief and Squaw as a rearguard.
When should the Chief and Squaw make a move to evacuate themselves from the Old Crossing Fort ruins and head for the canoe? Playing solo, throw a dice to decide of course.
A d6 throw of 1-3 means an immediate retreat or evacuation by Native Chief and Squaw towards the canoe and possible safety down river
A d6 throw of 4-6 means stay put for this move.
In this move, they throw and have to stay put.
Turn 5 Summary – In the firing phase there are no losses so Turn 5 ends with One Redcoat lost and of course the brave Lone Native / Indian.
Turn 6 of Game 8
Redcoats throw highest so move first. Playing solo, I needed to decide whether the four Redcoats nearest the bridge would cross the bridge and attack the Natives or remain and fire at whoever was in sight or range.
Again a d6 throw was set up, 1-3 ordered across by Officer via the bugler, 4-6 remain on their side of the river.
The dice throw saw them ordered to cross the river and the river / bridge crossing throw saw one of them fall in (on a dice roll of 1) but saved by the others (on account of a successful casualty saving throw).
The Redcoats moved immediately into Melee with the nearest Natives who lose two of their men and the melee morale throw, retreating in rout one hex move backwards.
The Redcoat colour party moves down from the heights. Redcoat reinforcements move forward to cover the bridge crossing.
Natives move second – again the Chief throws his evacuation dice but rolls to remain put. He orders reinforcements of 2 Native spearmen to reinforce the routed bowmen retreating from the bridge.
Redcoats fire first, members of the Colour Party also joining in using abandoned rifles now that they have moved closer into range. 1 Native is killed. Natives fire second, no hits.
Turn 6 Summary At the end of turn 6, the Redcoats are successfully across the river but are quite low in number. 3 Natives have been killed during the turn, 2 at the bridgehead, one on the riverbank.
Turn 7 of Game 8
Whoops! Turn 7 never happened – miscounted in the fog of war. No casualties.
Turn 8 of Game 8
A photograph was taken of this turn when 4 Redcoats crossed the bridge.
Redcoats move first into melee at bridgehead; 1 Native killed and 1 Redcoat. Natives lose melee morale throw and retreat 1 move in good order. Extra Redcoats ordered over bridge to reinforce bridgehead party. The colour party stays put on Redcoat side of river.
Natives move second, again into melee of 3 Natives versus 4 Redcoats, resulating in the loss of 1 Native and their retreat 1 hex in good order after melee morale throw. The Chief rolls d6 re evacuation but stays put.
Firing phase, Redcoats fire first but inflict no casulaties. The Natives fire second and on a long shot from the Native warrior guarding the Native Chief, kill one Redcoat (who rolls d6 but loses casualty saving throw).
Turn 8 Summary – Turn 8 of Game 8 – 2 Redcoats lost, 2 Natives lost.
Turn 9 of Game 8 –
Redcoats move first, 4 of them into melee with Natives. 2 Natives killed. Another Redcoat on the Riverbank moves to the Bridgehead.
Natives move second, again into melee. Chief rolls re evacuation and again stays put.
Four Natives into melee at Bridgehead with four Redcoats; 1 Redcoat and a Native killed. Redcoats lose melee morale throw and retreat 1 hex back onto bridge in good order.
Redcoats fire first, inflicting a casualty on a Native rifleman on the riverbank below the bridgehead. Natives return fire but inflict no casualties.
Turn 9 Summary – Turn 9 of Game 8 – 4 Natives killed, 1 Redcoat killed. The battle still centres on the bottleneck of the bridge crossing, the river being unfordable and uncrossable elsewhere.
Turn 10 of Game 8 –
Three Redcoats at the Bridgehead move first again into Melee with the further loss of a Native casualty, yet the three Redcoats gain lose the Melee Morale Throw. They retreat back to the bridge in rout (no further firing from these 2 Redcoats).
The Natives move second and the two remaining Native Bowmen at the bridge move into melee against the rear of the three routed retreating Redcoats (adding 1+ impetus to their dice scores). One Redcoat is lost, again the Redcoats retreat in rout a one hex move taking them over / onto the bridge.
The Chief orders two further Natives from the Canoe river bank party to reinforce the bridge and two Native Bowmen from the riverbank to protect him by moving to the front of the old Crossing Fort.
Turn 10, Counterpayne / Close Little Wars Game 8 – the escape dugout Native canoe can be glimpsed near the edge of the board by the three Native spearmen.
The Chief passes on his orders in his native language and by arm movements so that his commands are not understood by the Redcoats , who have no translator with them. likewise, the Natives do not understand the Redcoats shouted orders or bugle calls.
The Redcoats fire first but score no successful hits, their field of fire being interfered with by the two routed Redcoats retreating across the bridge, who are themselves unable to fire being in rout and retreat.
When the Natives fire second, there are no casualties.
Turn 10 Summary – Turn 10 of Game 8 – one Redcot lost, 1 Native, both in Bridgehead melee.
By this stage of the game, the Redcoats have lost 11 men, almost 50% of their 21 men at the start of the game. No officers, colours or NCOs have yet been lost. The Natives have lost 16 Native warriors out of 24 (not including the non-combatant Squaw), being two-thirds of their available men. The Native Squaw, Chief and canoe are still safe on their side of the river and they still control the river crossing.
Turn 11 of Game 8
The Natives move first and the Chief again rolls an evacuation d6 dice but stays put.
Whether the Natives risk a melee on the bridge itself (roll 1-3, d6 dice) or stay put on their side of the river (roll 4 – 6, d6 dice) is decided by a dice throw: they stay put and make no further movement during this turn.
Again with the bridge becoming a battle bottleneck, the Redcoats when they move second have to throw a d6 to decide movements. The problem is the 2 Redcoats in rout stuck on the bridge, they throw a d6 and remain in rout on the bridge unable to move further.
A bridge crossing throw is brought in, having crossed or crossing the river. One of the two Redcoats falls in and is lost in the river, failing his casualty savings throw.
This still leaves three Redcoats including the NCO unable to cross the bridge unless a another d6 dice decision rule is brought in.
Can the Redcoat NCO and his men cross the bridge past their routed Redcoat colleague?
Roll 1 – 3, yes they can. Roll 4 – 6 no they can’t, being blocked by the routed and unmoving Redcoat.
They throw a 4 so remain blocked on their side of the bridge. 2 more Redcoats move to the rocky ridge breside the bridge to improve their field of fire.
Both Redcoats and Natives fail to hit anything on their firing round.
Turn 11 Summary – Turn 11 of Game 8 – one retreating routed Redcoat lost in the river and drowned whilst crossing bridge.
Turn 12 of Game 8 –
Redcoats move first. Thankfully the Redcoat blocking the bridge finally passes his morale throe so can move and fire. The NCO can then cross the bridge with his two men, gather up the Redcoat on the bridge (no Redcoats lost in Bridge crossing throw) and move into Melee with the two native bowmen holding the Bridgehead.
One Redcoat is lost in the Melee (dice thrown to see if it was the NCO – not) but the Natives lose the Melee Morale throw and retreat 1 move in good order backwards. Seeing this, the Redcoat Officer orders his Bugler to recall the two Redcoats watching the three Native spearmen guarding the canoe end of the river.
When the Natives move second, the Native Chief throws a d6 evacuation dice and on the resulting 6 begins to move himself and Squaw towards the Canoe and escape.
A minimum of two Natives is required to operate the canoe.
As the Chief and Squaw move 4 hexes towards the canoe with one Native rifleman as cover, 2 Native bowmen moving to higher ground.
The Chief orders 4 of his Native warriors into Melee against the three Redcoats at the Bridgehead as further cover for his escape.
During this Melee of four Natives versus three Redcoats, 2 Native spearmen are lost. The Redcoats lose the Melee Morale Throw and retreat in rout or disorder 1 hex back onto the bridge. (Dice for River crossing throw on next move.)
The Chief’s retreat with Squaw and Native warrior bodyguard is still bodily covered or shielded by the presence of two Native bowmen at the bridgehead and two bowmen on the ridge.
The Redcoats are unable to fire as their view is blocked by the three retreating routed Redcoats on the bridge.
The Natives fire next and two of the Redcoats on the Bridge are wounded (passed their casualty savings throw). Most Natives at this Turn have no clear field of fire.
Turn 12 summary – Turn 12 of Game 8 – 2 Native spearmen are lost and 1 Redcoat.
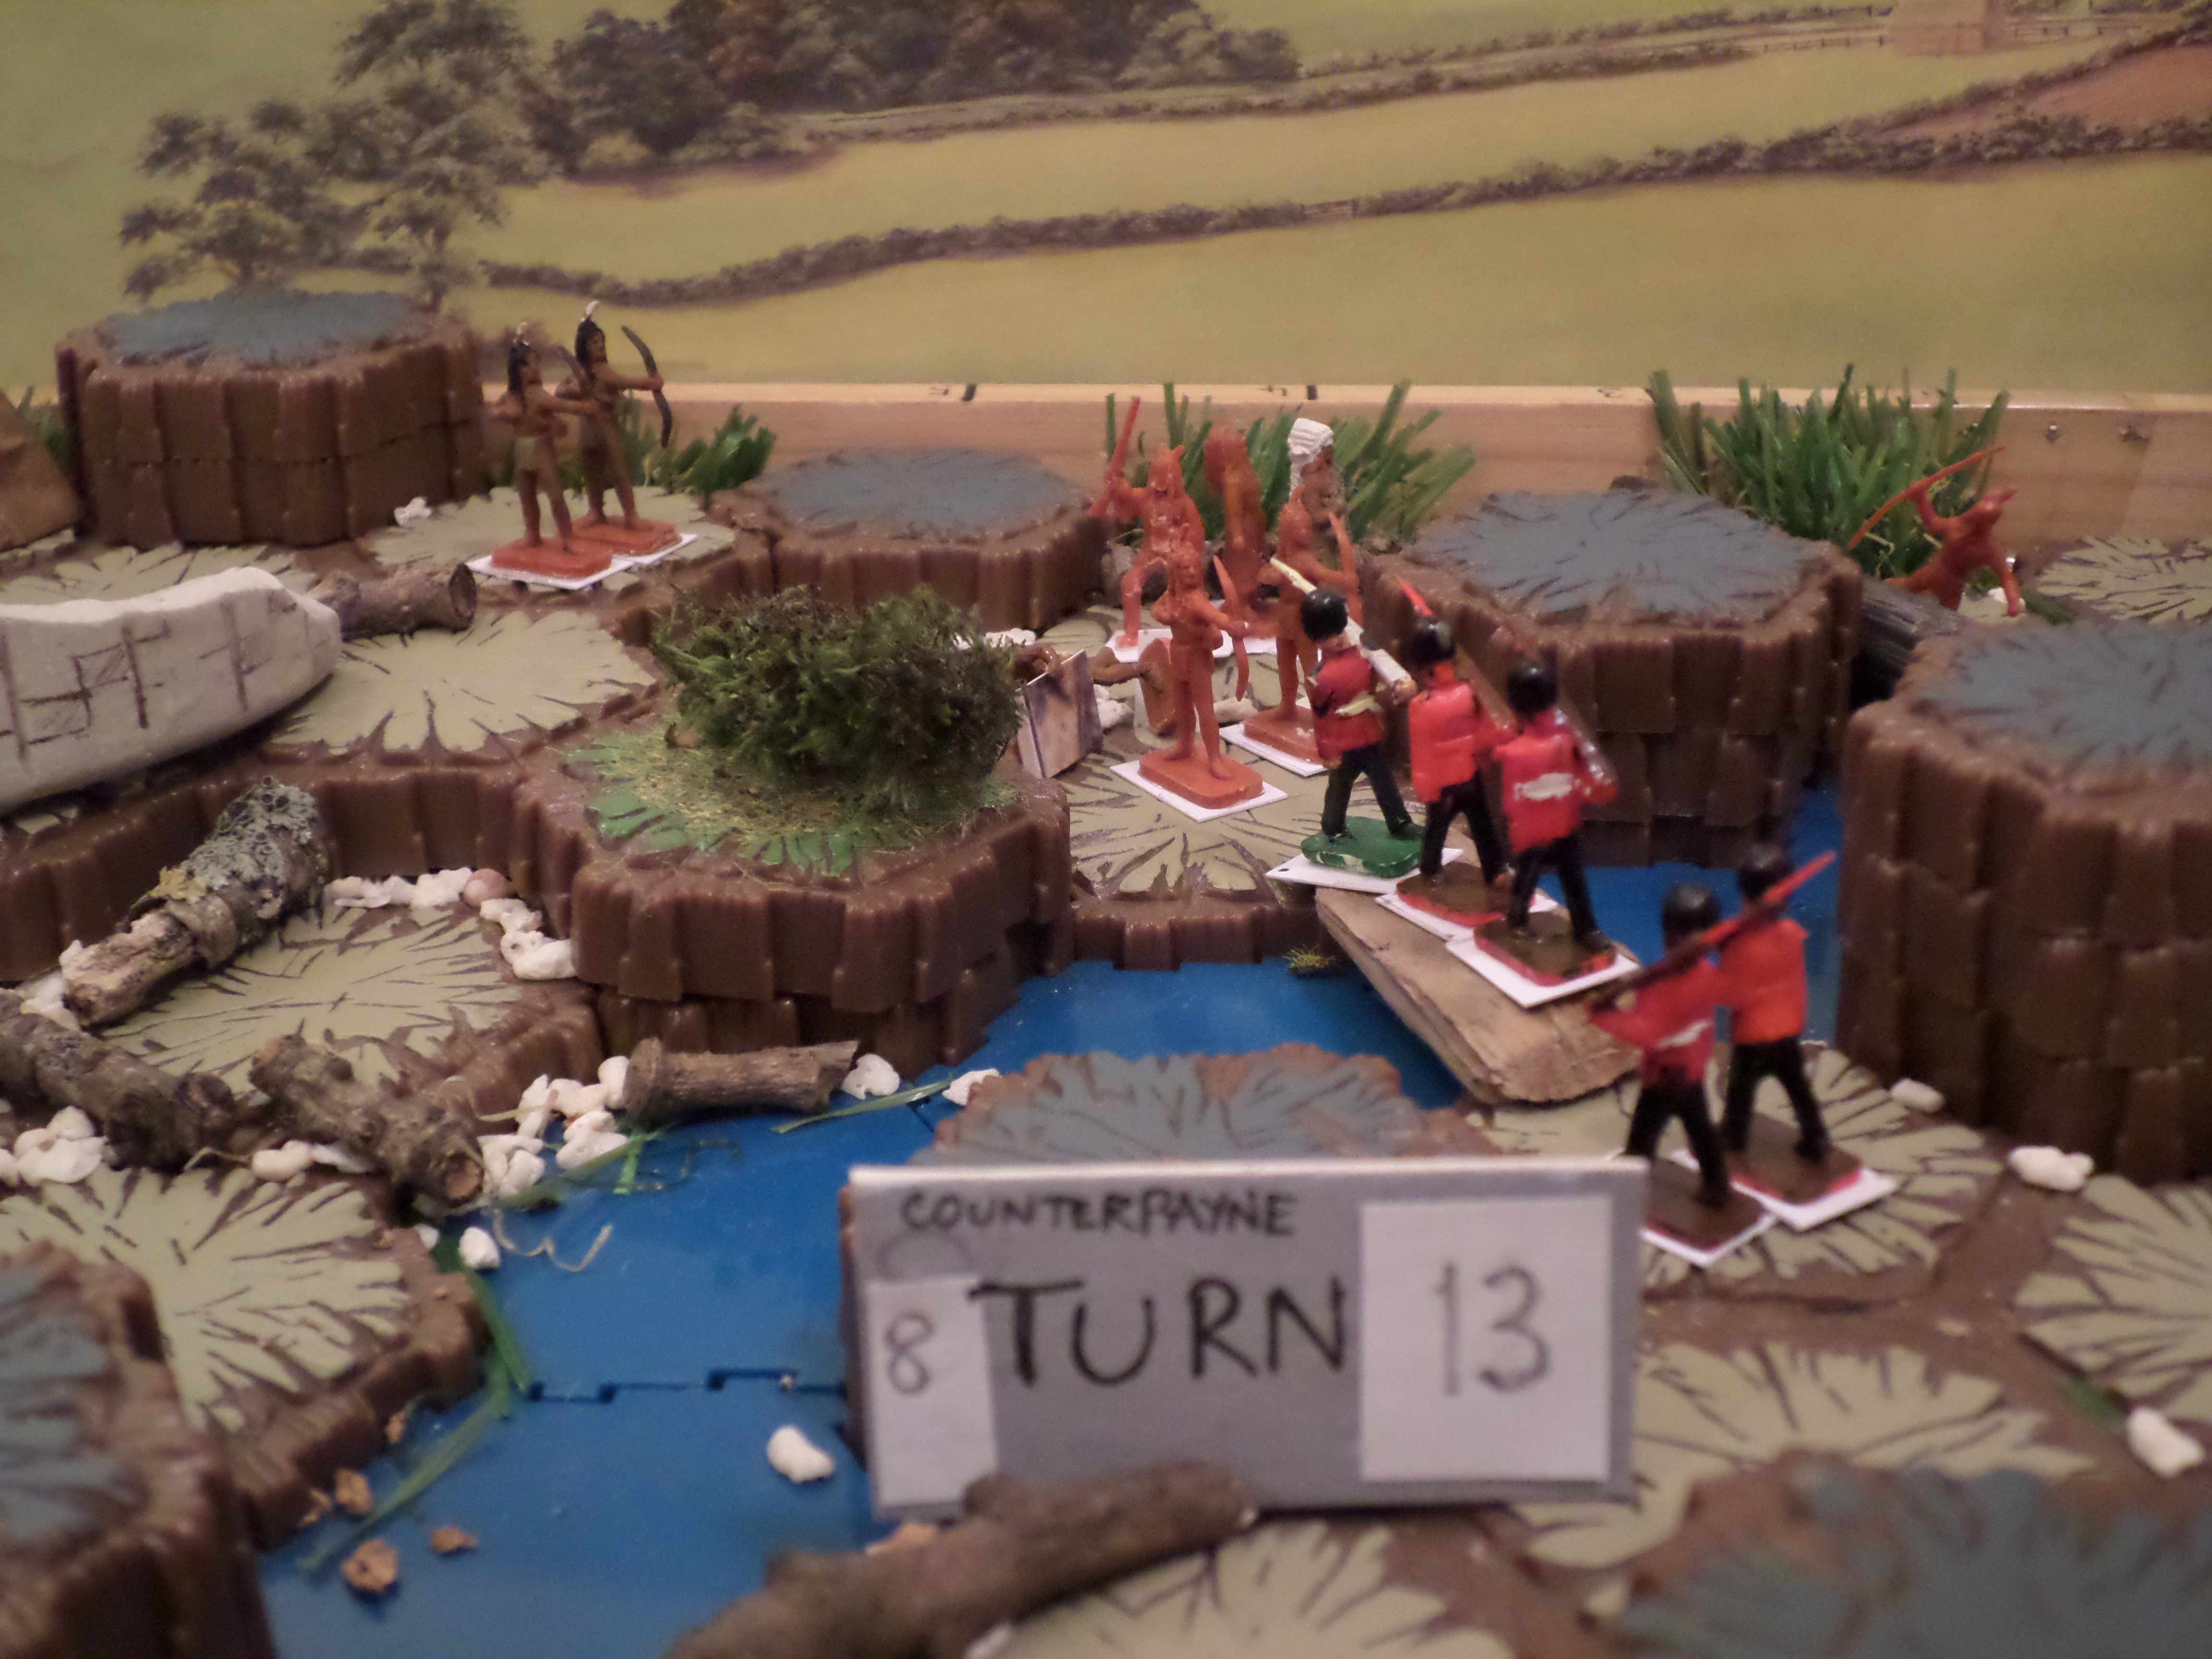
Counterpayne / Close Little Wars Game 8 Turn 13
Turn 13
Redcoats win dice throw and move first. Turn 13 opens with the Redcoat NCO Sergeant and 2 Redcoats retreating over the bridge but luckily they morale throw a 6, steadying their retreat. They are now able to fire, move and respond to orders. Thankfully all of them survive the bridge crossing dice throw (If they rolled a 1, they fall in and drown).
The Redcoat Sergeant rallies the group back into a melee to defend the bridge and the Sergeant defeats one native bowman in hand to hand combat. The natives lose the melee morale throw and retreat one move backwards but in good order rather then rout.
The Redcoat NCO reminds his party that they are ordered not to fire on the squaw and native chief but to capture them alive if possible.
The Redcoat officer orders another Redcoat guardsman over the bridge, leaving one Redcoat on the Redcoat side of the Bridge to cover the Colour party. The Redcoat guardsman moves into the lee or cover of the large rock near the bridge to get a better view of the final actions.
The Natives move second having thrown the lower dice at the start of this turn.
The Native Chief with Squaw retreats to the log canoe with their warrior guard rejoining the native spearmen. They have range to fire on the bridge from their position. It will take one clear move to launch the canoe.
The remaining three Native bowmen move into melee to deal with the 4 Redcoats including the NCO / Sergeant. During the melee one Native bowman is killed and they lose the morale throw, retreating in good order and providing further cover for the Native Chief and Squaw.
Firing phase of Turn 13
Redcoats fire first but no losses are inflicted or are unable to fire without hitting the Native Chief or Squaw.
The Natives fail to hit anything in their firing round.
Turn 13 Summary – Turn 13 of Game 8 – two Native bowmen have been lost.
Turn 14 of Game 8
Natives move first. The Native Chief, Squaw and two Native warriors push canoe into the water. Roll a d6 to see how many can fit into the Canoe – the dice roll of a six means up to 6 Natives can squeeze in.
The Native Chief orders his two remaining bowmen to stay put and cover his escape then to melt away and meet him off the board further upstream.
The two Native bowmen roll a d6 to see if they move into Melee (roll 1 -3) or stay put and block the Redcoat movements (roll 4-6). They roll 3 so move into Melee where one Redcoat is killed. The Natives lose Melee Morale Throw but retreat in good order back one hex, still covering the escape route / attempt of their Chief.
Redcoats move second, back into Melee with the two Native bowmen. there are no casualties. The Redcoats lose melee Morale Throw and retreat one hex backwards to bridgehead in rout or disorder, being unable to move or fire further this turn.
Native bowmen fire first being the only Natives in range of the Redcoats but fail to hit any Redcoats. Redcoats unable to return fire.
Summary of Turn 14 – Turn 14 of game 8 – 1 Redcoat killed.
Turn 15
Redcoats move first, a successful morale throw allowing the Redcoat NCO and two Redcoat riflemen to move back into Melee with 2 Native bowmen. One Redcoat and one Native are lost. Again the Redcoats lose the Melee Morale Throw and retreat again in disorder back towards the bridge.
Further Redcoat movements require a d6 decision dice throw
Should the Redcoat Officer and Colour party move into position to see what is going on? Roll 1-3 yes, 4-6 no, too risky. As a 4 was thrown, they rely still on the limited view of the lone sentry on the bridge.
Natives move second. The canoe moves off downstream and off the games board to safety, taking the Native Chief, Squaw, one Native spearman and a bowman.
What should the lone Native bowman do? A D6 decision dice to be thrown.
1-2 retreat to the canoe safely. 3-4 Retreats off board to safety
5 Stays put and blocks Redcoats. 6 – Melees into the Redcoats.
Bowman rolls a 3, so he retreats safely off the board down river to rendezvous with the escaped canoe party further downstream.
The Canoe is now out of the Redcoats firing range. All natives are now out of firing range.
Summary of Turn 15 – Turn 15 of Game 8 – 1 Redcoat and one Native lost in Melee.
The Native Chief, Squaw and three Native warriors have escaped the Game board, leaving the Redcoats in possession of the Bridge crossing fort and their old campsite.
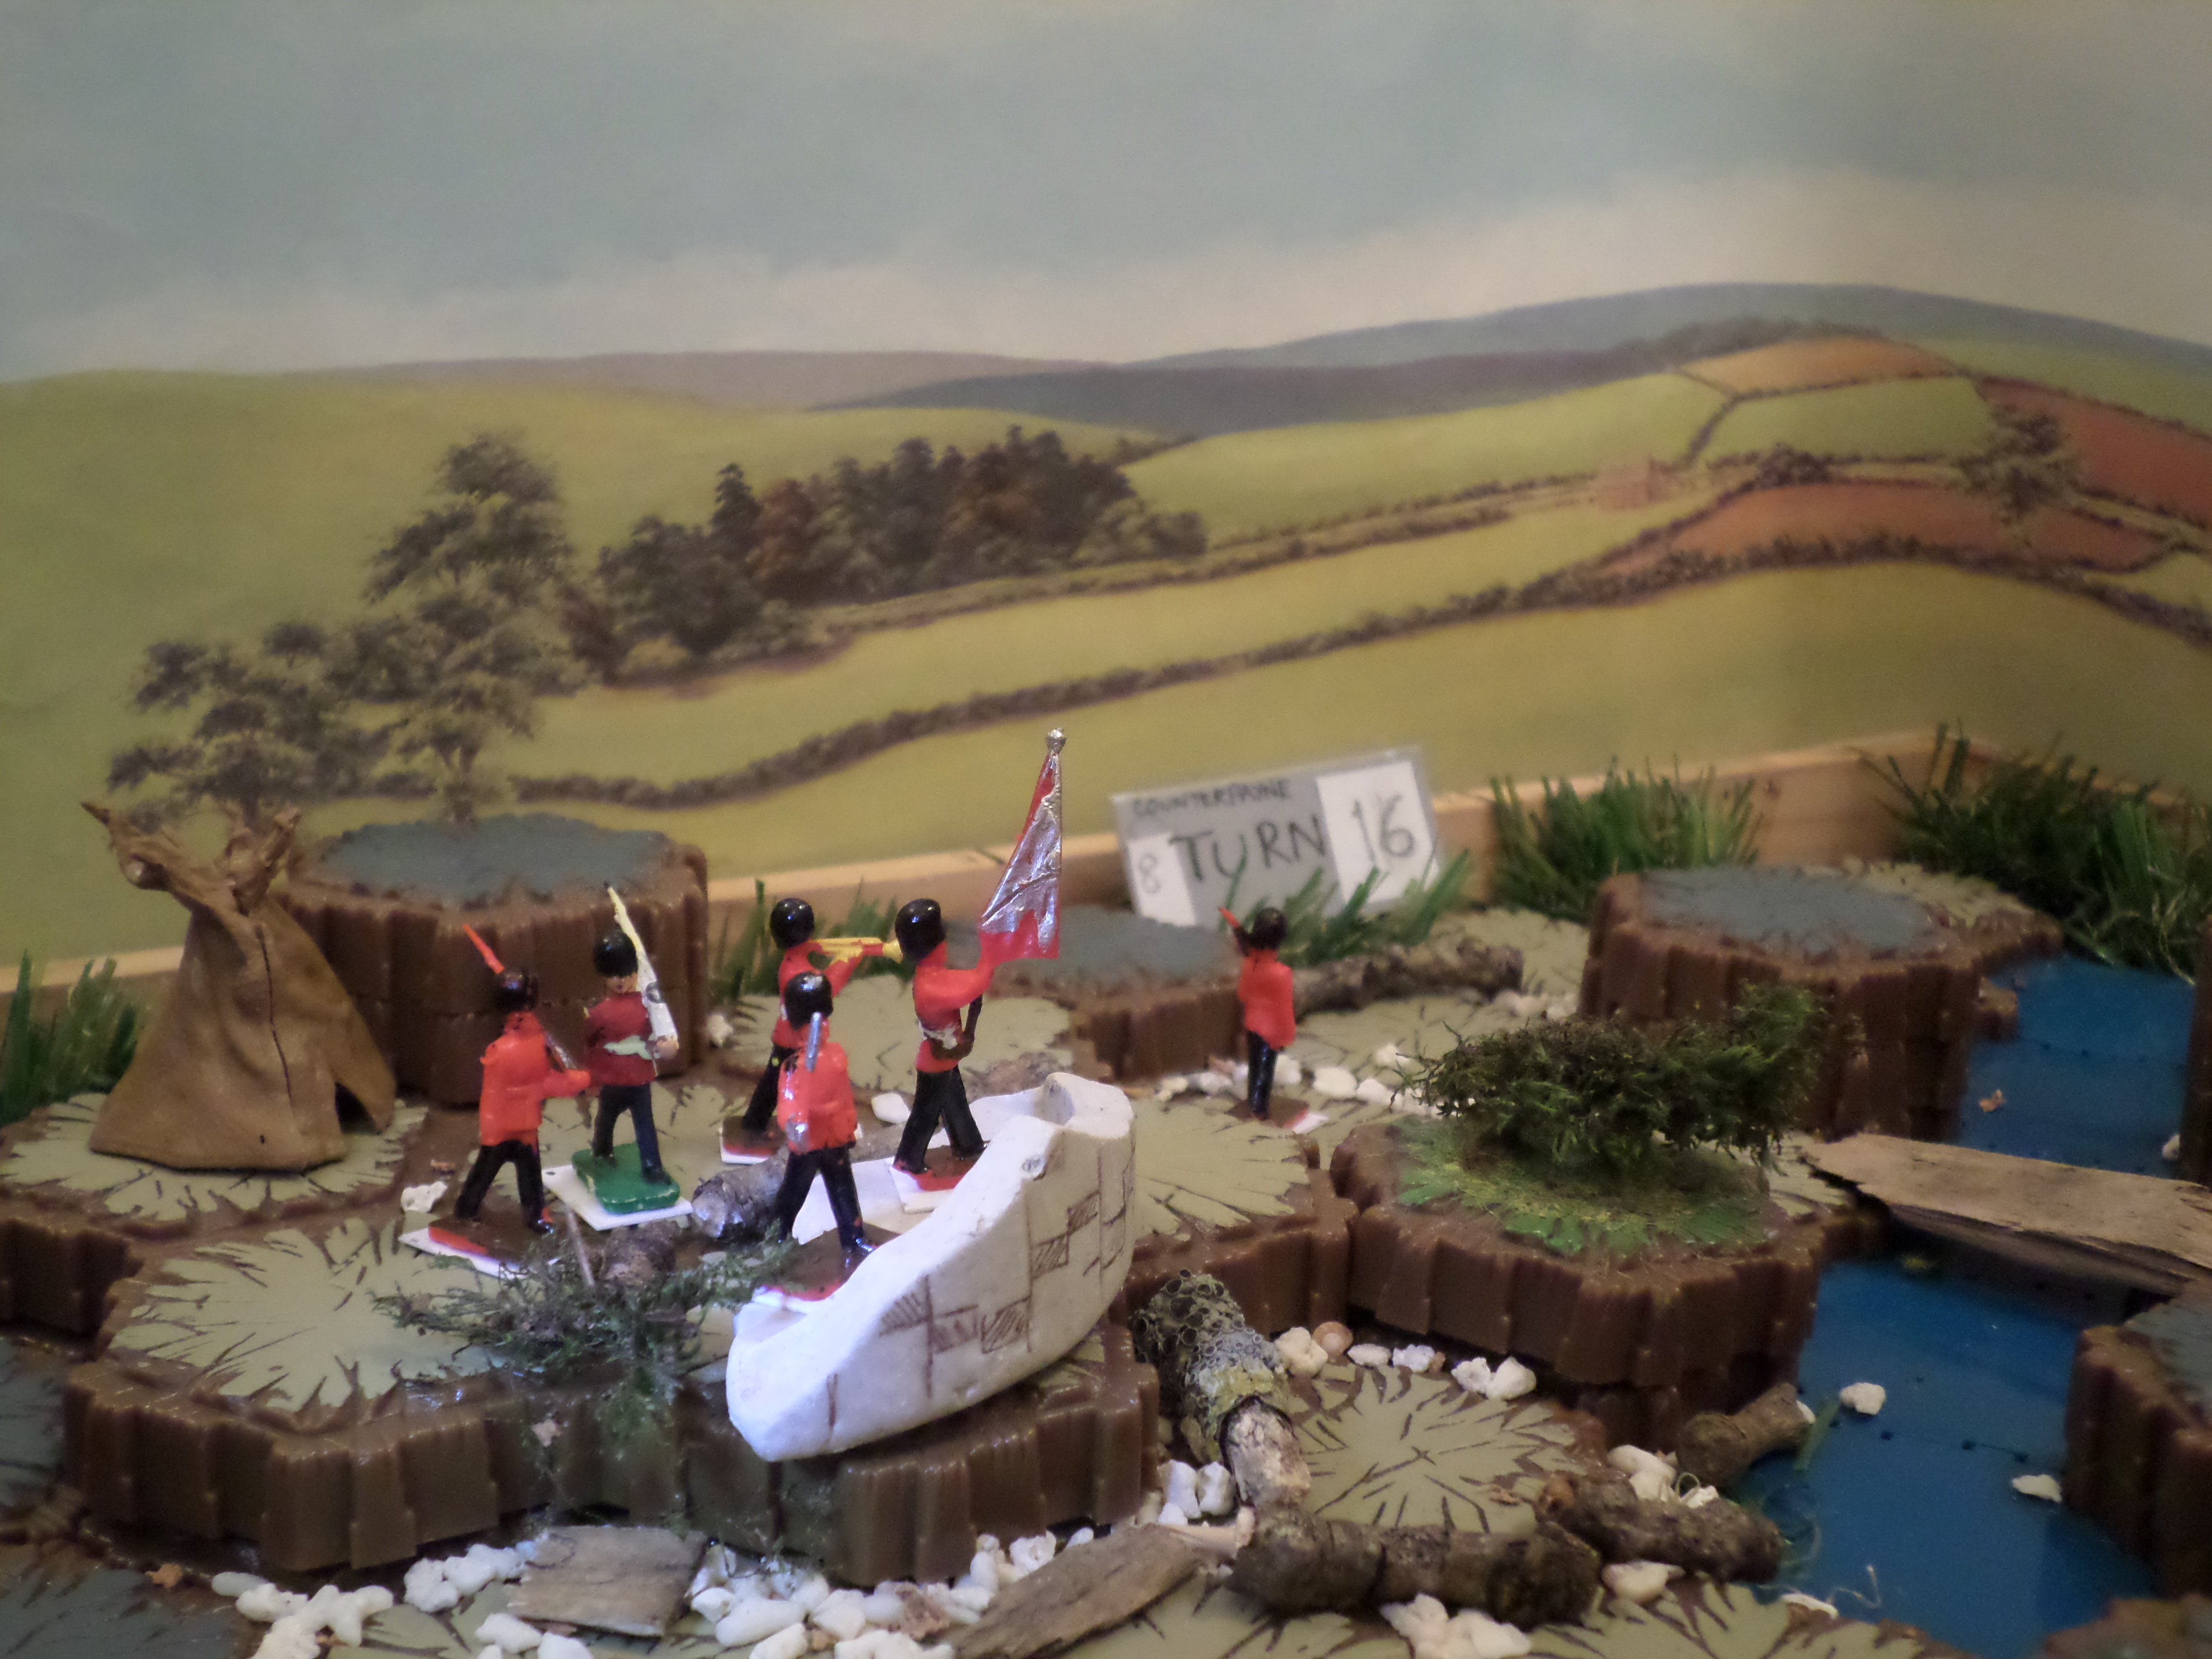
Redcoat Colour Party retake the Old Crossing Fort – Turn 16 of Close Little Wars Game 8.
Final Turn – Turn 16 0f Game 8
The 2 Redcoats on the bridge throw a morale throw dice of 4 so are able again to move towards and secure the ridge camp and old Crossing Fort. The Colour party successfully cross the bridge and join them. One Redcoat sentry is posted to watch the direction of the Native retreat.
The Colours are hoisted again on the old Crossing Fort and a second tent posted next to the abandoned Native tent. The bridge crossing is also watched from the Crossing Fort again. Bugle calls are ordered to contact any Redcoat reinforcements in earshot, the number of troops at present being too few to send any messenger to gain any reinforcements.
The surviving Redcoat group are small in number – what would happen if a further Native force returned? Interesting future scenario.
Is Game 8 a Native or Redcoat Victory?
I think this is a Draw.
The Redcoats reoccupied the Crossing Fort and Bridge, awaiting reinforcements to strengthen their position. The Colours are safe.
They failed to capture the Native Chief and his Squaw or wipe out the other three Natives (a bowman, spearman and rifleman) who escaped in the Canoe with some provisions.
Both groups live to fight another day!
At the end of Turn 16, there are six Redcoat survivors: Two Riflemen and their NCO Sergeant, an Officer, Colour Bearer and Bugler.
15 Redcoat casualties are lost on both sides of the river or in the river and need recovery and burial where possible by the surviving six Redcoats, as soon as the Crossing Fort is made as safe as possible.
In addition 21 Natives need mass burial by the Redcoats.
All these brave and surviving Native warriors and Redcoats have the number 8 written underneath their cardboard base, in addition to the brave Lone Indian (though departed to the happy hunting grounds has 8 and the Lone Indian inscribed.
Draft from 2016, finally blog posted by Mark Man of TIN on 22 September 2019.
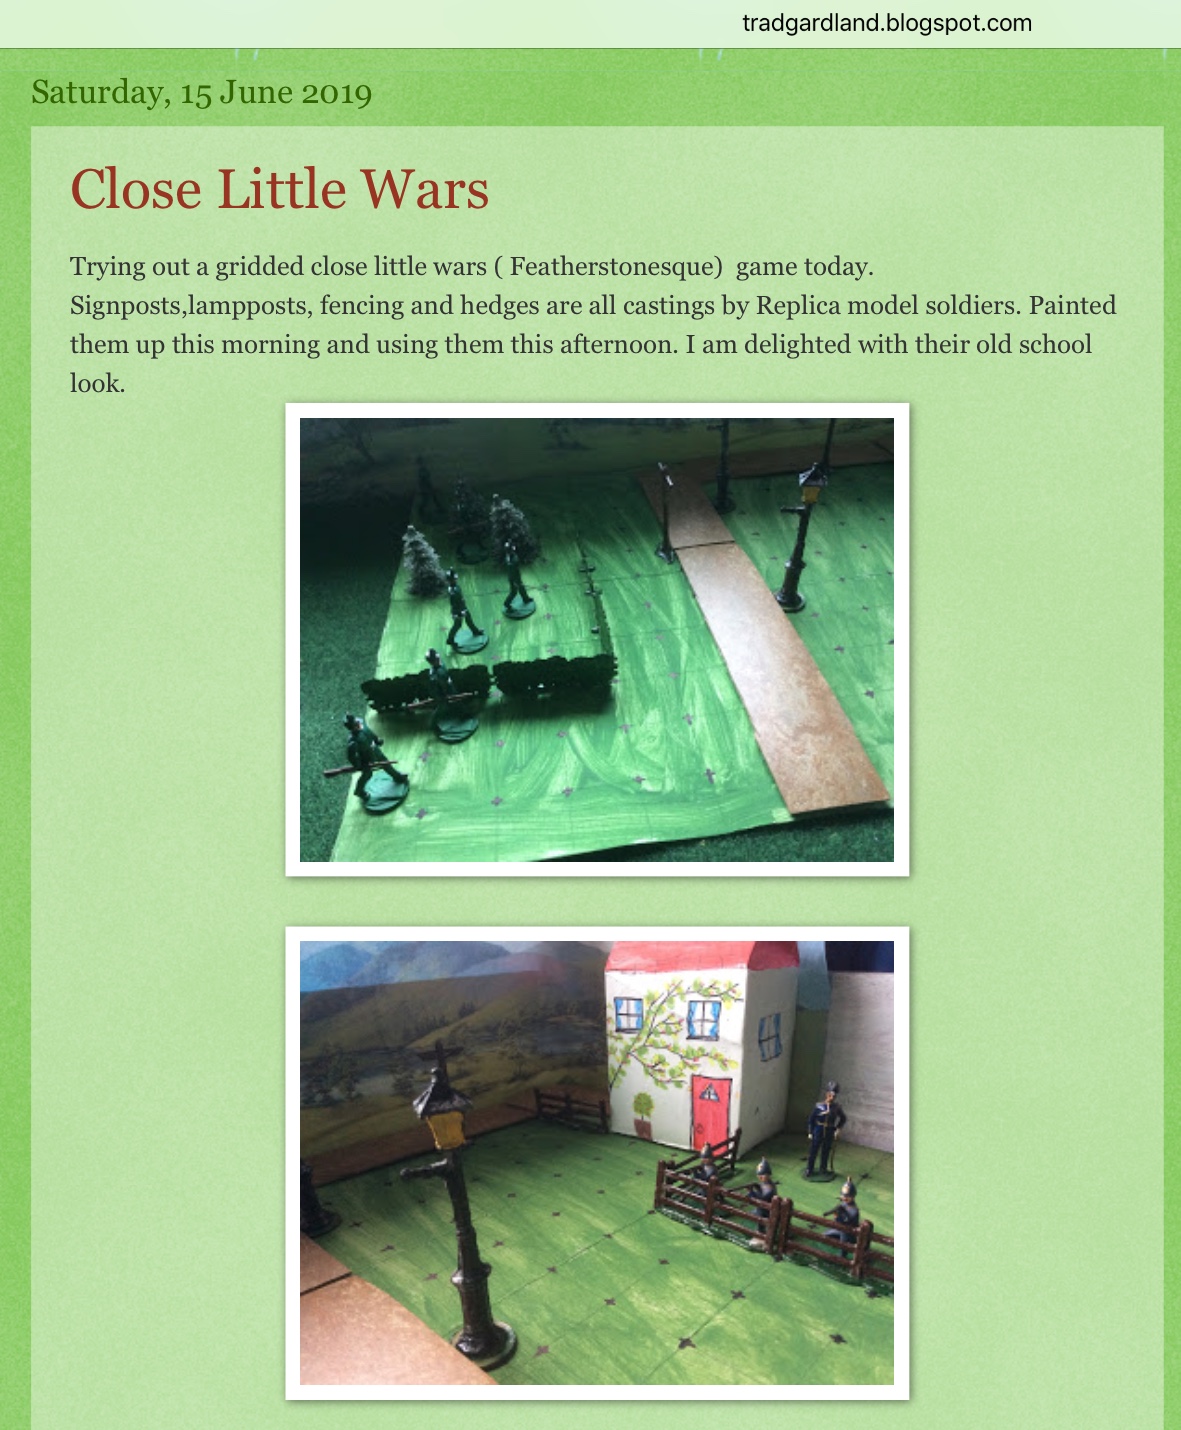
Screenshot. Image copyright: Alan Gruber / Duchy of Tradgardaland
Huzzah! Good looking Wellsian game by Alan the Tradgardmastre on a small gridded games board using Replica 54mm figures and accessories of old style hollow-cast Soldiers.
Because of some setting thing I can’t comment on Alan’s Tradgardland blog at the moment. Worth visiting as its good fun stuff.
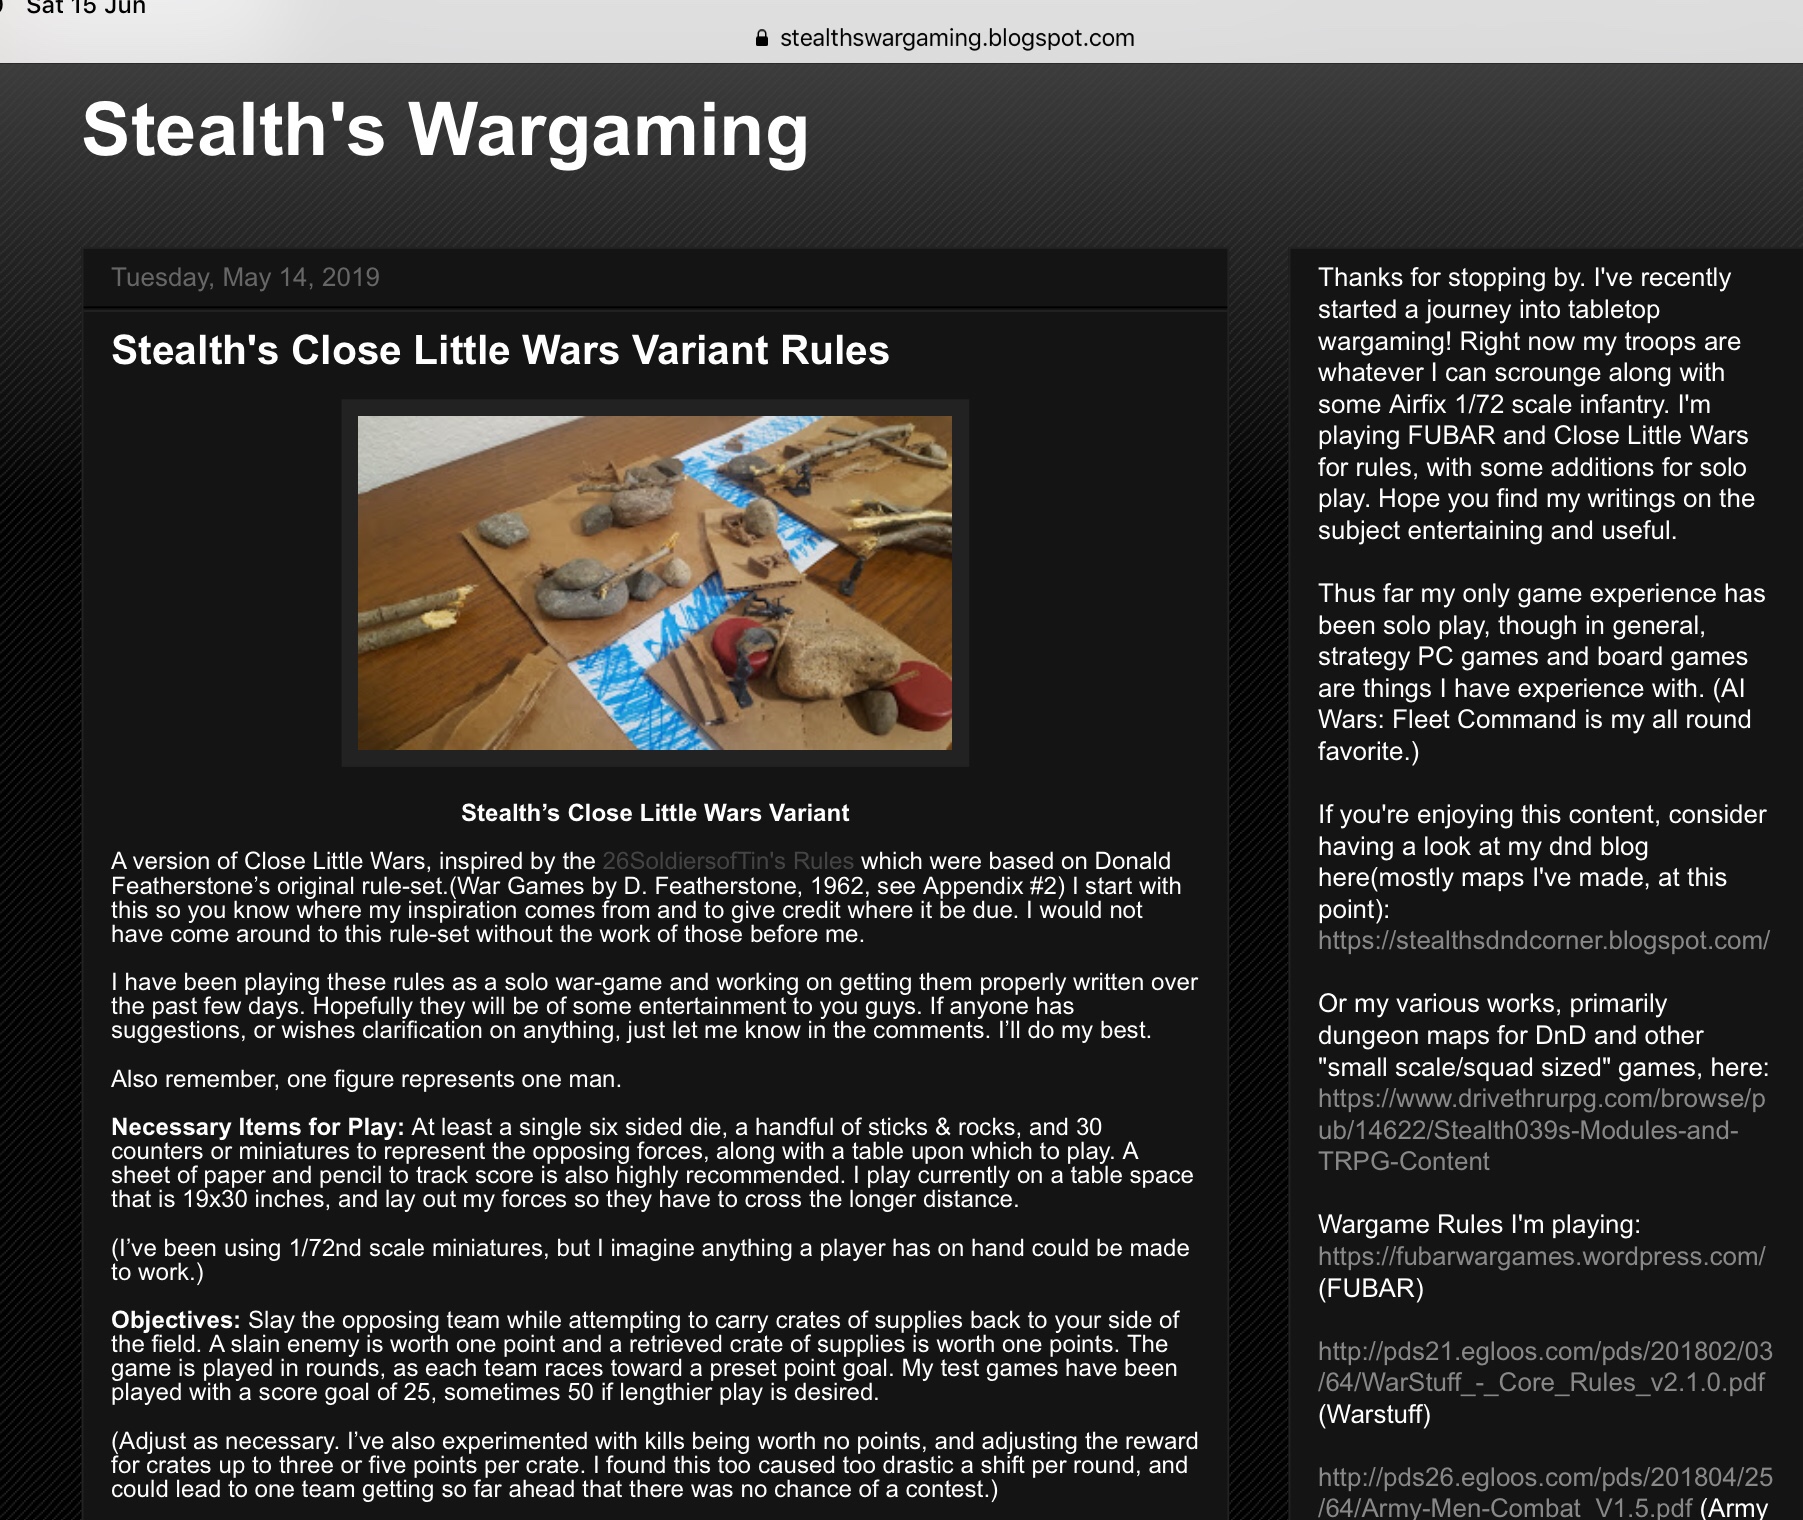
Following up my post about Jen B’s version of Featherstone’s Close Wars Rules, fellow games blogger Stealth contacted me to say that he had been playing around with his own variant of Donald Featherstone’s simple Close Wars rules.
These were first published in Don’s appendix to War Games (1962) and Stealth had been looking at my variants Close Little Wars.
Stealth’s rules have a slight D & D influence or feel (see his other blogs) in that carrying or capturing crates forms part of the victory conditions, scoring and scenarios. Interesting idea for ambushing a supply column etc.
I hope you find something of rules variants interest here. I enjoy seeing how people adapt and tinker, go back to basics and then elaborate a bit more.
It has been a few weeks since I ran a solo game bigger than sword fighting and Bartitsu duelling. I feel that I have neglected my Peter Laing figures of late. To be fair I’ve been busy making the fortified Signal Tower as well.
I wanted to get a quick evening game in, based on the Bronte family’s Imagi-Nation of Angria, having read more of Charlotte Bronte’s Tales of Angria and the Oxford Companion to the Brontes. Both these books are slowly helping me work out maps and scenarios based on more of Bronte’s fictional realms or paracosms.
Turn 2 – Angrian 5th Infantry supported by Dragoons cross the river to rescue the waggon from MacTerrorGlen’s Scottish troops. Ashantee bowmen line the rock opposite.
Small Angrian Skirmish Scenario:
By March 1836 – half of Angria is “in possession of our foes”.
During 1835-37 The Second Angrian War, Civil War between Angria and the Verdopolitan Union is happening at the same time as the Ashantee threat.
Early 1836, Angria, Western Central Africa: A group of invading Ashantee bowmen, part of Quashia Qamina’s forces, have discovered an abandoned Angrian supply waggon and remain in ambush on the rocks overlooking the crossing.
They are backed by a small sword and musket group of Sir Jehu MacTerrorGlen’s rampaging Scotsmen and Highland Warriors, led by one Captain Scotte, who are aiming to capture the river crossing and loot the abandoned Angrian supply waggon.
Location: The river crossing eventually feeds into one of the many tributaries of the River Olympia or Calabar, running down to the sea.
This waggon was part of a supply column along one of the many roads to the regional or provincial capital of Adrianoplous, all aid and supplies to The Duke of Zamorna. Zamorna is fighting to protect the Angrian province (that he is named after) against this invasion of Ashantees and MacTerrorGlen’s unruly Scots.
A rebellious and unruly kilted Highland Regiment in Africa? Many of the original settlers of the Bronte’s fictional realm of GlassTown and Angrian area of West Africa were of Scots, Irish and Yorkshire origin.
Coming to recover the waggon of supplies are Angrian forces under the Blood Red banner of the Rising Sun. These include a dismounted group of smart red-coated Angrian “Dragons” or Dragoons, along with some men of the “Fighting Fifth” (or “Filthy Fifth”), the 5th Angrian Infantry Regiment in homespun and motley campaign dress, led by a young Lieutenant called Prunty.
The scruffy nature of the Angrian Regiments on campaign in the ‘East’ in the Angrian Civil War is reminiscent of Confederate Butternut Infantry towards the end of the American Civil War. Their scruffy dress is commented on by one of Charlotte Bronte’s cynical narrators in the smart Regency Colonial society of the cities.
The Angrian dragoons had dismounted, leaving their horses up the valley and with the 5th Angrians in two groups were scouting the river, half their number in reinforcements a mile or two behind.
D6 dice rolls saw these troops delayed arriving, until the 5th and 6th turn in area 5 and 6 on the Angrian baseline.
The turns were short and brutal, mostly involving fast melee, using the Kaptain Kobold modification or d6 dice version of Gerard De Gre’s Lunge Cut and Stop Thrust melee or duelling rules.
1-2 Attacker Hit
3 Both Hit
4 Neither Hit
5-6 Defender Hit
Melees occurred from group stage in adjacent hexes or who have charged into their opponents. The Pell-Mell, Hell for Leather pace of the game meant that there were few casualties from rifle or musket fire, many more from Highland claymore, bayonet, short sword and rifle butt (and no doubt boot and fist).
Turn 1 and 2 saw rapid movement through the cluttered terrain towards the first shots and melees of Turn 3.
Turn 3 saw 9 Angrian troops and 12 of MacTerror Glen’s Scots killed, mostly when the Highland claymore warriors charged the Angrian troops.
At the start of turn 4 (as shown in photo by a d6 Turn Dice) the few Angrian infantry over the bridge are outnumbered by Scots.
By Turn 4, some of the outnumbered Angrian forces on the board retreated to await their reinforcements (D6 dice roll 1-3 Retreat, 4 Stay, 5-6 Advance).
This didn’t stop one party of three Angrian 5th Infantry being surrounded and outnumbered on two sides by Scots around the bridge. Luckily supporting fire from the Angrian command party and standard bearer picked off two further Scots musketeers.
Engaged on both sides by Scots, this small cohort of Angrian 5th Infantry are wiped out.
In Turn 5 the advancing Scots moved into Melee with the Angrian Command and Colours party, leading to a doubly fatal duel between Highland claymore against Angrian officer’s broadsword.
Angrian Officer Lieutenant Prunty charges down the hill to engage with his Highlander enemy in a fatal duel.
Thankfully the rest of the Angrian Dragoons and Fifth Regiment arrived in Turn 5 and 6. Just in the nick of the time …
These Angrian reinforcements pushed back and pursued the last of MacTerrorGlen’s troops and the Scots command party and colours back over the bridge. They made their last stand outside the crossing hut. The Scots colours were lost when the command and colours party decided to fight to the finish (dice roll d6 roll 1-3 surrender, 4 – 6 fight on).
Throughout the early part of the battle, the Ashantee Bowmen on the high ground rocks were out of range and sight of many of the Angrian troops. Overall they played very little part in the whole battle, not even firing many volleys of arrows before they were engulfed in melee. Their officer or chief Khla managed to escape to carry on the invasion with the other invading Ashantees under Quashia Qamina.
Ashantee bowmen move into range of Angrian troops.
At the end, the Angrian Armed Transport Corps hitched the abandoned supply waggon to their horses and slowly dragged this back up the valley to where the dismounted dragoon horses and horse holders would provide further armed escort back to Adrianopolis, Zamorna or Edwardston as needed.
Detail of map of Angria by Christine Alexander (Oxford Campanion to the Brontes)
Discarded weapons and the captured colours of MacTerrorGlen’s Scots are sent back onboard the supply waggon as victory trophies to inspire the flagging Angrian forces.
The remaining two Angrian Dragoons, Angrian standard bearer and drummer remain behind in the bridge crossing hut. Suitably armed with discarded carbines, muskets and ammunition, they make themselves busy fortifying this outpost and guarding the crossing until further Angrian reinforcements arrive. Burying the dead will have to briefly wait, but not too long in these African “Yorkshire Tropic” climes.
The Rising Sun banner of Angria flies victorious over the captured river crossing hut as the surviving Ashantee officer flees on the opposite bank.
Arise Angria! Raise the Blood-Red Banner of the Rising Sun! Huzzah!
Figures and Terrain
All the figures are from the sadly now discontinued Peter Laing range of 15mm figures.
The Ashantee bowmen are from the Ancient Egyptian range (Nubian Archers F452 and their officer F453 Nubian Spearman).
MacTerrorGlen’s rogue Scots troops are from the Peter Laing ECW and ’15-’45 ranges. I especially like his kilted Highlander charging with Claymore (F1006) and small shield but his Highland musketeers ( F1008) are fine figures too. https://manoftinblog.wordpress.com/2016/11/04/more-peter-laing-scots/
The “Angrian Dragons” are ECW dismounted dragoons firing, F515, one of my favourite Peter Laing figures.
The homespun 5th Angrian Regiment in campaign dress are the ACW butternut infantry advancing F3012, along with the Boer Rifleman advancing at trail F622.
I quickly made and coloured an Angrian flag and added this to one of the Boer figures to make a standard bearer.
The Heroscape hex terrain terrain on my two portable gaming boards tries to create that curious mix of European and African or Yorkshire Tropical that exists in the Bronte’s limited but imaginative view of the world outside their native Haworth and Yorkshire. This was backed by PECO Scene Backgrounds Medium SK 44 Country with River with its great view of mountains and stone bridges over streams and slightly incongruous European stone farm houses, obviously in the Yorkshire / European influenced Angrian settler style.
Pine trees, impassable rocks, a raging stream or river form all part of a rugged and Romantic, almost Gothic landscape of hills, fields and craggy mountainous peaks of how the Bronte children saw Angria (West Africa). This fits well the restricted routes and impassable labyrinths of trees, logs and rocks that suit Donald Featherstone’s original Close Wars rules for forest skirmish that I have tweaked for hex board or garden games. https://manoftinblog.wordpress.com/2016/06/09/close-little-wars-featherstones-simplest-rules/
The waggon was an underscale diorama piece from the 54mm Safari figures Wild West Settlers Toob. Its eventual escorts were Peter Laing Boer War cavalry M603 or M605 Imperial Yeomanry figure.
Post-mortem:
This was a great fun game for an evening. Using the Gerald De Gre duelling rules in Kaptain Kobold’s simplified dice version for the first time as the Melee section with the rest of the Little Close Wars rules led to quick fast and murderous melees.
The look of the board / game?
I like the portable hex game boards but I would like to flock or sand more of the Heroscape hex pieces, and glue and flock some of the pine tree bases permanently to hex bases.
Part of the early evening was spent tidying up the portable game boards, removing the temporary masking tape letters and grid numbers and sanding the edges before rewriting them in a neater fashion. Eventually I think I will wood stain the outer edges and possibly acrylic paint (sap green) the inner sections of game board that show up as bare wood in the middle and edge. Hopefully they will look less intrusive but still allow each board to be used separately.
Outcome:
A swift outcome of a minor skirmish in the Angrian Civil War, a minor victory in a disastrous campaign.
This campaign led to Angria’s defeat at the Battle of Edwardston 26 June 1836, which saw Zamorna exiled and Angria savagely occupied by Ashantee and MacTerrorGlen’s forces throughout the rest of 1836. Angrian troops fight on in the hills.
Victory does not come until Zamorna returns and leads his forces to victory at the Battles of Leyden, Westwood and Evesham throughout 1837.
Hopefully Charlotte and Branwell Bronte would approve, their imaginary worlds having been sparked by a gift from their father of a box of toy soldiers.
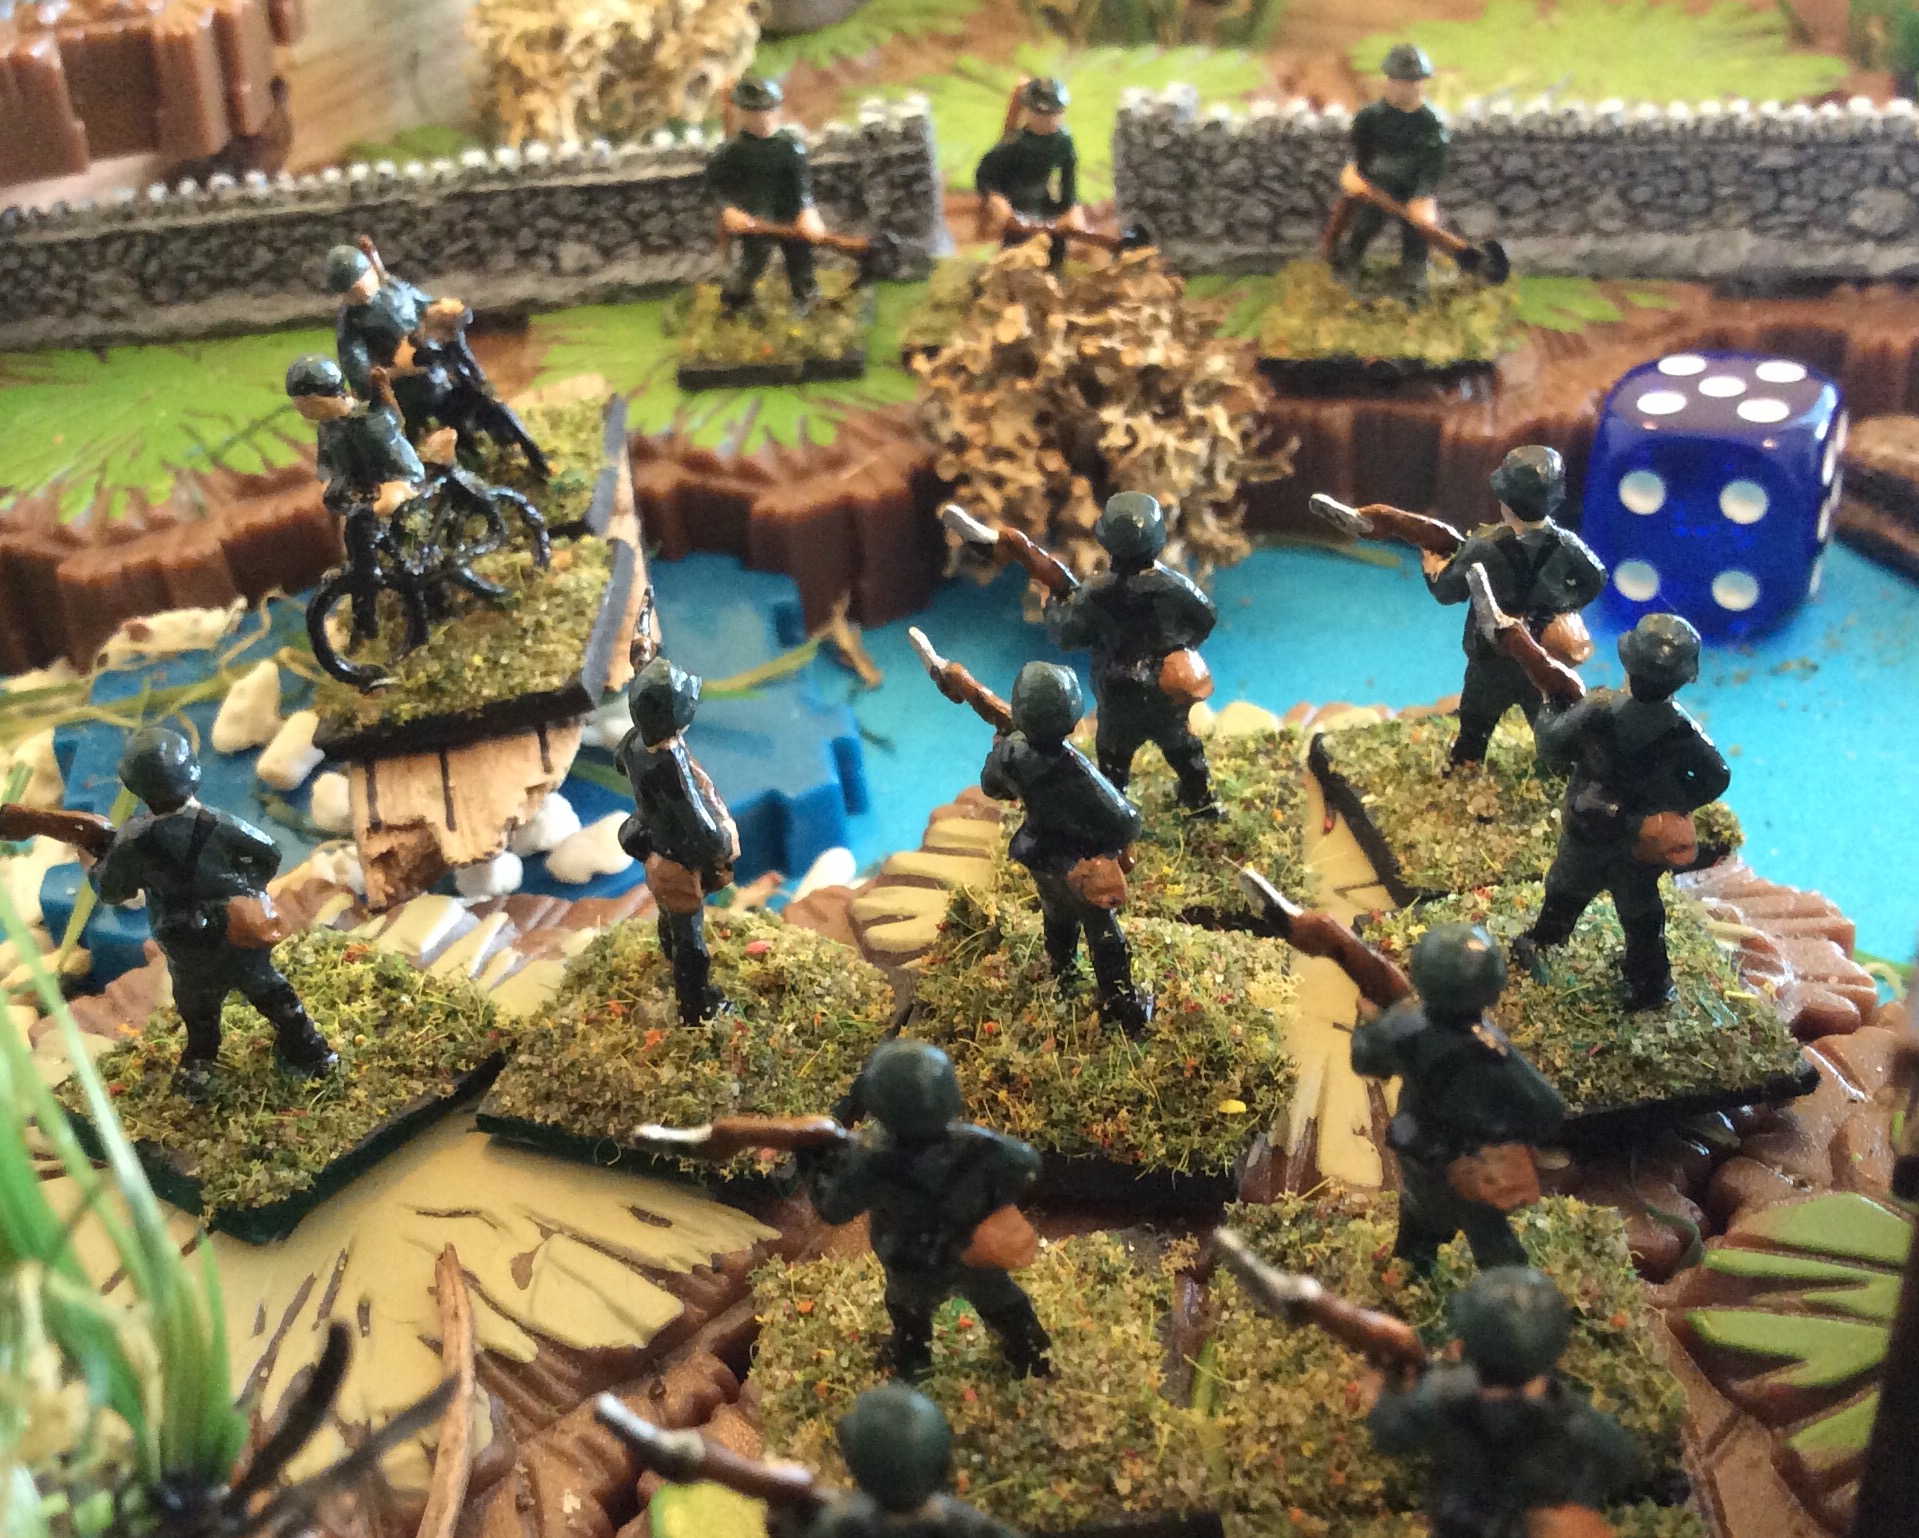
I wanted in this skirmish games to get a motley collection of Peter Laing 15mm British and German infantry into action, WW2 figures bolstered by late war WW1 British and German Infantry in steel helmets.
I wanted to fight another skirmish over the hex terrain portable game board that I had laid out for the American Civil War skirmish a few weeks previously.
I also wanted to test out a platoon level infantry scrap with few heavy weapons and almost no vehicles using a mash up of Donald Featherstone’s ‘Close Wars’ appendix rules to his 1962 War Games with a few additions from his simple WW2 rules in that book.
A lucky find of some Peter Laing WW1 / WW2 figures (lots of Sapper figures) amongst a job lot of 15mm WW2 figures of various manufactures gave me just enough for a small platoon level skirmish. Sappers and others had rifles added by me from finely carved slivers of wooden coffee stirrers.
This gave me a scratch force of British infantry:
Three 5 man sections of pioneers or sappers with rifles and shovels (handy in a scrap!)
1 light mortar team (2 men)
1 Light Machine Gun (Bren Gun) team
1 motorcycle despatch rider
A light 2pounder anti tank gun team with three men emerge in Turn 5. A spare Bren gunner was also found to join the British several turns in.
Versus a much larger but slightly lightly equipped German infantry group:
A larger infantry force of German infantry consisted of:
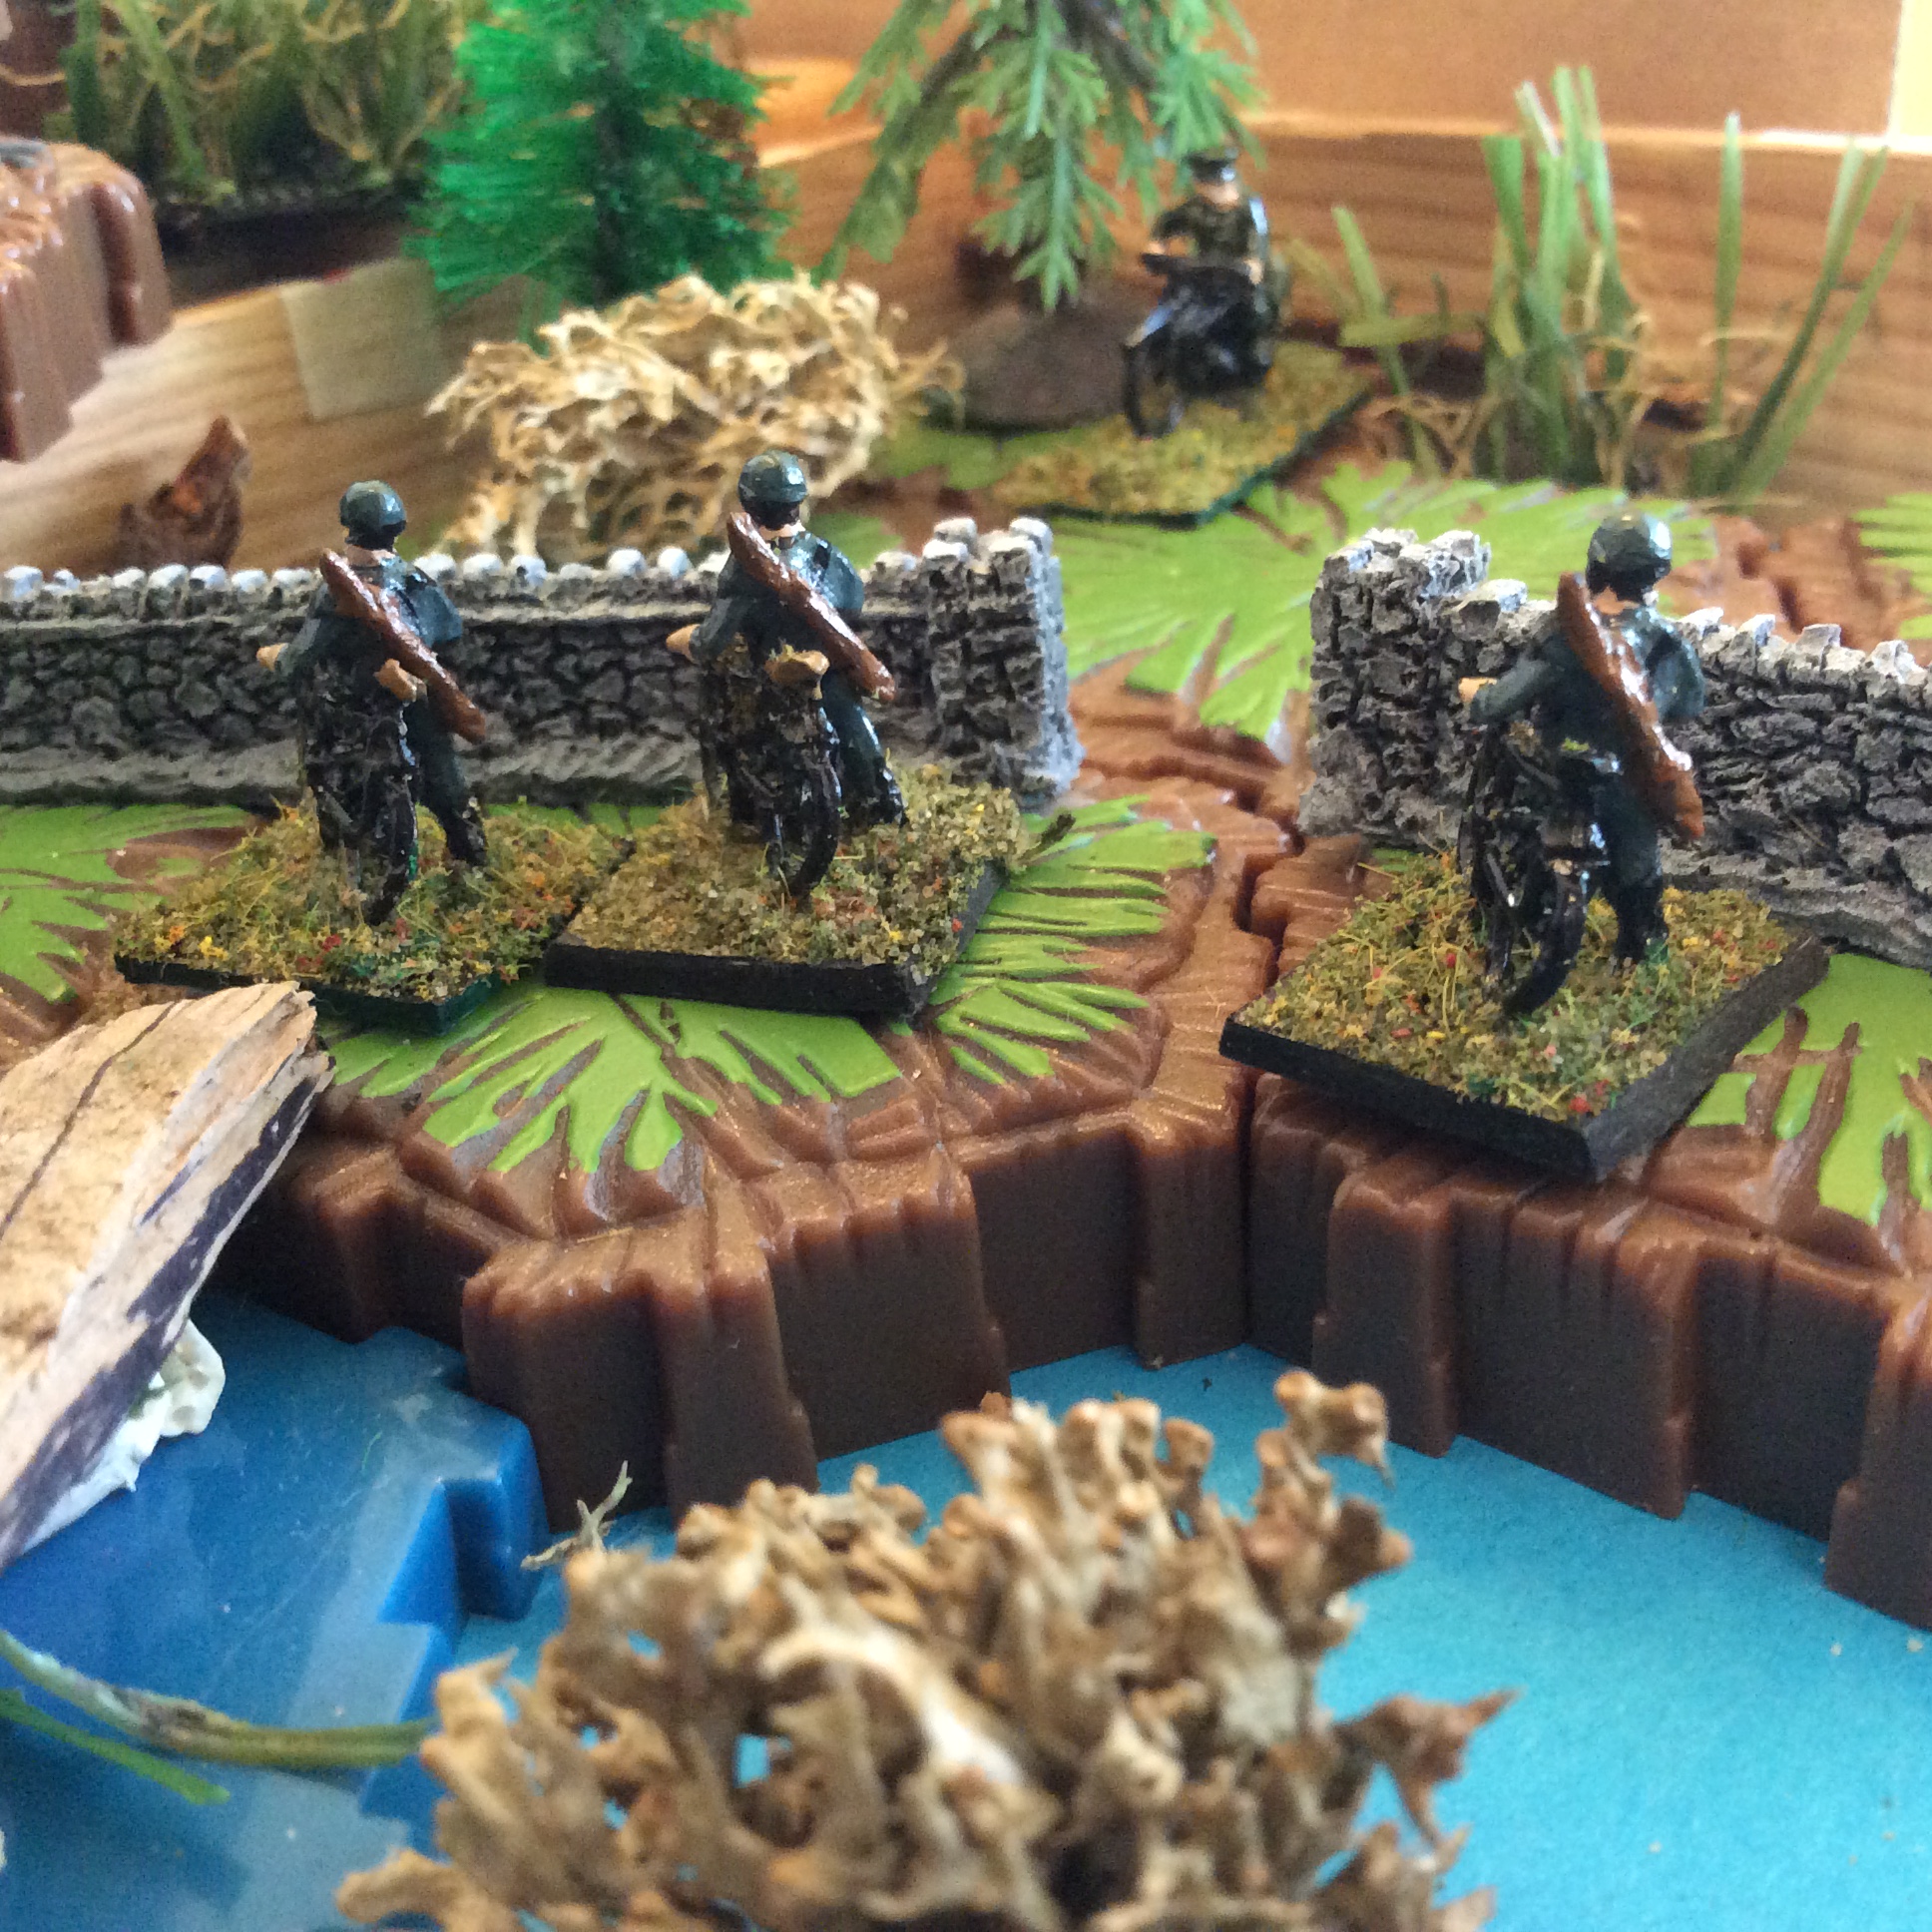
Three cycle reconnaissance troops
1 German despatch rider
Five x 5 men rifle squads directed by 1 officer with pistol
1 light machine gun (MG34) team of two men
1 light mortar team of 2 men
Officer and two rifle men
The game was played solo over two evenings with a skirmish figure scale of 1 figure = 1 man.
Arrival of different sections and weapons at a different times and locations was staggered by dice throws d6. The two board(s) being roughly marked with 6 by 6 squares A to L and 1-6, arrival of different sections was diced for using 1 d6.
Indirect artillery fire could be plotted in using this grid system and dicing to see which turn this lands but none was used in this game.
The Germans started with their reconnaissance troops (3 rifle equipped bicycle troops) in place at the river crossing and to the North a British 5 man pioneer unit of sappers and officer and the Bren Gun team on the board.
Dice thrown at start of each move to see who moves first, other side second, first side also fire first, other side second – highest score wins first move.
To speed things up, no casualty savings throws were used after Melee.
Aerial reconnaissance view recording troop positions, end of Turn 2 (see dice)
In Turn 1, Germans moved first and shots were exchanged without casualty between the British motorcyclist and the German cycle troops who were behind the cover of the stone farm walls.
In Turn 2, the British despatch rider was not so lucky! In turn the first British rifle volley brings down one German infantryman.
Playing solo, deciding which of the two possible British infantry targets the German troops fire at is decided by dice throw: roll 1 to 3 aim at Bren gun team on left, 4 to 6 at British infantry on right.
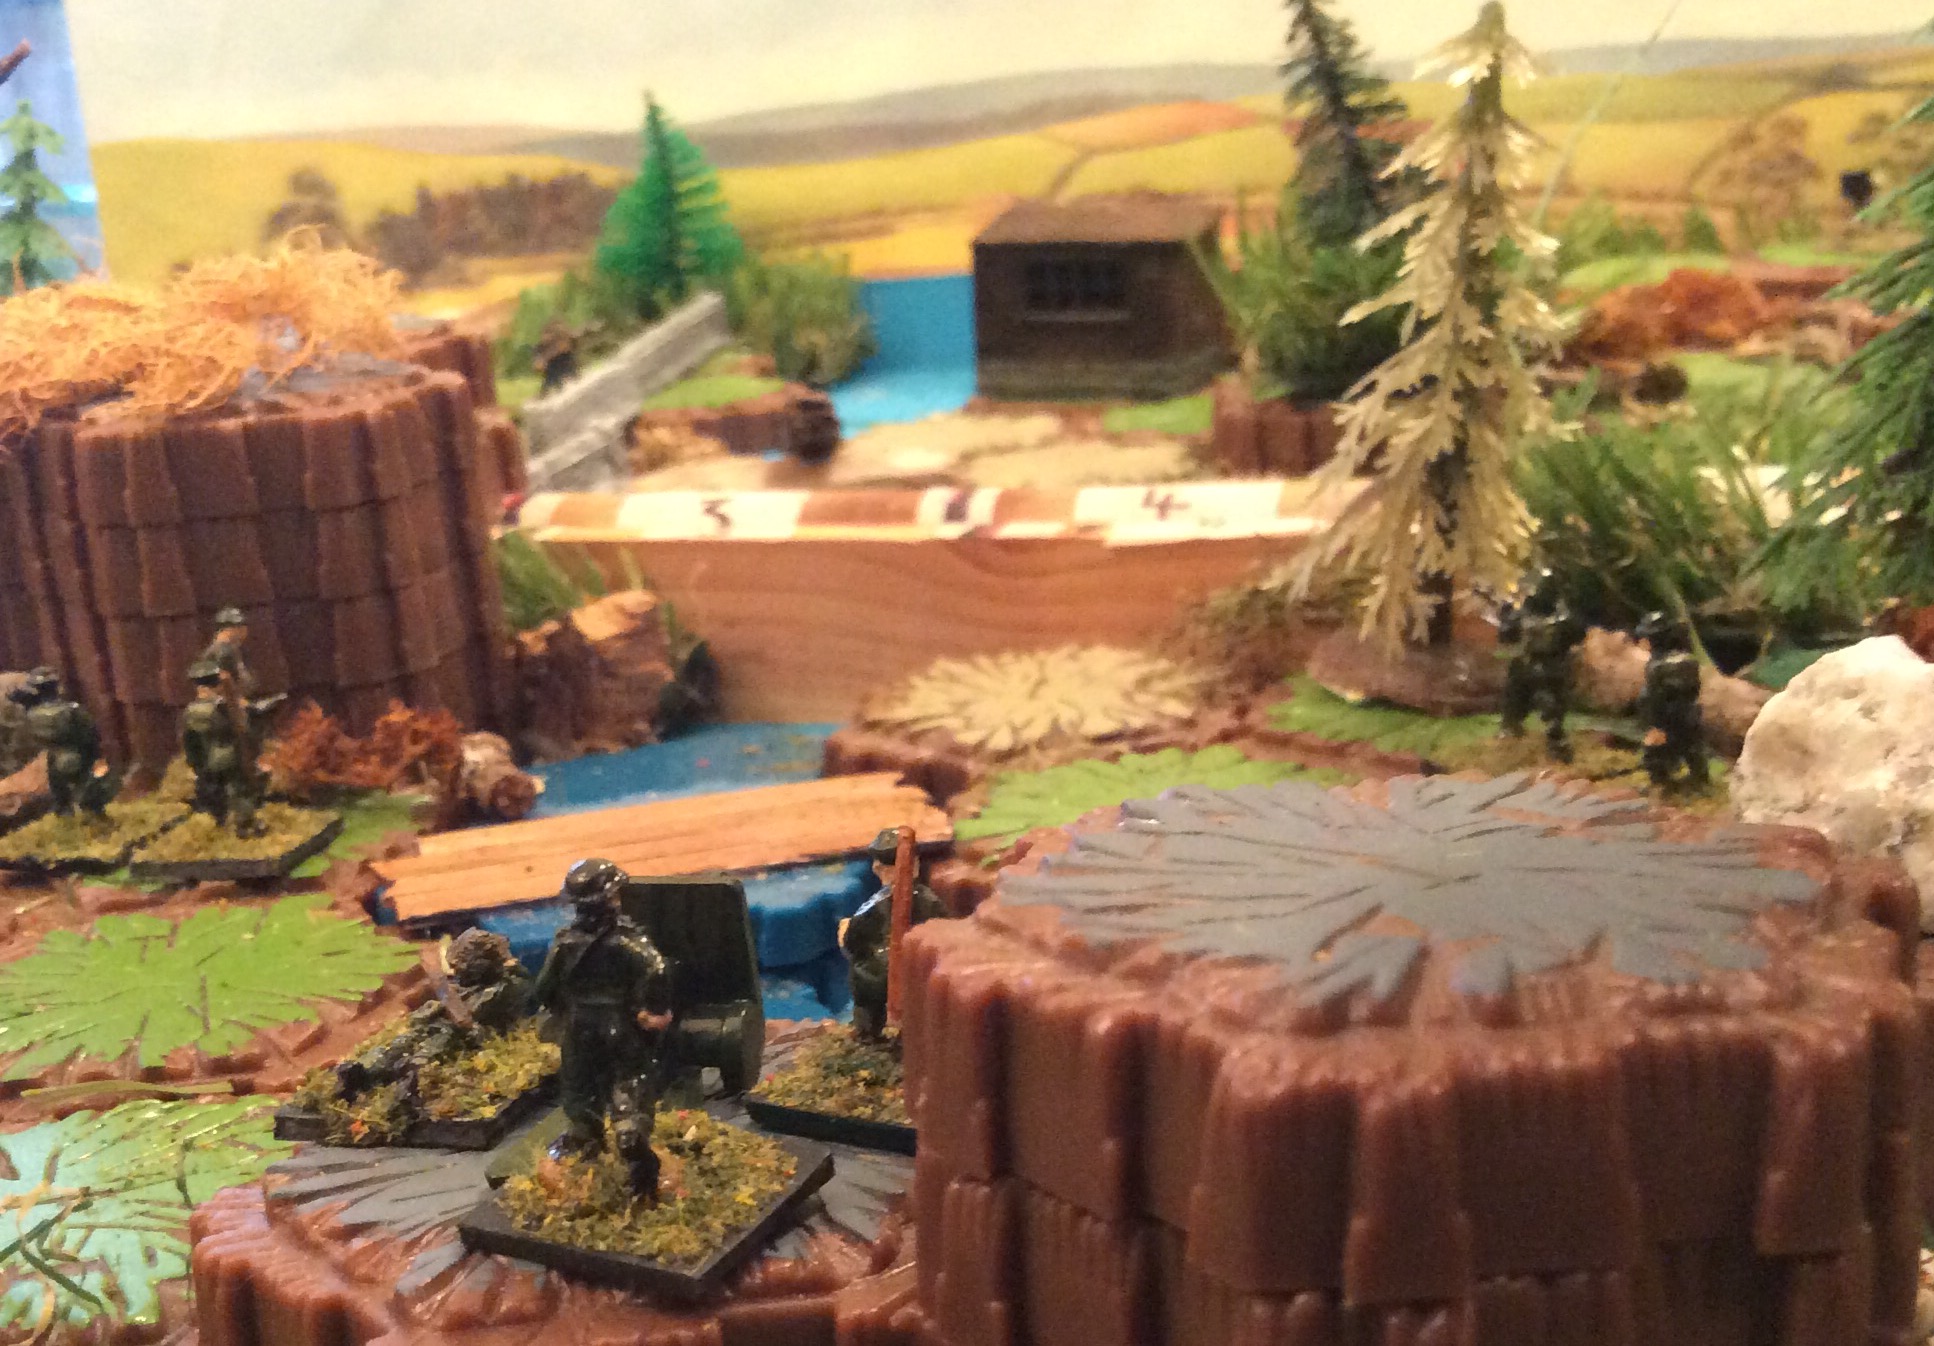
Dismount, aim, fire. Peter Laing 15mm British despatch rider spotted by German bicycle troops (unknown manufacturer, but good fit). Walls from N gauge model railway suppliers.
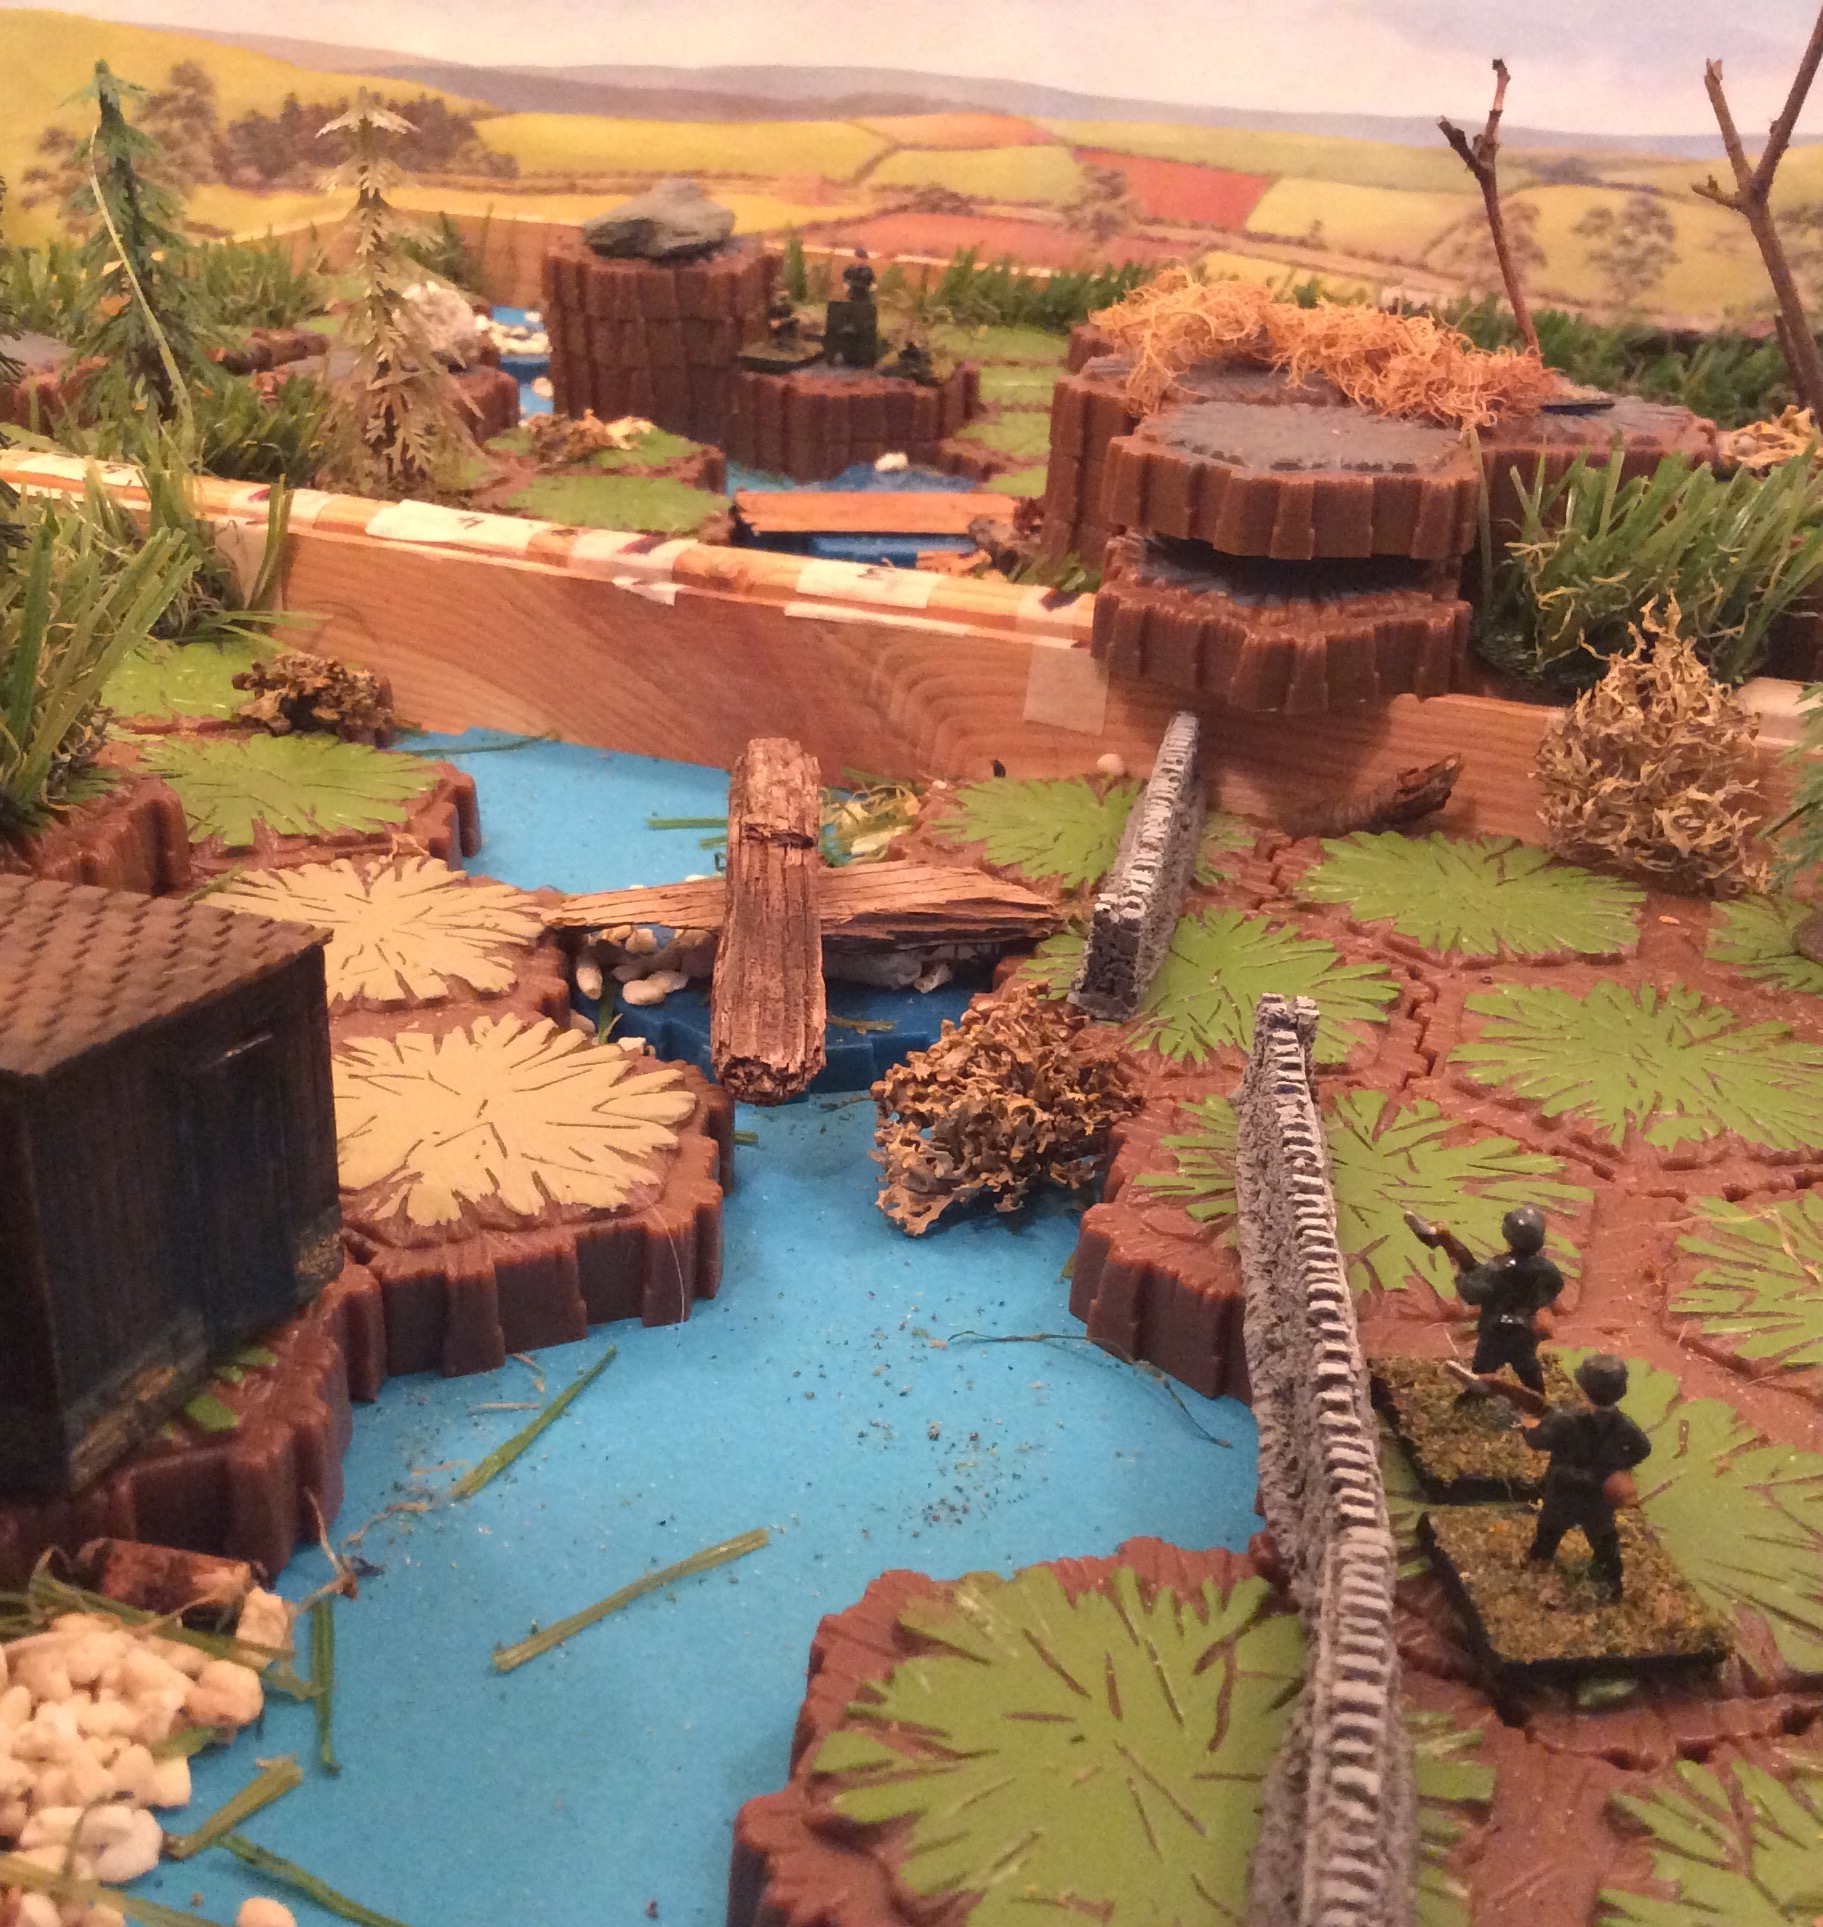
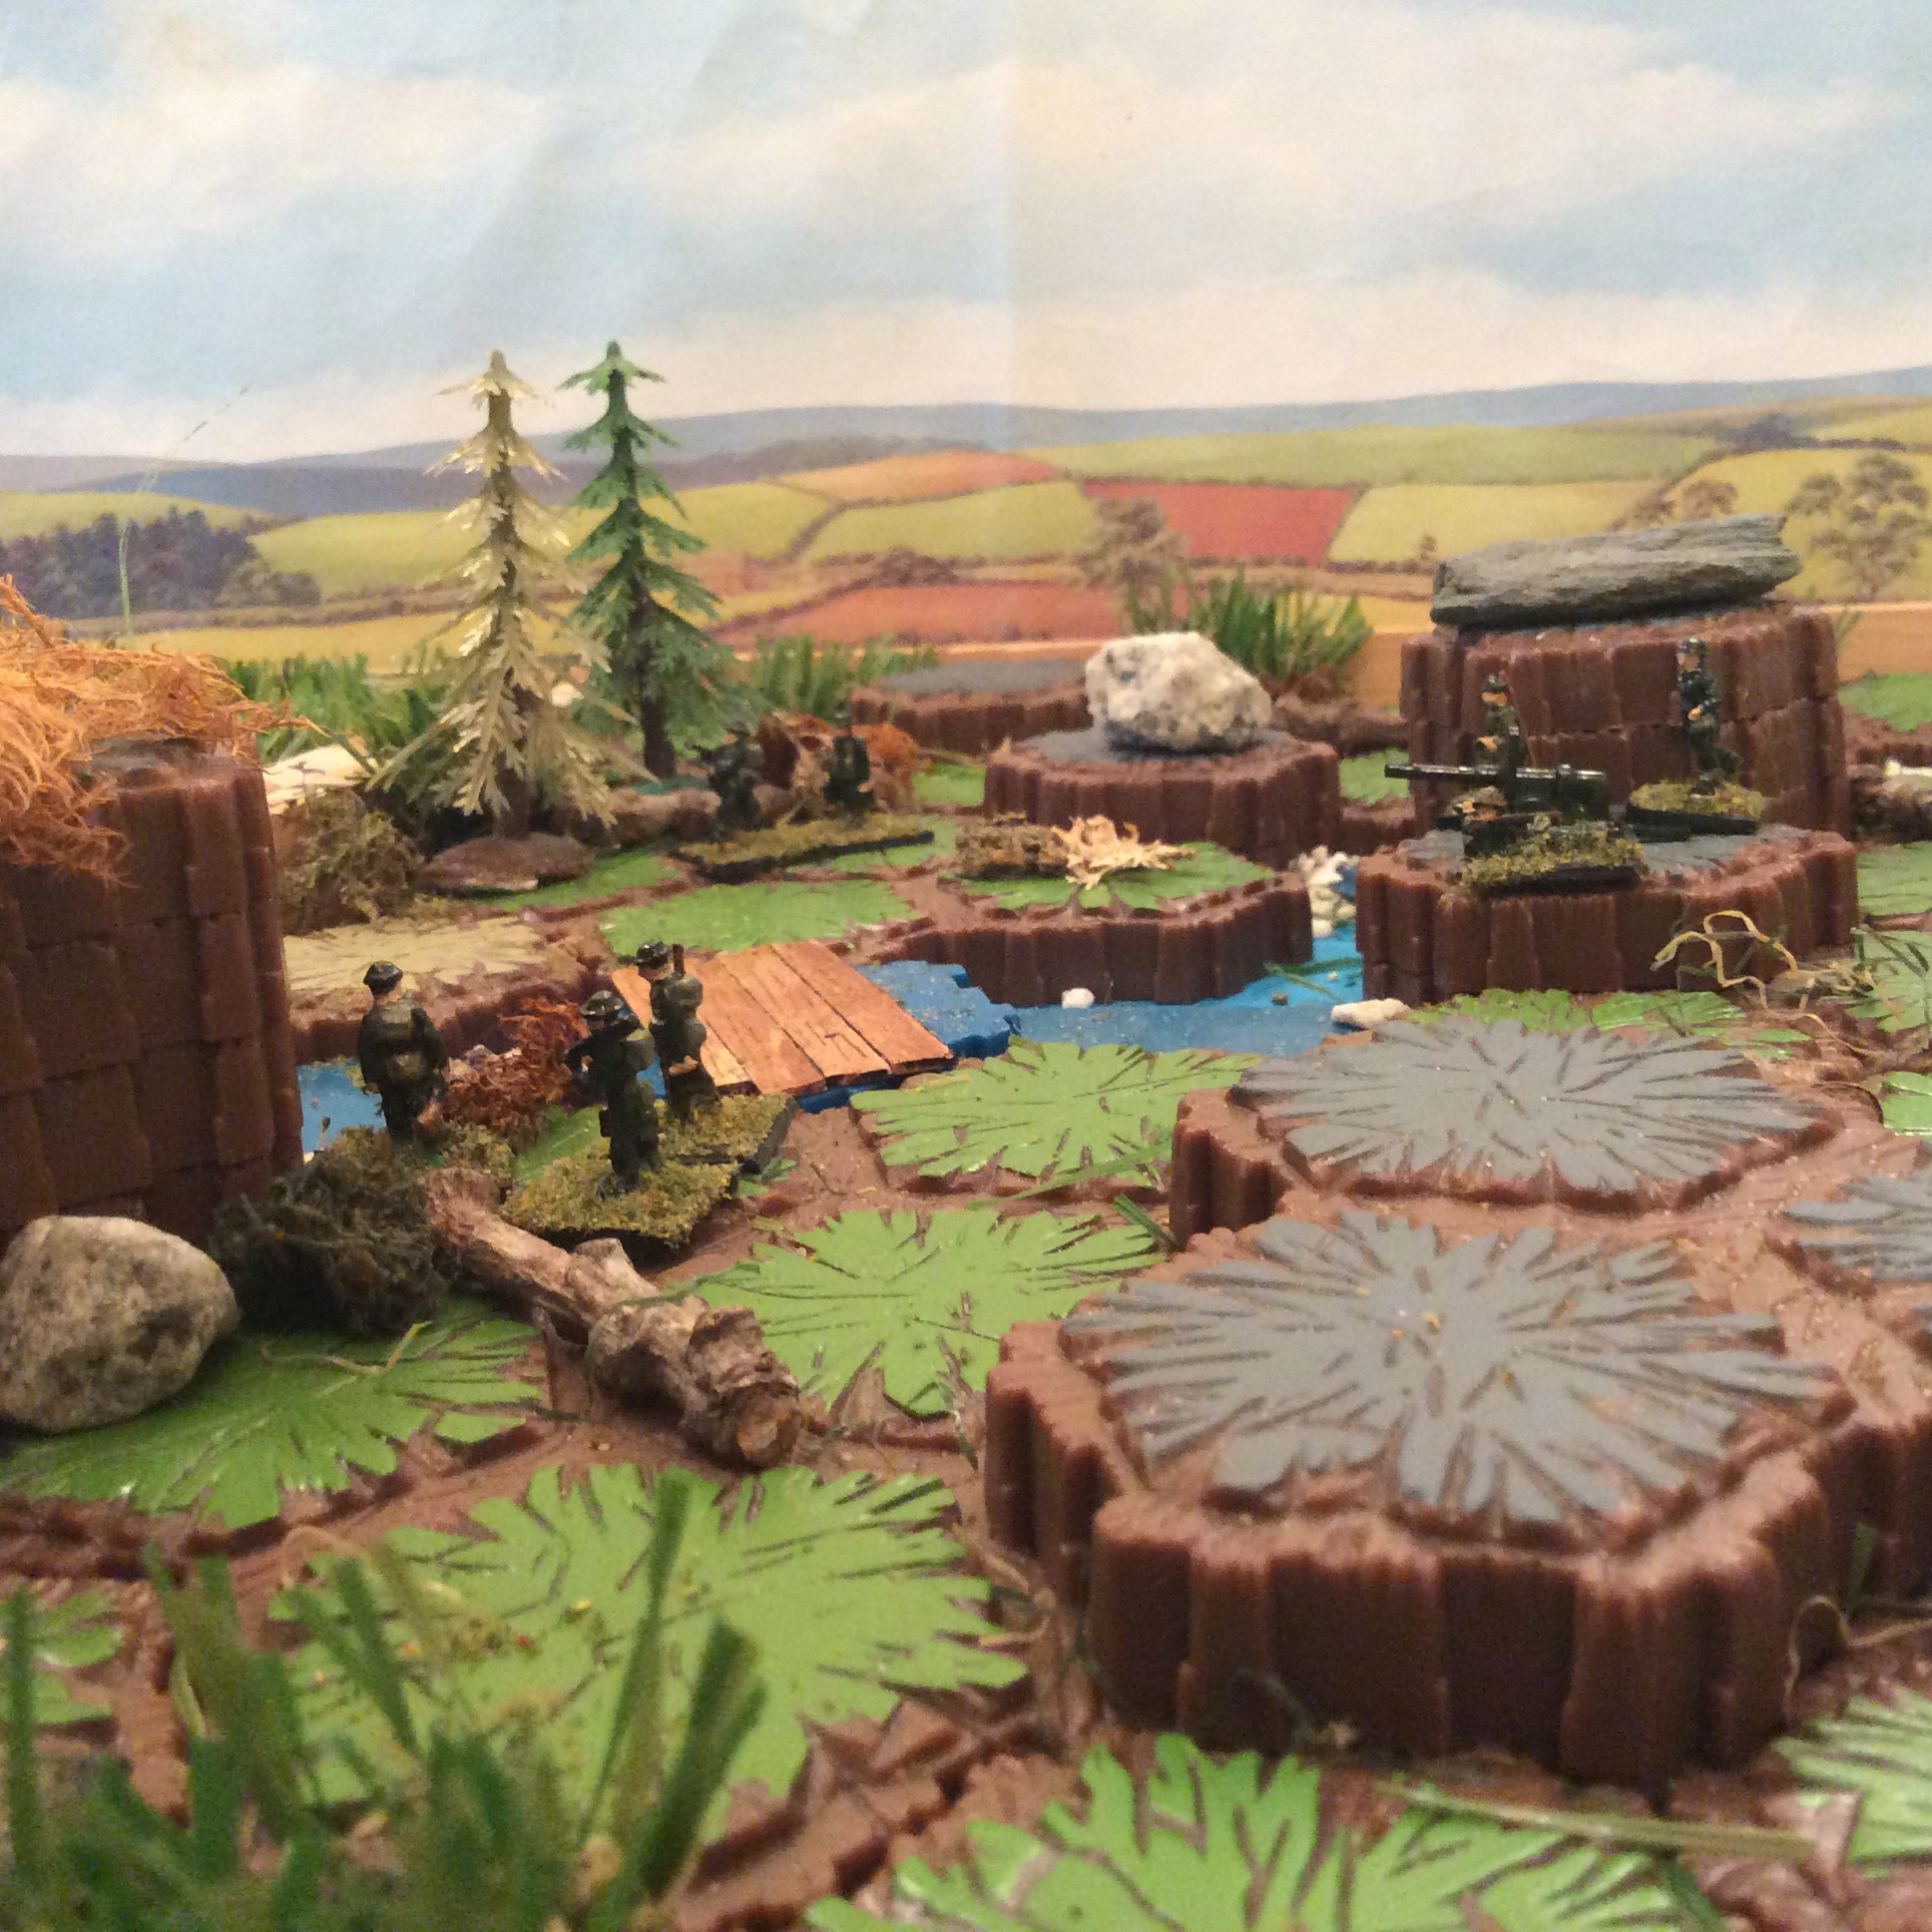
The terrain is the same portable hex wooden box lid territory as used for the American Civil War skirmish, but with the house location moved and a small wooden hut used instead.
The high rocks and the forest either side of the river are deemed impassable, the river unfordable. This concentrates the efforts into dominating the crossings and the ground between them with all available firepower.
Peter Laing British WW2 (and a non Peter Laing British officer) fire at the German officer and infantry at the other bridgehead leafing to 1 German infantry casualty in Turn 2.
The Peter Laing WW2 German officer and infantry with rifles are really WW1 Germans with steel helmets.
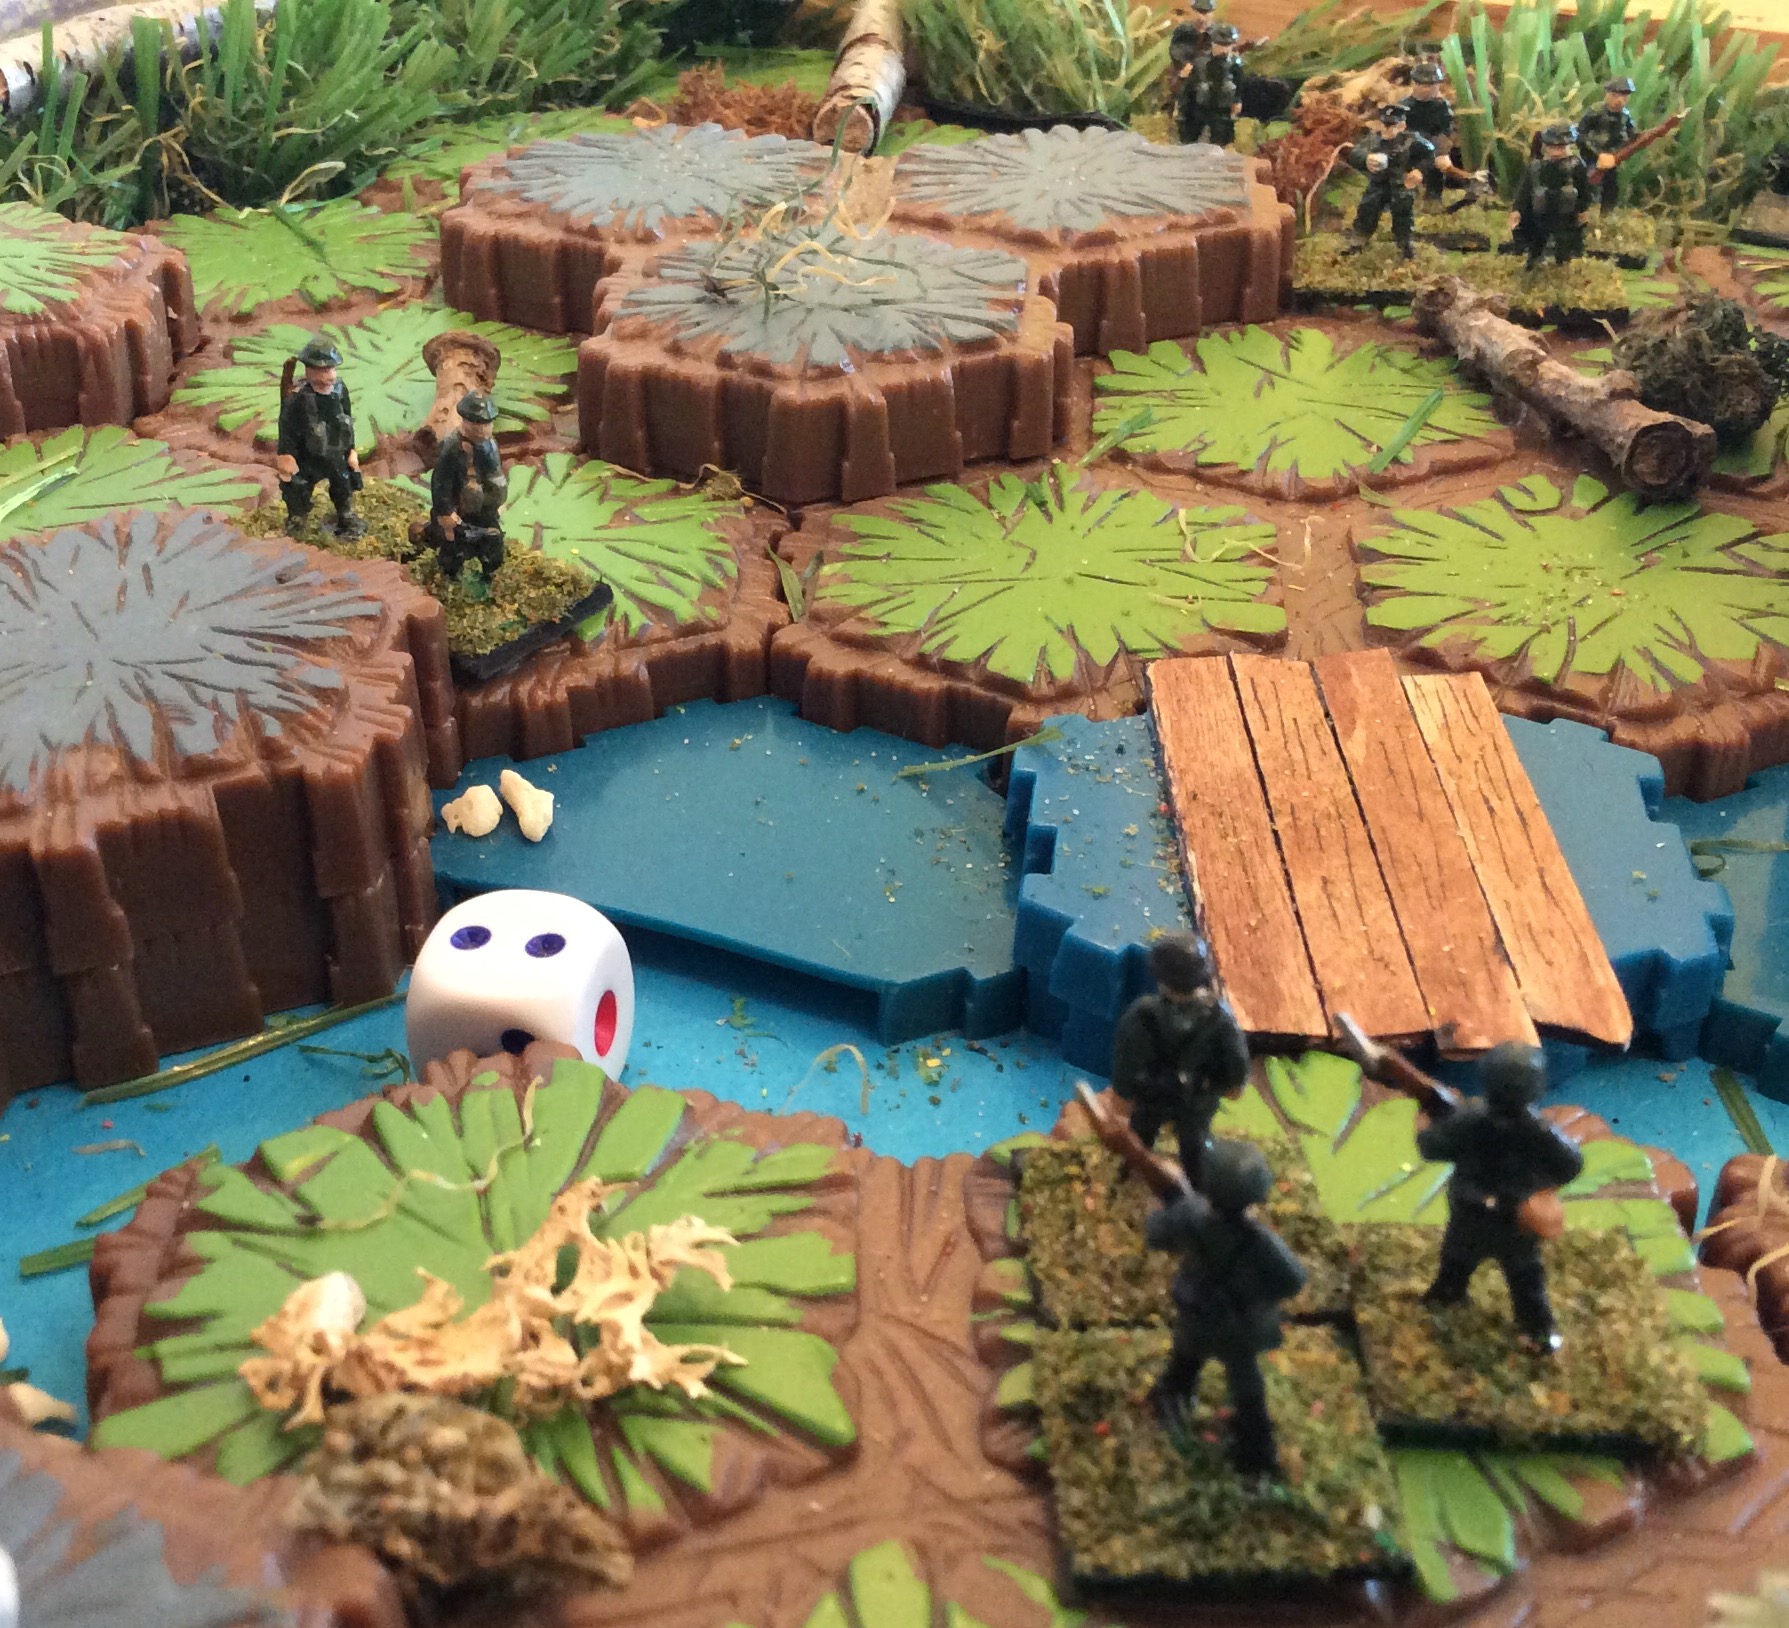
Turn 3 sees more infantry on each side appear on the game board. Line of fire is checked with a reversed Lionel Tarr style periscope (from another appendix in Featherstone’s 1962 War Games).
Turn 4 sees the British move first and a further British rifle squad appear near where their despatch rider was killed. They close in melee with the German cyclists and two are killed for the loss of one British infantryman.
Turn 5 sees more German troops emerge onto the board. The German motorcyclist emerges onto the board only to be blocked and killed in melee with three British Infantry.
One of the British Bren Gun team is hit – I diced quickly to see if another nearby British soldier could help man the gun and it to remain operational. It did and brought down a German infantryman, as did the light field gun. Fortunately for the Germans the British light mortar team is just out of range.
In Turn 6 the German Light Machine Gun MG34 and light mortar teams (each of two men) make it onto the Board at G and J on the German / South side of the river.
This mortar team in Turn 7 take out one British infantry, whilst melee and rifle fire take out 3 German infantry and 2 further British.
The forest, impassable scrub, rocky ridge and river crossings continue to create safe spaces or bunchings but once the mortars come into action, lobbing their shells over trees and obstacles etc, these safe spaces are no more.
British 2 man mortar team in the foreground. Turn 9
The British field gun is a board game piece from childhood.
In Turn 8, this gun begins to damage the hut and the Germans inside it. Melee, mortar and rifle fire brought down 8 German infantry including their officer and 3 British including their officer.
Turn 9 – stalemate.
By Turn 9 , a stalemate has set in – the British mortar team from behind cover takes out the German Light Machine Gun team. Positions are consolidated. Both sides have lost their officers.
If the German infantry remain in the cover of the hut, they will eventually be killed by the 2 pounder which is just out of rifle range.
The British bridge position is now covered by one British mortar team and two Bren gun teams.
Sketch map round about Turn 10. British left /west , Germans to the right / east
In Turn 10, the German mortar team move closer towards the British position whilst four German infantry take cover behind the stone wall to give themselves a better field of fire onto the British dominated bridge, should anyone try to cross it. Many of the German and British troops are now out of sight of each other and out of rifle range.
A lucky ‘counter battery’ hit by the British mortar team on their German rival reduces the last opportunity of the Germans to dislodge their opponents without a fatal rifle charge.
Turn 12 – the German infantry dice to advance or stay put. They stay put but a further German infantryman in the hut is then killed by 2 pounder fire.
By Turn 14, one of the British mortar team is hit crossing the British sector bridge. The last German in the hut retreats over the German bridge behind the stone wall.
Turn 15 – no movement, just British gun and mortar fire.
Turn 16 – The 5 Germans behind the stone wall must decide what to do as they are now within British mortar range. 1-2 Advance, 3-4 Retreat, 5-6 Stay Put. They roll d6 – advance.
3 Germans killed are crossing the bridge under rifle and gun fire; the bridge is destroyed (d6 1-3 destroyed, 4-6 intact). In the return fire, a further British infantryman is hit.
A view from the German position back down the valley to the British field gun, annoyingly just out of rifle range. The bridge destroyed by field gun fire and the hut damaged by gun fire. Time for those last two German soldiers to slip away out of range and await reinforcements?
Turn 17 – German infantry retreat behind wall out of rifle range, their bridge blown.
The game is at an end, nominally a British victory but all depends on whose reinforcements turn up first.
Sheltering behind the rocks: the British position, tucked out of rifle fire range.
The British final position looking up the valley towards the abandoned German line. Mixed Peter Laing and other 15mm WW2 figures.
Play testing these Close Little World Wars rules
The increasingly dominant force in this game were the heavier weapons – mortars, light machine guns and the light field gun. It would be interesting to play / replay this game at rifle squad level without (some of) these other weapons.
This and the restricted terrain created the shape and the pressures of this solo game.


 Captain Snortt and the Major’s daughter Miss MacGuffin as ASC Private Fuller helps the Fort Engineer mend the wheel